Grieving mother
Содержание:
Свет вдали
 Свет вдали
Эотас был замечен неподалеку от острова Асонго, где находится база рауатайцев, а также адровый маяк. Необходимо посетить это место, чтобы попытаться настроить связь с богом.
Квест начнется сразу же после беседы с королевой архипелага Некитаки. Покиньте острова и плывите на северо-запад, чтобы достичь Асонго. На месте вы обнаружите разрушенные поселения – дело рук Эотаса, что прибыл сюда прежде вас.
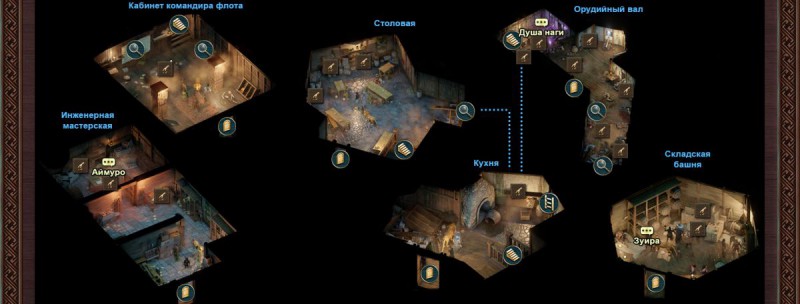
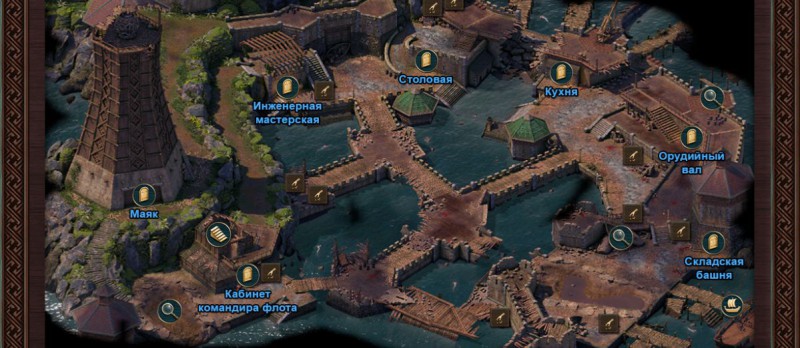 Остров Асонго — карта
Разберитесь с врагами и исследуйте помещение справа, где спрятались миряне. Узнайте от последних о случившемся, а затем ступайте наверх вдоль стены, чтобы отыскать оружие. Изучите бомбарду, а затем вернитесь к Зуире и расскажите ей о состоянии оружия.
Чтобы найти боеприпасы, вам необходимо посетить мастера на северо-западе острова. Старайтесь держаться стены, если не хотите наткнуться на армию нагов в центре. На месте одолейте парочку врагов и откройте дверь, за которой прячется мастер. Заполучив боеприпасы, возвращайтесь к бомбарде.
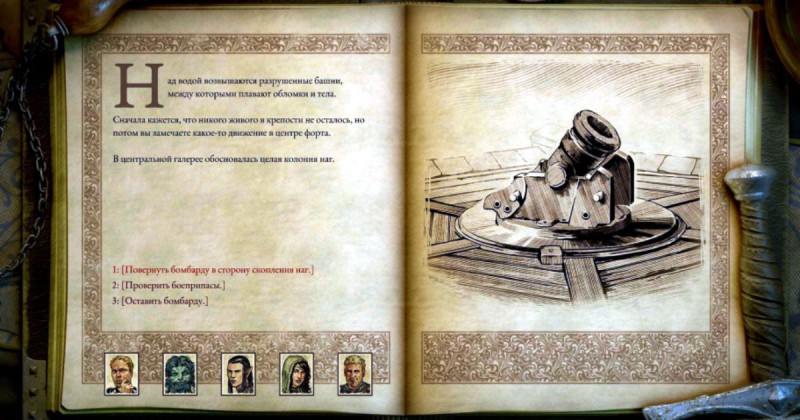 Управляем бомбардой
На месте установите снаряд, после чего изучите подпольное помещение рядом. Внутри окажутся тела погибших, на одном из которых можно найти инструкцию по работе с оружием. Изучив документ, используйте бомбарду и уничтожьте нагов.
Далее покиньте стену и доберитесь до самого верхнего угла карты. Миновав дверь, вы зайдете в затопленное помещение. Теперь вам необходимо достичь души наги, которая стала свидетельницей деяний Эотаса. Она откроет вам, что именно Эотас поглотил из Столпа Вечности.
 Окрестности Асонго
В итоге вы должны посетить маяк и побеседовать там с королем наг по имени Сугаан. Здесь вы можете убедить его встать на свою сторону, мирно открыв доступ к Столпу Вечности.
Если прежде вам не удалось найти душу наги, то в таком случае короля придется убить. Наконец, активируйте маяк и создайте связь с богом.
The White March — Part II[]
The second expansion for Pillars of Eternity. The DLC continues the story started in The White March — Part I, expanding the game world with new locations and quests.
Side quests
| Quest | Given by | Start location | Notes |
|---|---|---|---|
| Iron and Flame | Masca | Stalwart Village – Temple of Abydon | |
| Whispers in the Dark | Foreman Ismey | Stalwart Village – Stalwart Mines | |
| Ready the Cannons | Deryan | Stalwart Village | |
| The Phylactery’s Promise | Ogne | Requires completion of both, the Siege of Crägholdt and The Iron Flail. |
Tasks
| Task | Given by | Start location | Notes |
|---|---|---|---|
| Wild Mylla | Royse | Stalwart Village | |
| Risk Tolerance | Tarfos | ||
| Bleak Oath | Kern | Stalwart Village – The Gréf’s Rest | |
| Bogged Down | Herla | Mowrghek Îen |
Bounties
| Task | Given by | Start location | Batch |
|---|---|---|---|
| Bounty: The Terror of Whitestone Hollow | Asca | Stalwart Village | 1 |
| Bounty: Magran’s Faithful | 1 | ||
| Bounty: Redwater Lagufaeth | 2 | ||
| Bounty: Brynlod | 2 |
Background[]
|
As the second dragon comes to a heavy landing, you take note of the figure atop its back: a woman with sweeping horns, garbed in flowing robes. She slides from the dragon’s back in one graceful movement. «I am Llengrath.» |
Llengrath is a powerful wizard, author of many (mostly defensive) spells. The list includes: Llengrath’s Displaced Image, Llengrath’s Mental Shields, Llengrath’s Physical Shields, Llengrath’s Safeguard, Llengrath’s Blunt Wisdom, Llengrath’s Siphoning Image, Llengrath’s Warding Staff, Llengrath’s Dread Haze, and Llengrath’s Superior Elemental Bulwark.
As one of the most powerful mages in the world and member of the Circle of Archmagi, Llengrath has made significant advancements in the field of magic. She later faced the same obstacle as one of her rivals, Concelhaut: death, though she chose to combat it in a more unique way.
Accompanied by two high dragons, Gafonercos and Turisulfus, Llengrath is a force to be reckoned with not only by her powers (as this is one of the toughest battles in the game) but also by her strategy to preserve oneself and cheat death in a different way.
The original Llengrath thought of something Concelhault did not. He realized memory and consciousness were insignificant when compared to one’s knowledge, and sought to become immortal by creating a cult and preserving his expertise through time.
At Mowrghek Îen, The Watcher of Caed Nua speaks to a Llengrath that wasn’t the first, nor the last. Each new disciple gains the title of ‘Llengrath’ by studying everything the original wizard has discovered, thus becoming the new Archmage.
During conversations in The Forgotten Sanctum, the Watcher can gradually piece together the history of Llengrath. Llengrath, you see, is not a person, but a memory passed on through acolytes and apprentices. The original Llengrath lives on by attaching himself to the soul of the most recent apprentice like a tick, though the current Llengrath assures the player that it is nothing so dramatic as that. She welcomed him —fought for him, and insists that theirs is a symbiotic relationship, not a predatory one.
Llengrath was behind the Siege of Crägholdt and the employment of the Torn Bannermen to kill Concelhault and acquire his engwithan phylactery. The Archmage acknowledges the Player’s strength for taking down the Torn Bannermen, one of the most powerful mercenary groups in eora.
For Llengrath feared that the phylactery might fall into wrong hands, and sought to destroy its secrets and kill anyone who knew them. For that reason, the Watcher is a primary target since they know how to possibly become immortal.
The Forgotten Sanctum
The Watcher encounters Llengrath again years later, while looking into the strange tremors linked to the newly-appearing tentacles at the Black Isles. Llengrath is found investigating the absence of Maura of the Seven Hills, a fellow archmage known for her cryptic activities and connections to some of the largest and most devastating cataclysms on Eora. She then invites the Watcher to join her little investigation beneath the isle.
Below, she stumbles upon her colleague—another of the most powerful mages in Eora, who claims to also be investigating the chamber buried beneath; the Archmage Tayn and imps Drowsy Puke and Fetid Spray, representing Arkemyr. As usual, Tayn’s chaotic behavior gets on her nerves, especially when he has the gall to call her Llen, as if she were his friend or imp companion.
However, the visit to Wael’s temple produces more knowledge than she’s prepared to learn, as it becomes apparent that the Halls Obscured also contain secrets related to the very first Llengrath, and the solution to the sudden disappearance of their communion. Llengrath isn’t just a title, after all, but a communion going all the way back to the very first archmage. It was taken from them by the Hand Occult, who sequestered the collected memories of the first Llen in its vast archives beneath the Black Isles.
(If slain during events of PoE1, she will be a green orlan instead of a nature godlike, and you will get different conversation options, but otherwise everything will proceed as normal)
Interactions[]
Companion
- He can be recruited outside of Caed Nua.
- As a chanter, he can be a critical asset during challenging fights. His summons also make good fodder if your group is especially squishy.
- The Collector’s Edition Guide describes him as «passionate, introspective, open-minded, academic, verbose, gregarious».
Companion quest
Time and Tide: Kana Rua’s personal quest is received by talking to him after completing The Old Watcher. It is resolved partway through The Endless Paths of Od Nua.
Endings
- Kana’s endings are determined by how you encourage him in his travels, divided between truth-seeking, confidence (Kana’s mission to help his people) and idealism (idealism regarding the past and Engwithans). The dialog in Time and Tide can greatly influence these traits.
- Kana has dialog after meeting Maerwald that can influence these traits:
- «It may be my fate, too.» → +2 Idealistic
- «I don’t think knowledge was the problem…» → +2 Truthseeker
- Kana has a dialog that can influence idealism when reaching the south-east corner of Endless Paths of Od Nua Level 1 where the stairs to Level 2
«You sound very impressed by this Gabrannos.» → «He does sound impressive.» → +1 Idealistic
are located:
- Speaking with Kana after talking to the ghost of Lord Adwellen Rügfald III at the ruined temple of Woedica in First Fires during Never Far from the Queen provides more options to influence his truth-seeking trait:
- «I’m glad you’re enjoying yourself.» → +2 Truthseeker
- «You’ve had run-ins with the Leaden Key before, haven’t you?» → -1 Truthseeker
- Kana has dialog that can influence truth-seeking when entering the North Ward at the Sanitarium:
- «There are just as many who come here and are cured of their ills.» → +2 Truthseeker
- «Here’s the source of all that knowledge you were so giddy about.» → -1 Truthseeker
- «This is the cost of discovery.» → -2 Truthseeker
- «The animancers justify their sadism with false cures and charlatan’s tricks.» → -2 Truthseeker
- «Let’s get moving.» → -1 Truthseeker
- Speaking with Kana after the Animancy hearings provides additional dialog that can influence these traits if the outcome is «acquitted»:
- «Whatever mistakes were made, animancy still benefits many people.» → -2 Truthseeker
- «It’s a science, like any other. Why should Dyrwood remain a backwater?» → -2 Truthseeker
- Speaking with Kana after the Animancy hearings provides additional dialog that can influence these traits if the outcome is «outlawed»:
- «Whatever its ‘potential’, the reality is that animancy has claimed far too many victims.» → -2 Truthseeker
- «His death served the same purpose.» → -1 Idealistic, +1 Confident
- After completing The Master Below, selecting any of the four dialog choices from Kana about a song provides +2 Confident.
| This character is involved in quests. | ||
| This character has other interactions. |
Minor references, and a brief appearance |
- Kana has a brief appearance in Pillars of Eternity II: Deadfire, but is not voiced and does not have an in-game representation. Upon leaving Crookspur, during the quest Clearing Out Crookspur, he is seen on a Royal Deadfire Company galleon. He is tasked with securing the port against pirates and slavers after you shooed them off the island. Kana reminisces the adventures he shared with the Watcher during his time in the Dyrwood, and his dialogue will reflect some of the choices you made in Pillars of Eternity. With Maia Rua in the party, the two will exchange some lighthearted banter.
- If you sacrifice Kana to Skaen’s Blood Pool during Pillars of Eternity, this interaction will not occur. You can talk to Maia about this at any time while she is in the party.
Background[]
A large, liver-spotted man, barrel-chested and paunchy, cowers in the far corner of the room, his white hair a tangled, stringy mess. He covers his face and chest with trembling hands, unable to look in your direction.
Maerwald was once a great and ambitious man seeking to establish himself as the new master of the keep. He banished the dark things lurking in the keep after centuries of neglect. Together with the Steward, he tried to restore the beauty of the keep, laying claim to it when no one else would take it. However, as time went by, his mental condition deteriorated. His withdrawal turned to isolation. Restorations stopped, followed by the servants and repair crews departing.
By the time the Watcher reaches him, Maerwald has completely secluded himself beneath his keep in the uppermost level of the Endless Paths of Od Nua, driven to madness by the resurgent memories of his past lives. He is only intermittently lucid, switching erratically between his three personalities.
The reason for his madness is simple: Maerwald’s previous lives were marked by violence and brutality. The oldest personality is of a female Glanfathan marauder of the Nine Claws clan in the Broken Stone War, who orchestrated a raid on a frontier colonial settlement. The raiders burned the houses, killed the men, and raped the women. It just so happened that the very marauder that organized the raid and ordered her men to violate the women was impaled on a pitchfork at the end of the raid. Her soul transferred to the closest vessel it could find, the boy her lover had just conceived by rape.
The victim gave birth to the boy and raised him as a soldier, imbuing him with hatred of the Glanfathan people. She told him that his father was slain in the raid on the village, except that he was a proud Aedyran soldier who died defending his family. The boy wound up enlisting just in time to participate in the War of Black Trees, carrying out Admet Hadret’s strategy of scorched earth. He committed atrocities against the clans, especially the Nine Claws he blamed for his father’s «death», burning entire villages to the ground with the people inside their homes.
These terrifying memories lurked within the soul, waiting for the time to strike. And so they did: As Maerwald stared into the fire in his hearth at Caed Nua, watching the wood burn, the memory of those other fires two centuries ago came to the fore. Together with the smell of burning flesh and the screams. Nobody could withstand that strain. Maerwald unraveled, eventually seeking refuge in the topmost level of the Endless Paths…
History[]
The legends of Ondra are old compared to those of the other gods, and tales of her romance with the moon are especially well-known. In the stories, Ondra attempts to touch the moon but grasps only a piece of it, which plummets into the ocean. Its catastrophic impact causes the earth to shudder and the seas to surge all over the world. Ondra still pursues the moon, which kith believe causes the tides. Tidal waves and tsunamis are a result of her more forceful advances.
Ondra is one of the few gods that doesn’t have a physical shape in legends and she is never known to speak. She is imagined as a goddess who listens without judgment. As such, many use the seas as a confessional. «Ondra’s Hair» are long, shifting pillars of water that appear on the surface of oceans. They are the most direct manifestation of Ondra, and people believe they serve to thwart and punish plunderers of the sea.
In reality, Ondra was one of the gods created by the Engwithans. As the master of forgetting and the only one determined enough to handle the task, she sought to destroy the Engwithans to prevent them from ever threatening the gods with their refinement of animancy. This would be the last intervention before the gods swore off direct involvement in the affairs of the kith. To achieve this, she pulled Ionni Brathr, the smallest of Eora’s moons, down from its orbit such that it would impact the Eastern Reach and Deadfire Archipelago, centers of Engwithan civilization. However, Abydon interfered with her plans. He forged a hammer that shattered the moon, causing most of its fragments to crash into the ocean. However, the largest shard remained on course. He threw himself in its path, sacrificing his life. Ondra honored his memory by erecting the Abbey of the Fallen Moon around his body, which lay in the mountains of the the White March.
Background[]
Woedica, like the other gods, was created by Engwith out of the sacrifice of thousands of their souls at Sun in Shadow. Intended to be the strongest of the gods and to rule their pantheon, Woedica was simultaneously a patron of justice, oaths, and promises, and conversely, an entity willing to disregard the rules when it was necessary to accomplish her goals. She could do what she wanted with Eora at the apex of her power, which is why the other gods conspired to vanquish her, bringing the Queen down on even footing with the rest of them.
Yet even in exile, Woedica remained a potent god and the favored partner of Thaos, granting the Engwithan effective immortality by awakening his memories in each of his lives. He was devoted to her, favoring her specifically because of her wanton disregard for rules when they stood in the way of goals. The two were a perfect match.
Loot[]
Upper level
Debris:
- Random «medium» weapon
- Random gem
- ()
Debris:
- Random «large» weapon
- Random gem
- ()
Debris:
- Random «small» weapon
- Random gem
- ()
Corpse (Byne «The Nimble»):
- Fine Sabre
- Random currency
- Random food/drug/potion/lockpick/gem
- ()
Corpse (Bandon Leer):
- Helm
- Random currency
- Random drug/food/lockpick
- ()
Corpse (Urblat «The Ripper»):
- Mail Armor
- Random currency
- Random drug/food/lockpick
- ()
Corpse (Azrael Stonebelly):
- Grimoire
- Random currency
- Random food/drug/potion/lockpick/gem
- ()
Corpse (Hannah Cade):
- War Hammer
- Random currency
- Random food/drug/potion/lockpick/gem
- ()
Corpse (Nok-thar):
- Quarterstaff
- Random currency
- Random drug/food/lockpick
- ()
Web Sac:
- Quarterstaff
- Random armor
- Random gem
- ()
Web Sac (Hidden, Difficulty 6):
- 112x Adra Enîach
- Random accessory
- Random gem
- ()
Sarcophagus:
- Cladhalíath
- Ancient Engwithan Weapons
Lower level
Sarcophagus (Trapped, Freezing Pillar Trap, Difficulty 7 / Hidden — Difficulty 6):
- Random accessory
- Random gem
- ()
Vase:
- Random armor
- Random gem
- ()
Container:
- Random accessory
- Random gem
- ()
Walkthrough[]
Go to the cave in the east part of Dyrford Crossing. The ogre Korgrak is very temperamental, and many dialogue options will result in him attacking you. In order to resolve the conflict peacefully, you must ask him why he’s living in the cave, then tell him it’s dangerous, and that even if he kills you, more attention will be brought on the ogre. You can convince him to leave (Eder will mention Twin Elms), advise that he lie low for a while, suggest killing Rumbald, or invite him back to your stronghold. This will unlock him as a hireling.
Rumbald will not be happy if you deal with the ogre peacefully, only giving you a Piglet for your trouble. If you reimburse him for the cost of his herd (400 ), he will be much happier, and give you his unique blunderbuss Lead Spitter. On the other other hand, if you sent Korgrak after the farmer, his wife takes his place in front of their home, and gives you a piglet instead.
If you do get in a fight with Korgrak, be very careful about who goes into melee; the ogre does massive amounts of damage. Try taking advantage of his low reflex and will defenses to incapacitate him, or charm/dominate some of his bears to take the blows for you. It is also possible to use pull and run strategy, killing bears at first and then Korgrak.
Interaction with Korgrak:
- He is extremely easy to aggravate.
- You may ask about lost elf noblewoman.
- You may ask about the pigs.
- You may ask about the piles of bones.
- Ask him what he’s doing in the cave:
- Perception 16 — Notice he’s favoring one leg — he becomes hostile
- Survival 9 — Mention that he already ate whole herd of pigs, and won’t be able to hide for long.
- Intellect 18 — Say that he’d only hole up in a spider infested cave if he feared something.
- Being Rational — allows you to parley and guide him or recruit him.
- Otherwise there will be blood…
Background[]
«Grieving Mother» is a seemingly middle-aged woman with brown hair. Beyond that, little information is immediately given to the player. Additional insight into her backstory is provided through her companion quest and dialog as the story progresses.
Identity
Upon first meeting Grieving Mother, she remarks that the Watcher is the first to truly see her as she is. Using her skills as a powerful cipher, she is able to hide her identity from others. She refers to this as creating a caul for herself, a cloak that allows her to appear as an easily forgettable peasant. None of the Watcher’s other companions see though this illusion.
Her true name is never revealed. «Grieving Mother» is a title the Watcher unconsciously gives her.
Much of her own history is initially forgotten to her. Sometime prior to arriving in Dyrford she acted as a midwife to a small village located in Dyrwood Forest. She would assist expectant and birthing mothers at «the birthing bell», a plateau of adra with a bell cradled in an arm of stone. The structure had once been abandoned by the Glanfathan and Grieving Mother took it as her own.
Even though she was not one, she became known as a Watcher due to her «tellings» of children’s souls. In truth, Grieving Mother would shape the minds of the children and their mothers through her cipher abilities. She based her tellings on the thoughts of the mother and continued to shape their expectations and the child’s mind over time.
Hollowborn Crisis
Grieving Mother’s village was isolated and word of Waidwen’s Legacy was slow to reach them. Fearing that she was at fault, or would be blamed for the hollowborn births or that the parents would kill the children, Grieving Mother used her cipher abilities to make parents believe their children were healthy.
Eventually, Grieving Mother focused too greatly on maintaining the lies and succumbed to the power of her own illusions. One morning a mother was found dead, «her mind so focused on the care of her Hollowborn child that she’d neglected even to feed herself». This broke the illusion she held over the town and caused her to flee.
Interactions[]
| This character is a party member. | ||
| This character starts quests. |
Companion
- Grieving Mother can be recruited in Dyrford Village.
- She is a powerful Cipher who can provide crowd control.
- As a result of her hidden identity, she has almost no banter with other companions.
- She will leave your party if you do any of the following:
- Sacrifice Saeda to Aldhelm during Undying Heritage.
- Sacrifice Vela during Sacrificial Bloodlines.
- Fail to save her during the end of Dream and Memory.
Companion quest
Dream and Memory: Grieving Mother is in a state of deep mourning from Waidwen’s Legacy. Her quest starts when you meet her. It is entirely resolved through dialogue, some of which is only available after later acts.
Endings
Grieving Mother’s ending slides are dependent on two events:
- Successfully guiding her through Dream and Memory.
- Choosing to either wipe her memory or not. She will request this after completing her quest and resting at least 2 times.
Walkthrough[]
This quest requires the player character to experience two visions to learn about Durance. Progress in this quest is made through conversing with Durance after with him in the party. Note that it is necessary to camp – resting at an won’t trigger the visions.
First vision
This triggers 3 rests into Act 1, or after Act 2 has begun. Exhaust all dialog options after confronting Durance about the vision.
|
You awake to see Durance, his staff held in both of his hands before him. A flame flickers at its top end, casting long shadows across his face as he stares in contemplation. Still, for all the light of the fire, your eyes can’t focus on him… perhaps it is awakening from sleep, or a trick of the light, but he seems… indistinct, blurred around the edges, everything except for the staff. The staff… he seems to be studying its engravings. As you watch, the engravings glow thinly red, like through the cracks of heat-suffused wood. The lines stream like molten metal, burning along the edges of his staff, then branch out in an intricate series of fiery veins, bunching thickly where his hands clutch the wood, pulsing as if a heartbeat. As you watch, the veins spiral into a dozen, separate circles… circles that spiral again until they are arranged in a circle of their own. They pulse, wait, and all is strangely silent… and… And then, suddenly, there is a great light from the fire, a rushing of air, a great flash… and you awaken again, to see Durance in the same place, still holding his staff, but he is solid, real. He doesn’t seem to have noticed you… or reacted to what occurred. |
Second vision
In the second cut-scene, the Watcher again wakes up to find Durance staring at his staff. This triggers 3 to 6 rests into (or after) Act 3. Exhaust all dialog options after confronting Durance about the vision.
|
Your eyes open to a familiar scene. Durance sits with his staff laid across his lap, a malignant flame sprouting from one end. He is difficult to make out, his features soft, bleeding together. But the staff you can see clearly, its etchings aglow in molten orange. Though Durance’s face is difficult to distinguish, there is no mistaking the hardened expression, the furrowed brow. His voice hisses and sputters, low and unintelligible, as though having a private argument with the staff. Traces of spittle catch the firelight as they fly from his lips like sparks. …and to your surprise, there is a female figure behind him. You are about to call out a warning, when you realize it is the Magran statue where you met Durance at the Fork… Yet… she seemed almost… alive for a moment… her cast shadow seemed as if it was moving, cloaked, then it is still, frozen with the night at its back. There is something odd about one of the symbols. A circle of twelve smaller circles. One of the small circles glows brightly, but the other eleven give off little light. They flicker and fade like dying embers. Between his hissing curses, Durance lowers his face close to the staff and blows on the fading circles with panicked rapidity, coaxing light from them, but they do not ignite. One by one, the light of the circles dies, and smoke rises from their ashes. Only one still burns. Durance hurls his staff at his feet, and it clatters to the ground. Its edges have become soft, difficult to find. Like its owner, the staff has become a blur. You close your eyes and reopen them, and Durance is there, picking up his staff from the ground, but the blur is gone, and you are awake. |
Final conversation
After the two visions, you need to complete Council of Stars and speak with Durance a third time. Your choices affect his .
- First ask Durance, «Does what we learned about Woedica trouble you?»
- Select any dialog options EXCEPT for «I’m not certain — it’s just a feeling I have» to convince Durance of the plot between Woedica and Magran.
- Exhaust all other dialog options. This will complete the quest.
Faction quests[]
The Dozens questline
| Quest | Given by | Start location | Notes |
|---|---|---|---|
| Rogue Knight | Osric | Copperlane – Admeth’s Den | |
| The Bronze Beneath the Lake | Wenan | Requires completion of Rogue Knight, refused if you’ve accepted The Changing of the Guard or Winds of Steel. |
Knights of the Crucible questline
| Quest | Given by | Start location | Notes |
|---|---|---|---|
| Built to Last | Commander Clyver | First Fires – Crucible Keep | |
| Winds of Steel | Requires completion of Built to Last, refused if you’ve accepted The Bronze Beneath the Lake or The Changing of the Guard. |
House Doemenel questline
| Quest | Given by | Start location | Notes |
|---|---|---|---|
| A Two Story Job | Abrecan Doemenel or by looting Thieves’ Letter | Brackenbury – Doemenel Manor orCopperlane – Thieves’ Hideout | Can be received directly from Abrecan Doemenel or by finding the thieves in Copperlane independently. |
| The Changing of the Guard | Gedmar Doemenel | Brackenbury – Doemenel Manor | Requires completion of A Two Story Job, refused if you’ve accepted The Bronze Beneath the Lake or Winds of Steel. |
Прохождение побочных квестов Beast of Winter
Те, что наверху
Как начать: поговорите с Бриде.
Брида попросит нас решить вопрос с паломниками, которые сделали лагерь неподалеку и мешают пройти в храм. Как только мы подойдем к ним, идя в гору, они сразу же набросятся на нас. К сожалению, мирным путем закончить эту миссию нельзя.
Разбираемся со всеми врагами (не забываем о белых мишках), а потом идем обратно к квестодателю. После окончания квеста стоит разговорить Бриде, чтобы она поведала о своей сестрице – это запустит новое задание.
Вознаграждение: 5 тысяч единиц опыта и 3,5 тысячи меди.
Последнее паломничество
Как начать: поговорите с Бриде.
Проходим по маршруту, который описан в миссии «Восход и падение», а потом идем в Заиндевелый храм, воспользовавшись восточным проходом. Убиваем противников, идем в помещение с левой стороны и встречаем Эрис. Уговорить ее не становится Хранителем, не получится. Поэтому помогаем барышне, чтобы впоследствии она провела нас вглубь подземелья до саркофага, в котором находится щит «Зимний оплот».
По дороге к вышеуказанному предмету, замечаем ледяную глыбу, стоящую в углу коридора. Уничтожаем ее с помощью Ледобоя и получаем доступ к сундуку с отличными вещицами. Далее проходим в пещеру, обезвредив все ловушки, и натыкаемся там на замерзшего беса. Пробуем достать из его рук вещицу, а затем видим, как тот оживает. Мы можем приобрести у него Око Римгранда за 20 тысяч меди или просто прибить его.
Идем обратно к Бриде и сообщаем ей, что мы смогли отыскать ее сестру.
Вознаграждение: 6 тысяч единиц опыта и 5 тысяч меди.
Нектар мертвых
Как начать: поговорите с Нивадиром.
Для начала добираемся до Заиндевелого храма, воспользовавшись маршрутом, указанным в миссии «Восход и падение». Спустившись по веревочке, находим в правом уголке сломанного заледенелого конструкта. Изучаем его и выливаем жидкость. Это создание потом тут же нападет на нас.
Эта жидкость может быть также получена нами в квесте «Последнее паломничество». Помогаем Эрис и ждем ее превращения в конструкта. Затем обыскиваем ее труп и получаем нужный предмет. Потом относим его Нивадиру. Далее мы можем либо уничтожить это ядовитое вещество (получим лишь опыт) или выбрать в качестве награды 4 тысячи меди вместо магического колечка. В последнем случае Нивадир даст опробовать новое пиво персонажу, стоящему неподалеку, и тот тут же умрет.
Вознаграждение: 2 тысячи единиц опыта, 4 тысячи меди или кольцо «Зов окончательности».
Walkthrough[]
- This quest will begin on completion of A Matter of Import, after talking to Fleet Master Okaya. She will ask you to pay a visit to the recently-arrived Iverra at the workshop on Sayuka to find out what they’ve learned.
- Upon entering the workshop, Iverra is in conversation with one of the Coralmason. They’ve determined that the wild coral growths are being caused by a source of magical disturbance that lies somewhere in the deep sea to the southeast of the island, the location of Cignath Mór, an old drowned Engwithan ruin. Iverra hands you her masterpiece, a set of Diving Equipment.
- Leave the workshop, and you’ll immediately be thrown into a yet another problem Sayuka is facing: Bog Druids. This starts Hunting Season, though it is unrelated to this quest.
- Leave Sayuka and travel just southeast of the island to a new icon on the world map. Interact with it to dive down to the Engwithan ruin.
- Cignath Mór
- As you swim down to approach the ruins, you come to a magical barrier, which is holding back the water from consuming the area entirely. and creating a large pocket of breathable air surrounding the ruins.
- See the main article, Cignath Mór, for a walkthrough on this area. Once you get to the lower level (and after slaughtering a bunch of seafolk) you will find the adra machine, the cause of the coral growths. It is under the protection of Galawain, who explains that it is feeding the creatures in the area, strengthening them so that they become «..strong and ruthless — and in so doing, worthy of regard.» You can do one of two things:
- Disable the Engwithan machine that makes the corals grow. This will anger Galawain, who confronts you with a Kraken to fight on your way out of the structure. You can loot the unique helm Mask of the Grotto Deep and a Kraken’s Eye off him. This result is preferred by the Fleet Master.
- Leave the machine operating and disable three pylons to flood the ruins. If you attempt to disable the machine first, Galawain promises you a boon for disabling the pylons instead. Once the ruins are flooded, you dive up to your ship; the watcher must pass a Mechanics 9 or Athletics 10 check to avoid injury. If Galawain promised a boon, the watcher gains (+1 Perception, +2 Survival). upon returning to the surface. The Fleet Master is unhappy with this result, which leads to a moderate reputation loss with the Royal Deadfire Company. The reputation loss can be recouped by passing a diplomacy check.