Tiny bang story, theтеория крошечного взрыва
Содержание:
General Information
- Main Menu
- Play: click to begin a new game. This will change to Continue when resuming a game.
- Options: Adjust the Sound and Music volumes and turn Full Screen on and off. Click on the Blue “i” to view information about the development team.
- Profiles: Create up to 5 profiles, with a maximum of 15 characters (letters and numbers, only). Click the Blue “+” to add a new profile or Blue “-” to delete one. Click on the Green “check mark” to accept, or Red “x” to cancel.
- Exit: Quit the game. Click the Green “check mark” to accept or Red “x” to cancel and return to the Menu.
- “F” and “t”: Share with your friends on Facebook and/or twitter.

- Game Screens
- Menu (“Pause” Button): Located at the upper left, click to access Resume, Options and Exit (to the Main Menu). You may also
- Clue (“?” Button): Located at the upper right, click to get a visual indication for what to do/where to go or a hint to solve a puzzle. Collect Fireflies to refill it.
- Puzzle Pieces: Located at the right, just below the Clue Button. It indicates the number of Puzzle Pieces you must find on the current level.
- Inventory: Located at the right, items you collect will be stored here until ready for use. Move your cursor anywhere to the right side of the screen and the Inventory will expand to show you where to use the items.

- Gameplay
- Find Puzzle Pieces on each level to advance to the next level.
- Investigate areas, objects and characters to advance the story, complete objectives, create tasks and/or find items.
- Collect Fireflies to refill the Clue button.
- Use items on objects and characters to advance the story, complete objectives and/or create new tasks.
- Complete puzzles to advance the story, complete objectives and/or create new tasks.
Level 3
Collect 4 Puzzle Pieces, click on the Camera (1), collect 2 Puzzle Pieces (2) and then click on the Left Door (3 – click twice).

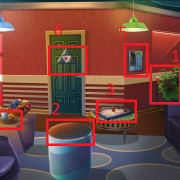
Collect 7 Puzzle Pieces, click on the Empty Frame (1), the Display Case (2) and then click on the Vending Machine (3). When complete, collect the Canvas (4), use it on the Empty Frame and then click on the Right Door (5 – click twice).

The object is to arrange the colors, in columns, from brightest to faintest. Click on a Square and then click on any Square directly adjacent to it (above, below or on either side) to switch their places. Click on the Clue Button for a solution image.

Collect the Apple (1 – orange) and then continue out the Right Door. Collect 6 Puzzle Pieces and the Apple and then click on the Map (2). When complete, click on the Ticket Counter (3), click on the Left Door (4) and then click on the Elevator (in the center).

The object is to reassemble the Map so all the colors are in their own sections. You can only click on the outer sections, on the Left (1) and the Right (2). The Left side rotates clockwise, one-half turn and the Right side rotates clockwise, one-quarter turn. Click on the Clue Button for the image solution. Keep working back and forth until the colors are in the correct locations.

Collect 5 Puzzle Pieces, click on the Cabinet Door (1) and collect the Puzzle Piece. Click on the Astrolabe (2) and the Display Panel (3), collect the Dial (yellow) and then click on the Elevator (4).

Collect the Dial, click on the Camera (1), collect the Compass (2 – blue) and then click on the Right Door (3). Collect the Dial, click on the Left Door (4) and then click on next the Left Door (5). Collect the Dial (6) and then return upstairs (click on the Right Door and then the Elevator).

Use the Compass on the Astrolabe (1). The object is to align all 3 parts of the Astrolabe. Click and drag the Compass (2 – large circle), in either direction (clockwise or counter-clockwise). It will take about 3 and one-half counter-clockwise rotations to get them to line up.
Click on the Papers (3), collect the Cipher Key (4) and use it on the Papers. Click and drag the Cipher Key over the grid until it lines up with numbers that result in the 2 you’re given (5). Click on the Clue Button for a hint. The solution is that all the numbers are results of subtraction: 3 1 3 2.
Use the Dials on the Display Panel (6) and click on the Dials to enter the number (7). Collect the Apple (8), click on the Elevator (9) and then click on the Right Door.

Use the Apples in the Display Case (1), collect the Coin (pink), click on the Right Door (2) and then continue outside (click on the next Right Door).

Use the Coin on the Ticket Counter (1), return upstairs (click on the Left Door and then click on the Elevator) and then click on the large Monitor (2).

The object is to guide the Plane to the Landing Strip (1), using the Controls. Use the Left and Right Arrows (2) to move your Plane along the path, avoiding trees and enemies; the Plane will move forward on its own. If you crash into trees or an enemy, the game will reset and you’ll have to begin again.

Click on the following for the video solution.
Return outside (click on the Elevator and then click on the Right Door) and click on the Orange Button (1). Click on the Cargo Door (2), click on the Compartment (3), collect 3 Packages and then click on the Left Door (4).

Collect 2 Packages, click on the Camera (1), collect the Package (2) and then click on the Left Door (3).
Collect 3 Packages, click on the Drawer (1), collect the Package, click on the Right Door (2) and then return upstairs (click on the Elevator).

Collect the Package and click on the Cabinet Door (1). Collect the Package, click on the Elevator (2) and then return outside (click on the Right Door).

Use the Packages on the Cargo Door.
ttbs62

Reconstruct the next area with the Puzzle Pieces and then click on Continue.

Прохождение игры — Страница 7
Акт II
Глава 7. Часть первая: прогулка по лесу
В автомобиле заканчивается бензин, когда детектив подъезжает к реке. Он должен найти способ перебраться к заправке, которая находится на другом берегу.
От авто идем вдоль берега реки.
Со стула берем ПЛАНШЕТ УПРАВЛЕНИЯ, применяем его на квадрокоптер, лежащий на большом камне – получаем карту местности.
Отточки обнаружения квадрокоптера идем в точку 2, к легковому автомобилю.
Смотрим на столик под тентом, берем записку. Отправляемся на поиски утерянного телефона – перемещаемся в точку 3.
Приближаем взгляд к плоскому камню, подбираем ТЕЛЕФОН. Нажимаем кнопку включения – на экране появляются клетчатые фигуры тетриса. Щелкаем по ним, пока они не сложатся в квадрат. Перемещаемся в точку 4. Поворачиваем экран, щелкаем по сухим стволам, отламываем ПАЛКУ.
Идем от одного птичьего гнезда к другому, сбрасываем их на землю с помощью палки и осматриваем в поисках ЖЕТОНА.
Примечание. Местоположение жетона задается случайным образом.
На экране телефона создаем такой же рисунок, что и на жетоне. Просматриваем записную книжку, находим код замка чемодана. Идем к автомобилю в точку 2, приближаем взгляд к чемодану. Вводим код 7359, забираем КЛЮЧ. Переходим к багажнику авто, открываем его ключом, вынимаем ТОПОР. Перемещаемся в точку 5.
Срубаем топором сухое дерево, перебираемся через реку.
Глава 7. Часть вторая: на заправке
Приближаем взгляд к телефону автомату слева, у стены здания. Достаем из него МОНЕТЫ.
Читаем записку, прикрепленную к входной двери. Перемещаем взгляд к автомату с закусками, бросаем в щель монетоприемника три монеты, забираем ПУЛЬТ ОТ ДВЕРИ. Применяем его на дверь, заходим внутрь.
Приближаем взгляд к витрине в центре магазина, забираем с верхней полки 2 ПАТРОНА К ДРОБОВИКУ.
Проходим за прилавок, берем ДРОБОВИК и заряжаем его патронами. Забираем со стойки ЗАПИСИ – журнал закупок
ОБРАЩАЕМ ВНИМАНИЕ на терминал – для входа требуется пароль
Выходим из магазина, идем на задний двор. Приближаем взгляд к задней двери, выстрелом из дробовика сбиваем замок.
В подсобке со шкафчика с кодовым замком забираем ЗАПИСЬ «Сегодняшний пароль» — на ней указана сегодняшняя дата. Просматриваем «Журнал закупок», находим сегодняшний чек. Вводим код 999112, забираем из шкафчика КАНИСТРУ.
Забираем ЗАПИСЬ «Не забывай про скидку», прикрепленную к закрытому на кодовый замок сейфу. Убираем доску, блокирующую дверь, проходим в магазин из подсобки.
В магазине находим пять предметов, указанных на подсказке «Не забывай про скидку», узнаем их стоимость. Подставляем цифры вместо рисунка предмета, получаем код. Возвращаемся в подсобку. Вводим код 911 321 на замке сейфа, достаем КАРТУ ДОСТУПА. Выходим на улицу, направляемся к колонке.
Вставляем в щель карту доступа, ставим на пол канистру, вставляем в нее шланг. Возвращаемся в магазин.
ОБРАЩАЕМ ВНИМАНИЕ на указатель «Сегодняшний пароль», прикрепленный к кассовому аппарату. Переводим взгляд по стрелке на записке, смотрим на бутылки на полке
Переводим взгляд по стрелке на записке, смотрим на бутылки на полке.
Поворачиваем их так, чтобы можно было определить их наполненность. Ориентируемся на бутылку слева, с наклейкой градации, получаем числовую последовательность 40213. Набираем ее на кассовом аппарате, включаем колонку.
Выходим и забираем КАНИСТРУ С ТОПЛИВЛОМ. Идем «К машине», заправляем ее топливом.
Страница 7 из 17
- …
- 7
- …
Вторая часть
Сначала нажимаем на плакат, составленный из вертикальных кусков изображений самолёта и яблока. Нам нужно собрать самолёт, для этого нажимаем сначала 2ю слева кнопку, затем 4ю, затем крайнюю левую. Выходим из собранного плаката, жмём на механизм над ним — получаем задание найти 3 колеса. Жмём на аппарат в кабине справа — получаем задание найти батарейку. Идём на следующую локацию налево, жмём на средний иллюминатор «батискафа» — он открывается. Жмём на него ещё раз — получаем задание найти 2 колбы. Идём ещё левее, жмём на люк в «кувшине» дважды — получаем задание найти 4 вентиля.
Начинаем собирать всё необходимое прямо с этой крайней левой локации. 1й вентиль — на кране слева. Идём правее. 2й вентиль — прямо посреди экрана. Открываем люк с прорезью чуть правее тележки, спускаемся вниз. Кликаем на картину-паззл на стене, собираем картину, меняя по очереди два любых рядом стоящих квадратика. В итоге должно получиться так:
Выходим из увеличенного вида картины и тут же кликаем на колесо на ней — получаем 1е колесо. Открываем нижнюю створку шкафчика слева, забираем 2е колесо. Открываем сундук, смотрим в него, берём из него 3й вентиль, 1ю колбу, 3е колесо. Открываем люк в подпол, забираем 2ю колбу. Кликнув на деда, видим, что батарейку можно получить, починив какой-то большой агрегат. Поднимаемся от деда, идём на локацию правее, в правом нижнем углу забираем 4й вентиль.
Идём на локацию левее, открываем средний иллюминатор батискафа, вставляем в него колбы — попадаем к тому агрегату, который надо починить. Принцип такой же, как с паровозом в первой части — нужно собрать агрегат из 13 кусков, разбросанных по помещению. Вот то, что берём, и то, что должно получиться:
Слева от батискафа открывается дверца, за которой — батарейка. Забираем её.
Идём на локацию левее, кликаем вентилями на люк в кувшине, попадаем в задачу с трубами. надо собрать замкнутую систему, поворачивая куски труб. Должно получиться так:
Кувшин наполнен, мост разведён. Кликаем на верхнюю часть правой бутылочной башни — получаем задание найти 4 рычага с набалдашниками. 1й — тут же, на левом берегу у моста. Идём направо. 2й, с зелёным набалдашником — у железнодорожной развилки. Спускаемся к деду, забираем 3й из кадки с цветами. Поднимаемся, идём правее, забираем последний, 4й, с красным набалдашником, возле паровозика. Возвращаемся на самую левую локацию, вставляем рычаги в верхнюю часть правой бутылочной башни — попадаем в игру, где надо повторять показываемые сигналы. Смотрим на цвета и когда очередная лампочка из ряда снизу приглашающе мигает оранжевым, повторяем показанную комбинацию. Когда заполним весь ряд, выходим из игры и, кликнув на монитор у подножья бутылочной башни, попадаем в аркаду, в которой надо управлять пароходом. Кнопки вверх-вниз — для движения парохода, в кнопку с плюсом нажимаем, когда на экране есть заграждения в виде плюсов — они исчезают. Надо проплыть до конца маршрута, избегая стенки, китов и лодки. Вот к нам и корабль приплыл.
Идём на самую правую локацию, собранные колёса вставляем в механизм над плакатом с самолётом, а батарейку — в аппарат в кабине справа. Кликаем на стрелку вверх на этом аппарате — плакат поднимается, а под ним — головоломка. Кликаем на неё — получаем задание найти 24 цветных шара и треугольник.
На этой самой правой локации 7 шаров: слева от плаката, на фоне синей большой лампы, в траве у стрелки, слева за паровозом, на конце антенны на крыше кабинки, на самой кабинке в левом из трёх слотов, на вершине какого маленького агрегата справа внизу. Идём левее, собираем ещё 6 шаров: в верхем правом наросте на батискафе, за дверцей над агрегатом с проводами внутри, за дверцей в нижней части фонарного столба (открывается нажатием на красно-белый полосатый рычаг у железнодорожной развилки) и 3 — в семафорах. Спускаемся к деду и забираем ещё 6 шаров: в шкафчике у умывальника, в сундуке, в кресле, на тарелке на комоде, на полке за верхними дверцами комода, в подполе. Поднимаемся, идём левее, забираем треугольник с парохода и оставшиеся 5 шаров: из громкоговорителя на кувшине, 2 — с левого пристроя к кувшину, 2 — с фонаря. Возвращаемся к головоломке на самом правом экране, используем на неё треугольник и шары.
Кликаем на головоломку. Для её решения надо поменять местами шары таким образом, чтобы на внешней окружности были все зелёные, на среднем — все синие, на внутреннем — все оранжевые (видно по ободкам лунок для шаров). Для обмена используем единственную пустую лунку и повороты двух внутренних окружностей.
Кликаем на открывшийся лифт, собираем вторую часть паззла мира:
Gameplay and Guide Tips
- This guide assumes you’ve read the General Information, paid attention to the in-game Tutorial and/or Help features or otherwise familiarized yourself with the gameplay.
- Click on the Blue Fireflies to fill up the Clue button. They appear 2 at a time and will tend to hover near tasks you need to complete. As soon as you’ve collected 2 Fireflies, 2 more will appear. You’ll need 30 Fireflies to fill it completely. In General Areas, click on it for a visual hint on what to do next (this will empty the Clue Button). In puzzles, click on it for a visual solution or strategy (this is always available). Move your cursor to see if you can interact with something. Often this will give you new tasks and/or items to find.
- There are Puzzle Pieces located on each level, in various areas. You must collect all the Puzzles Pieces (the amount is indicated on the right, at the beginning of the level) in order to advance to the next level.
- The game begins with a visual tutorial to get you familiar with the game mechanics and elements.
- The game only uses 1 Indicator, other than your system cursor. When you mouseover something, and see a Gear, you can interact with an object.
- Some items can be clicked on; however, you may need to complete another task before you can do anything with them.
- Most areas and Puzzles/Minigames do not close automatically. Click on the Cancel Button (Red “x” or Green “check mark” to exit.
- If you exit a Puzzle or Minigame before you complete it, any items you use will be returned to Inventory. You’ll need to use them again to complete it.
- All Puzzle Pieces will be indicated in white and interactive items/tasks with numbers. All other item/area indicators will be mentioned in the text of the walkthrough, the first time it occurs. If there are multiples, of an item, the color won’t be mentioned again. Additional/Alternate colors, numbers, arrows, lines and/or letters will be used where necessary and for clarification.
Полное прохождение игры «Теория крошечного взрыва».
В игре есть система подсказок, активировать которые можно, собирая вездесущих мух.
I Глава
Улица:
1. Первым делом собираем кусочки пазла (5 шт.):
2. Жмем на красную кнопку — это лифт, заходим внутрь, и оказываемся этажом выше
2-й этаж:
1. Здесь также собираем кусочки пазла (4 шт.)
2. Замечаем сломанную лестницу на самом верху — нужно раздобыть 5 перекладин: — первая находится тут же — в виде ручки на круглой дверце
3. Заходим снова в лифт и едем на 1 этаж
Улица:
1. Подбираем перекладины: — на правом башмаке — на стене домика прямо над заплаткой
2. Открываем печь у правого башмака: — собираем кусочки пазла (3 шт.) — и ручку от крышки сковороды в качестве перекладины для лестницы
3. Кликаем на металлическую заплатку на стене, — здесь нужен гаечный ключ
4. Поднимаемся на 2-й этаж
2-й этаж:
1. Изучаем стену за открытой дверью: — здесь нам предстоит решить головоломку: «найди пару»:
— после того, как мы найдем все пары, должно остаться 3 числа: 7, 1, 3 — это подсказка, запомним ее
2. Спускаемся вниз
Улица:
1. Изучаем сломанный семафор (странный механизм, стоящий справа): — вводим код 713 (его мы получили ранее) и жмем на красную кнопку — дверца откроется, и мы сможем взять последнюю перекладину для лестницы — кликнем на схему внутри семафора, чтобы активировать задание на нахождение 9 лампочек
2. Первая лампочка находится прямо над дверцей лифта
3. Едем на второй этаж
2-й этаж:
1. Подбираем вторую лампочку у устройства возле двери
2. Применяем полученные перекладины на сломанную лестницу вверху
3. Поднимаемся наверх
3-й этаж:
1. Собираем 6 кусочков пазла
2. Открываем шкаф и забираем еще один кусок пазла
3. Выкручиваем 2 лампочки у торшера
4. Еще одна лампочка находится в плафоне фонаря на балконе
5. Кликаем на пустую раму над диваном, — здесь нам потребуется собрать 25 бутыльков
6. Пробуем открыть сундук, чтобы активировать задание по поиску ключа
7. Разговариваем с бабулей, которая соглашается отдать ключ взамен на реставрацию картины
Загрузка. Пожалуйста, подождите.
PCHET » Прохождение » Прохождение игры The Tiny Bang Story
Прохождение игры The Tiny Bang Story
The Tiny Bang Story (Теория Крошечного Взрыва) — Одна из лучших игр в жанре головоломок, которая предлагает прекрасное сочетание эстетики побега из комнат, и поиска предметов. Прохождение игры происходит на крошечной планете, с крошечными существами, они жили в этом прекрасном и загадочном месте пока на землю не упал крошечный метеор. Теперь ваша обязанность восстановить мир до его прежнего состояния и снова наполнить этот мир счастьем. Ваша задача в игре исследовать игровой мир, восстанавливать сломанные машины и механизмы, решая сложные и увлекательные головоломки, помогать другим, находить и собирать различные предметы, которые помогут вам решить головоломки. Прохождение игры достаточно интуитивно понятно, но некоторые локации могут вас заставить задуматься или использовать подсказки. На нашем сайте можно посмотреть полное прохождение игры The Tiny Bang Story, чтобы решить головоломки с трубами, вентилями, поплавками, компасом и полностью погрузиться в неповторимую атмосферу игры.
Прохождение игры The Tiny Bang Story Ниже вы можете посмотреть полное прохождение игры The Tiny Bang Story Free (Теория Крошечного Взрыва), а именно на все уровни.
Уровень 1. Башня телескопа
Уровень 2. На железной дороге
Уровень 3. В огромном дереве
Уровень 4. Побережье
Уровень 5. Башня часы
-
Где находится торговый город в rage 2
-
Lord of heroes как пройти 8 5
-
Готика 2 как попасть в канализацию хориниса
-
The evil within время прохождения
- Ninja blade как открыть мечи 5 уровня
Level 1
Collect 5 Puzzle Pieces, click on the Red Button (1) and then click on the Open Doorway (2).

Collect 4 Puzzle Pieces, click on the Ladder (1), collect the Ladder Rung (yellow) and then click on the Wall above the Stairs (2). When complete, click on the open Doorway (3) and return to the base of the Tree.

The object is to eliminate all the numbers that can be matched with an identical number or similar object. Click on one and then click on its mate to eliminate it. The numbers that can be paired are: 0, 2, 4, 5, 6, 8 and 9 (1). The remaining numbers are: 7, 1 and 3 (2).

Click on the Panel (1), collect 2 Ladder Rungs and then click on the Furnace Door (2 – click twice). Collect 3 Puzzle Pieces and 1 Ladder Rung (3) and then click on the Switch Panel Door (4).

Click on the Dials (1) to enter the number from the Puzzle on the second level of the Tree: 7, 1, 3. Click on the Red Button (2), collect the Ladder Rung and then click on the Open Panel (3). Collect the Bulb (blue) and then return to the second level of the Tree (4).

Collect the Bulb, use the Ladder Rungs on the Ladder and then click on the Ladder.

Click on the Armoire (1), collect 7 Puzzle Pieces and 3 Bulbs. Click on the Chest (2) and the Empty Frame (3) and then click on the Stairs (4) to go up to the Roof.

Collect 3 Bulbs and 4 Puzzle Pieces and then click on the Telescope (1). When complete, click on the Stairs (2) to return to the Apartment.

The object is to collect 25 Pieces of Canvas by popping the Balloons that have Bottles containing Pieces of Canvas. Click on the Balloons (1) to collect the Pieces of Canvas (2). This is an arcade-style game, so the solution is entirely random. The Balloons will continue to rise, even after you’ve collected 25. Once the Cancel Button (3) turns from a Red “x” to a Green “check mark,” and the number you still need to collect disappears (4), you can exit.

Click on the following for a short video example of gameplay.
Use the Pieces of Canvas on the Frame (1) and reassemble the Image (2). Click and drag each piece into position. Once placed correctly they will lock into place; there’s no need to rotate the pieces. Collect the Key (yellow), use it on the Chest (3) and then click on the Open Chest (4). Collect the last 2 Puzzle Pieces, the Bulb and the Wrench (orange) and then enter the Hatch (5) and continue down to the base of the Tree.

Use the Wrench on the 3 Bolts (1 – use it 3 times), click on the Open Compartment (2) and collect the 2 Gears (pink) and the Pipe (orange). Click on the Furnace Door (3 – click twice), collect the Gear and the Pipe (4) and then return to the second level (5).

Click on the Compartment (1), collect the Gear (2), collect the Pipe and then return to the Apartment (3). Collect the Gear and the Pipe, click on the Armoire (4) and collect the Pipe. Click on the Chest (5), collect the Gear and the Pipe (6) and then return to the Roof (7).

Collect the Gear and the 2 Pipes and then return to the base of the Tree.

Use the Gears and Pipes on the Open Compartment (1) and then use the Bulbs on the Switch Panel (2). When complete, click on the Lever (3), click on the Orange Button (4) and then enter the Garage (5).

The object is to rearrange the Bulbs so that each row contains the same colored Bulb. Click on one of the Circular Arrows (white) to rotate one quadrant (yellow) of Bulbs counter-clockwise. The solution is always the same; however, the initial configuration is different each time you play. Click on the Clue Button (blue) for the solution: Red in the top row, Purple in the middle row and Green in the bottom row.

Click on the following for a video solution. Note that your solution will probably be different.
The object is to reassemble the Train. Click and drag each piece of the Train to the correct position (1) and place according to the diagram (2).

Click on the following for the video solution.
To advance to the next Level, you must reconstruct the next area with the Puzzle Pieces you collected (1). Click and drag each Puzzle Piece into position. When placed correctly, they will lock into place. A good strategy would be to rearrange the Puzzle Pieces and work on sections separately, using the pieces that are most obvious, first. When complete, click on Continue (2).