Wicked ward
Содержание:
- Prison Guard/Police Officer[]
- Routines[]
- Schedule[]
- Summary[]
- Types
- Other info
- Obtaining
- Crafting
- Other info[]
- Со скоростью молнии
- Прием
- Инструменты
- Master Craftsman крафт-лист для PS4/X1
- Riot Guards (The Escapists 2 Only)[]
- Jobs[]
- The Escapists 2 советы и приемы для начинающих
- 3rd Strategy[]
- The Escapists 1 DLC Prisons
- Как сбежать с карты K.A.P.O.W Camp в The Escapists 2
- Тюрьма Area 17
- Escape Plan[]
Prison Guard/Police Officer[]
Behavior
In Desktop TE1, Guards you knock out will attack you once they wake up. This lasts until you escape from them chasing you.
- Guards that witness prisoners fighting will attack them. If they witness you start a fight, they will attack you and the target.
- Guards at roll call choose two prisoners whose cells will be searched for contraband.
- Guards will attack you if they see you stealing from other inmates or if your guard heat is above 89% (79% in The Escapists 2).
- If a guard catches you chipping, digging, or cutting, they’ll attack and raise your heat to 99% instantly.
- If a guard picks up dropped contraband, it cannot be retrieved afterward.
- Guards will not attack you in hiding, even above 89%
- If a guard finds the following, you will be sent to Solitary. In The Escapists 2, a lockdown will trigger instead of immediately being sent to solitary (the guard dogs will KO you shortly after).
- Finds evidence of tunneling, cutting, or chipping.
- Catches you outside of your cell after lights out without a guard outfit equipped. (Riot guard or regular guard)
- In The Escapists 2, guards will follow you if you have a heat at or above their opinion level. Guards with an opinion of 80 or above won’t follow you unless they are trying to attack you, while guards with an opinion of 0 will usually follow you no matter what your heat is. This can be prevented by raising a guard’s opinion or avoiding being spotted by them.
- In The Escapists 2, extra guards can be found in the during low Security Levels.
Outfit
Guards wear a Guard Outfit. If you are near guards while wearing it, Infirmary Overalls, or a Civilian Outfit, the player’s heat will go up rapidly, 3% at a time in the Escapists 1, but 1% in the Escapists 2. It can be worn to grant you exclusive permissions (i.e., free desk looting). This item is especially useful during Lights Out, when you are prohibited from wandering around the prison as an inmate. However, if you don’t place a Bed Dummy in your bed at night and your cell is spotted empty, a lockdown will be called and you will be sent to solitary. This outfit will be confiscated immediately.
Opinion
This states how much a guard likes you. A guard with a low opinion of you will tear down sheets and posters placed by the player, and is more likely to call your name at roll call. A guard with a high opinion of you is less likely to call your name at roll call, and won’t attack you if they see you fighting. It is best to have guards to have a high opinion of you. In the Escapists 2, a guard with a lower opinion is more likely to keep watch of you.
Guard Quarters
Not to be confused with the Control Room.
In the Escapists 2, guards have an area within the prison that contains their own quarters. Extra guards will wander around here, never leaving the room until the security level rises. Despite their idleness, they can still raise heat, chase you around, and check cameras outside the guard quarters. Like inmate cells, each guard room has a desk and a bed. However, guard desks contain a narrower variety of loot (e.g. Medikit, Screwdriver, Adrenaline Shot). This area is restricted, so if you are seen by a guard or a camera, your will increase.
Routines[]
You always live in the middle row of cells on the 2nd row to the left. 8:00 is morning Roll Call. Failing to go to rollcall will cause a prison lockdown. After Roll Call, you have breakfast, which is a good time to take on favors and buy items. After breakfast is Free Period, which is good to plan your escape or complete favors to get cash. Lunch follows the first free period. Use Lunch the same as breakfast (NOTE:You could always skip out on these, but be careful of being spotted!) Your job follows lunch. If you’re unemployed, you can simply take on favors, talk to inmates or try and steal someone’s job. You can steal a job by beating the inmate with the job up so they get no work done. If you’re starting out you probably have laundry duty (See the jobs section on how to complete it.) Finish your quota and leave. A good tactic to complete your quota is leave items ready to go for tomorrow (Like putting 2 dirty outfits in the washer and leaving them for the next day.) Finish your job and head to the gym for either weights or a treadmill. Weights give you more strength and overall health while treadmills increase speed. If you become too fatigued or it’s time to go, head next door to the showers to reduce fatigue. After Shower Time, eat dinner just like breakfast and lunch, then enjoy your 3 hour free period. After, go to roll call and go to bed. Repeat until you escape!
Available jobs:
Janitor, laundry (default), kitchen, mailman, metalshop
Schedule[]
PC
| 08:00 — 09:00 | Morning Rollcall |
| 09:00 — 10:00 | Breakfast |
| 10:00 — 13:00 | Leisure \ Work Period |
| 13:00 — 14:00 | Afternoon Rollcall |
| 14:00 — 16:00 | Free Period |
| 16:00 — 17:00 | Evening Meal |
| 17:00 — 18:00 | Exercise Period |
| 18:00 — 19:00 | Shower Block |
| 19:00 — 22:00 | Evening Free Time |
| 22:00 — 23:00 | Evening Rollcall |
| 23:00 — 08:00 | Lights Out |
Console/Mobile
The free period music is different depending on your game version
- On PC the free period music is a unique Alcatraz free period soundtrack.
- On Console the free period music is the Stalag Flucht free period soundtrack.
- On Mobile the free period music is the Santa’s Sweatshop free period soundtrack. (Bug)
Summary[]
Every type of key opens another set of doors. Every guard (with the exception of some in HMP Irongate) randomly carries one of the five keys with them. The key will always be carried by the same guard.
You can knock out guards to steal their keys. A Cup of Molten Chocolate or Makeshift Stungun can one-shot a guard which can be useful to quickly take their stuff if you have low health.
It is not a good idea to do this outside, as your heat will increase to very high levels and you will be shot by tower guards.
Make a copy of that key with a Wad of Putty and return the key back to guard’s inventory. You can also place a key in an inmate’s desk. You can take it out and use after getting out of the solitary. If the guard wakes up and he doesn’t have his key, you will be sent to solitary.
This may also work on the console version.
Types
Cell Key (Yellow) ItemID: 0
Utility Key (Orange in PC, Cyan in Console and Mobile) ItemID: 7
Entrance Key (Purple) ItemID: 6
Staff Key (Red) ItemID: 1
Work Key (Green) ItemID: 43
The guards will have certain keys based on their order in the pre-game screen. Above you can see the order for PC. The guard to the leftmost position (Guard #1) has the Cell Key, the guy beside him (Guard #2) has the Utility key, and so on. After the 5th guard, the order loops.
On console the order is this:
1st Guard: Utility (Orange/Cyan)
2nd Guard: Work (Green)
3rd Guard: Entrance (Purple)
4th Guard: Staff (Red)
5th Guard: Cell (Yellow)
(Note: On Xbox One guard number does not matter)
The Cell key is only useful between 23:00 and 8:00, when cells are locked. Per its name, it allows to open the cell door, and, in certain prisons, a sub-section of the prison containing all the cells.
The Entrance key is only useful between 22:00 and 10:00, when exterior doors are locked. It open the doors that lead to the exterior yard, sometimes also an inner yard.
The Utility key can open utility areas, which usually leads to ladders to the roof or ventilation.
The Staff key opens critical areas prisoners can not access, such as the generator room, or the guards barracks.
The Work key can open workroom doors, such as the janitor room. Note that if you have a Job, you can access your job room without Keys, but not other jobs rooms (i.e. If you are a Janitor, you can access the Janitor room, but not the Tailor room).
Other info
Be sure to make note of which guards have which key. You can find out what number the guards have by writing down the guard order when naming your people or by simply giving the first 5 guards a specific name to recognize them. The key color unlocks the color lock as is on the door. The guards from 1st to 5th have the following keys Yellow, Orange, Purple, Red, Green. You can name them the color key they have to easily remember who has what color key.
Plastic Keys are contraband and they are made with a Key Mold and Molten Plastic.
A real key obtained by using the exploit works forever.
If you access the menu from an unconscious guard and have putty, select the key and touch X on Xbox or space on PC to make a key mold without needing to access the craft menu.
There are a few colored doors that don’t have their own respective key.
- Blue doors (with star icons in TE2) can only be opened by guards or while the player is wearing a Guard Outfit.
- White doors can only be opened by the staff (warden, guards) or unlocked by the player during a prison takeover in a lockdown. Silver doors in TE2 cannot be opened by players in any way, and only appear to open during escape cutscenes.
- Green doors with health symbols, which can only be opened by either the infirmary staff or a player wearing the Infirmary Overalls. (Mobile/Console edition only, and TE2)
Obtaining
Obtaining a key is as simple as knocking out a guard with a method of your choice. However, when the guard wakes up and doesn’t have the key, you will be sent to solitary. This can be resolved by crafting a less durable Plastic Key then putting the original back into the guard’s inventory.
Crafting
| Item | Requirements | INT |
|---|---|---|
| Key Mold | Wad of Putty x1 + Any Key x1 | 50 |
| Plastic Key | Key Mold x1 + Molten Plastic x1 | 80 |
The Escapists 2:
| Item | Requirements | INT |
|---|---|---|
| Plastic Key | Key Mold x1 + Molten Plastic x1 | 60+ |
Other info[]
Be sure to make note of which guards have which key. You can find out what number the guards have by writing down the guard order when naming your people or by simply giving the first 5 guards a specific name to recognize them. The key color unlocks the color lock as is on the door. The guards from 1st to 5th have the following keys Yellow, Orange, Purple, Red, Green. You can name them the color key they have to easily remember who has what color key.
Plastic Keys are contraband and they are made with a Key Mold and Molten Plastic.
A real key obtained by using the exploit works forever.
If you access the menu from an unconscious guard and have putty, select the key and touch X on Xbox or space on PC to make a key mold without needing to access the craft menu.
There are a few colored doors that don’t have their own respective key.
- Blue doors (with star icons in TE2) can only be opened by guards or while the player is wearing a Guard Outfit.
- White doors can only be opened by the staff (warden, guards) or unlocked by the player during a prison takeover in a lockdown. Silver doors in TE2 cannot be opened by players in any way, and only appear to open during escape cutscenes.
- Green doors with health symbols, which can only be opened by either the infirmary staff or a player wearing the Infirmary Overalls. (Mobile/Console edition only, and TE2)
Со скоростью молнии
Еще один способ для одиночного прохождения. Вам понадобится самодельная лесенка, кукла заключенного, реактивный движок, собранный вручную, форма охранника и отвертка. Создаются эти предметы следующим образом:
- форма медицинского работника: форма заключенного и 1 отбеливающее средство;
- форма охраны: чернила и форма медицинского работника;
- кукла заключенного: 2 подушки и 1 одеяло;
- реактивный движок: 1 мятная конфета (можно найти у офицера) и 1 банка с содовой;
- лесенка: 6 банок с краской (ставятся друг на друга).
Побег осуществляется довольно просто. Идите к месту, где проводится перекличка, и отыщите сооружение с губной гармошкой. Подойдите к нему и подставьте самодельную лесенку, чтобы дотянуться до вентиляционной решетки. Сломайте ее и начните идти в другое здание с мотоциклом. Воспользуйтесь ракетным движком, подсоединив его к технике, и уезжайте в закат как старина Биг Босс.
Прием
Прием
| Агрегатор | Счет |
|---|---|
| Metacritic | ПК: 71/100 XONE: 74/100 PS4: 71/100 iOS: 80/100 NS: 67/100 |
| Публикация | Счет |
|---|---|
| Информер игры | 6/10 |
| GameSpot | 8/10 |
| IGN | 7,6 / 10 |
| OXM (США) | 7/10 |
| X-One | 7/10 |
The Escapists получил в целом положительные отзывы, с версии для Windows и Xbox держит множество 71 из 100 и 74 из 100 соответственно на обзор агрегатор сайте Metacritic .
Обзоры подчеркивали свободу в подходе, которую позволяла игра, а рецензенты рассказывали истории своих прорывов. GameSpot писатель Cameron Вулси туннелирование его выхода, Official Xbox Magazine ( ОХМЫ ) писатель Энди Келли, описал пряча систему вентиляции побега крафта поддельного папье-маше вентиляционной крышки, в то время как X-One «s Дом Peppiatt прямолинеен shivved охранника и похитил его ключи.
Рецензенты были неоднозначны относительно кривой обучения, представленной игрой, даже положительные отзывы, такие как OXM , признали, что игра «не для всех», требуя от игрока «терпения и творческого ума». По мнению X-One, без подробного руководства игра «возможно, слишком сильно полагается на метод проб и ошибок». Кимберли Уоллес, пишущая в Game Informer, сочла, что этот метод проб и ошибок разочаровывает, обнаружив, что она «постоянно наказывается за ошибки и упущенный прогресс» из-за результатов, которые невозможно предсказать. С другой стороны, она чувствовала, что такой уровень сложности способствует «великому чувству выполненного долга, когда вы побеждаете».
Game Informer раскритиковал взаимодействие с другими заключенными как поверхностное и искусственное, требующее от игрока «скучных услуг», чтобы «просто метр». Ричард Коббетт, пишущий для IGN , отметил, что, несмотря на «очаровательную 16-битную графику», он быстро воспринимал сокамерников без сочувствия как «чистую головоломку», а не персонажей. Он также заявил, что «The Escapists представляет собой смесь песочницы, головоломки и экшена с открытым миром, предлагая что-то свежее и интересное». OXM чувствовал, что игра имеет характер, цитируя «забавные несеквитеры и отсылки к поп-культуре» неигровых персонажей . Дэн Уайтхед из Eurogamer согласился с этим, высоко оценив «процветающий социальный элемент» игры, который позволяет легко «втянуться в мелкие вендетты и мини-драмы повседневной тюремной жизни».
Eurogamer порекомендовал игру, заключив, что, хотя у нее были незначительные разочарования, «здесь нет ничего, что действительно портит то, что в остальном является восхитительной и бесконечно удивительной игрой». GameSpot закончил, сказав, что игра обеспечит часы приятного развлечения, а поскольку разработчик работает над инструментами для пользовательского контента , он может предоставить еще больше в будущем.
Инструменты
Ручка инструмента. Используется для создания кирки и лопаты. Для создания необходимо: Напильник +Дерево
Хлипкая кирка. Используется для удаления камня, также нужна для создания более прочных кирок. Для создания необходимо: Ручка инструмента + Лом + Клейкая лента . Требуется 40 интеллекта
Легкая кирка. Используется для удаления камня, также нужна для создания более прочных кирок. Для создания необходимо: Хлипкая кирка + Дерево + Клейкая лента. Требуется 60 интеллекта
• Прочная кирка. Как и остальные кирки, используется для удаления камня, является наиболее эффективной и прочной. Для создания необходимо: Легкая кирка. + Дерево + Клейкая лента. Требуется 80 интеллекта
• Хлипкая лопата. Используется для начала рытья подкопа, для рытья земли,а также нужна для создания более прочных лопат. Для создания необходимо: Ручка инструмента + Лист метала + Клейкая лента. Требуется 40 интеллекта
• Легкая лопата. Используется для начала рытья подкопа, для рытья земли, а также нужна для создания более прочных лопат. Для создания необходимо: Хлипкая лопата + Лист метала + Клейкая лента. Требуется 60 интеллекта
• Прочная лопата. Является наиболее эффективной и крепкой лопатой. Для создания необходимо: Легкая лопата + Лист метала + Клейкая лента. Требуется 80 интеллекта
• Хлипкие кусачки. Используются для разрезания чего либо, а также для создание более прочных кусачек. Для создания необходимо: Напильник + Напильник + Клейкая лента. Требуется 40 интеллекта
• Легкие кусачки. Используются для разрезания чего либо, а также для создание более прочных кусачек. Для создания необходимо: Хлипкие кусачки + Напильник + Клейкая лента. Требуется 60 интеллекта
• Прочные кусачки. Являются наиболее прочными и эффективными кусачками. Для создания необходимо: Легкие кусачки + Напильник + Клейкая лента. Требуется 80 интеллекта
• Электро отвёртка. Быстрее и прочнее обычной отвёртки. Нужна отвёртка, провод и батарейка. Требуется 80 интеллекта. С каждым использованием ломается на 5%. Ломает вентиляции на 20%
• Мульти-тул (Набор инструментов) . Является самым эффективным инструментом. Для создание необходимо:
• Прочная кирка + Прочная лопата + Клейкая лента. Требуется 95 интеллекта.
Так же, прочные инструменты (прочную лопату, прочную кирку и прочные кусачки) можно чинить.
Как вы знаете, у всех инструментов есть проценты, и если они будут равны нулю — тот сломаеться (пропадёт из вашего инвентаря). Но прочные инструменты жалко ломать, по этому я расскажу как их чинить.
• Для починки лопаты требуется — Прочная лопата + Лист металла + Клейкая лента. Нужно 80 интеллекта.
• Для починки кирки требуется — Прочная кирка + Дерево + Клейкая лента. Нужно 80 интеллекта.
• Для починки кусачек требуется — Прочные кусачки + Напильник + Клейкая лента. Нужно 80 интеллекта.
Источник
Master Craftsman крафт-лист для PS4/X1
Инструменты 1. Самодельная рукоятка = Файл (Напильник) + Дерево 2. Хлипкая кирка = Самодельная рукоятка + Клейкая лента + Лом 3. Легкая кирка = Хлипкая кирка + Клейкая лента + Дерево 4. Крепкая кирка = Легка кирка + Клейкая лента + Дерево 5. Хлипкая лопата = Самодельная рукоятка + Клейкая лента + Лист металла 6. Легкая лопата = Хлипкая лопата + Клейкая лента + Лист металла 7. Крепкая лопата = Легкая лопата + Клейкая лента + Лист металла 8. Хлипкие кусачки = Файл + Клейкая лента + Файл 9. Легкие кусачки = Хлипкие кусачки + Клейкая лента + Файл 10. Крепкие кусачки = Легкие кусачки + Клейкая лента + Файл
Оружие 11. Гребень-бритва = Гребень + Лезвие бритвы 12. Кастет = Клейкая лента + Лезвие бритвы 13. Молоток в носке = Носок + Кусок мыла 14. Супермолоток в носке = Носок + Батарея 15. Нунчаки = Дерево + Провод + Дерево 16. Кнут = Дерево + Провод + Лезвие бритвы 17. Растаявший шоколад = Чашка + Зажигалка + Шоколад
Одежда 18. Комбинезон = Роба заключенного + Хлорка 19. Форма охранника = Комбинезон + Чернила 20. Роба заключенного с мягкой подкладкой = Роба заключенного + Клейкая лента + Подушка 21. Роба заключенного с подкладкой = Роба заключенного + Клейкая лента + Синяя книга 22. Укрепленная роба заключенного = Роба заключенного + Клейкая лента + Лист металла
Предметы для побега 23. Ложная крышка = Папье-маше + Папье-маше 24. Ложный стеновой блок = Папье-маше + Папье-маше + Чернила 25. Ложная заслонка = Провод + Провод + Провод 26. Плакат = Клейкая лента + Фиолетовый журнал 27. Чучело = Подушка + Подушка + Простыня 28. Контрабандная сумка = Клейкая лента + Фольга 29. Голова крюка = Лом + Клейкая лента + Лом 30. Якорный крюк = Голова крюка + Веревка 31. Веревка из простыни = Простыня + Простыня 32. Деревянная скоба = Дерево + Дерево 33. Нелакированный стул = Дерево + Дерево + Дерево
Компоненты 34. Свеча = Батарея + Провод 35. Папье-маше = Клей + Туалетная бумага 36. Жидкая пластмасса = Пластиковая вилка (ложка или гребень) + Зажигалка 37. Замазка = Зубная паста + Тальк 38. Оттиск ключа = Замазка + Ключ (для получения трофея понадобится скрафтить 5 ключей каждого цвета и, следовательно, 5 различных оттисков). 43. Пластиковый ключ = Оттиск ключа + Жидкая пластмасса
Сюжетные предметы 48. Подписанные бумаги = Неподписанные бумаги + Перо + Чернила (Доступны только на уровне в джунглях). 49. Еж = Клейкая лента + Гвозди (Гвозди можно раздобыть только в тюрьме San Pancho). 50. Парус = Дерево + Простыня (только на 6 уровне в тюрьме HMP-Irongate). 51. Основание плота = Пробковое дерево + Пробковое дерево + Веревка (только на 6 уровне в тюрьме HMP-Irongate). 52. Самодельный плот = Основание плота + Веревка + Парус (только на 6 уровне в тюрьме HMP-Irongate). 53-57. Кроме того, устроившись портным, надо сшить все доступные виды одежды: шляпу, футболку, шорты, трусы и носки.
Источники
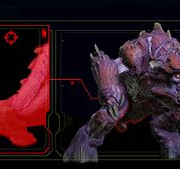
Riot Guards (The Escapists 2 Only)[]
Main article: Riot Guard
A SWAT Guard
Where SWAT guards spend most of their life…
Riot Guards or SWAT guards are riot specialized guards that rest in the Control Room until the Lockdown state is triggered. They’re better equipped than normal guards with Metal Batons and Riot Guard Outfits. They won’t be knocked out with a single hit from a Makeshift Stungun or Cup of Molten Chocolate, the player must hit twice to knock out a SWAT guard. There are always two of them in every classic prison. They function identically to other guards (e.g: they report escape attempts or damage and attack mischievous Inmates). Knocking one out is also the only way to obtain the weapons and armor they use. The Control Room contains the contraband desk which holds confiscated items and items that can be required for some Favours. One of them always has a Purple Key and the other a Red Key. Defeating them can be difficult; you either need a weapon, armor, good stats, or a good strategy.
Note from someone: In Santa’s Shakedown you can go to the 2nd floor from the Control room and do something to alert the camera, once a swat guard checks it out, you can attack him, don’t worry about being knocked out, you’re in the medical bay, right?
Jobs[]
- Janitor (10 intellect)
- Tailor (30 intellect)
- Woodshop (50 intellect)
At the beginning, all three jobs are already occupied by another prisoner on PC. To get a job, you’ll need to beat one down, or at least occupy him during a big part of the Work Period.
On console and mobile the player starts with the Janitor job.
A good strategy is to attack him on the way of his job, then let him run after you for the next two minutes, making sure not to distance him too much. You can also stop near a guard, and let him attack you. The guard will then target him, and beat him down. There, to win additional time, you can steal his prisoner outfit; once awakened, he will have to go back to his cell to get a new one, and will surely be unable to meet his quota, and then get fired.
The Escapists 2 советы и приемы для начинающих

В последней игре The Escapists 2 вы должны найти способ побега из тюрьмы. В этом руководстве для начинающих вы сможете узнать все необходимые нюансы, а также лучшие советы.
Основы
Первое, что вам нужно сделать, это завершить учебник. Будьте внимательны, поскольку вы получите полезную информацию, и она поможет вам на протяжении всей остальной части игры. Есть 6 статистических данных, 3 из них вы можете улучшить.
- Здоровье: Ваша общая жизнь. Когда показатель достигнет 0, вас доставят в лазарет.
- Выносливость: Сколько энергии у вас есть. Вам нужно это для выполнения таких действий, как упражнение, учеба или копание.
- Тепло: это уровень подозрительности ваших охранников. Если он станет высоким, они начнут следовать за вами. Если он станет слишком высоким, они будут бить вас, пока вас не привезут в лазарет или одиночное заключение.
Ниже приведена статистика, которую вы можете улучшить. Каждый из показателей может достигнуть 100.
- Сила: влияет на то, сколько урона вы наносите.
- Фитнес: влияет на то, сколько выносливости вы теряете во время занятий.
- Интеллект: влияет на то, что вы можете делать.
Лучше максимизировать Фитнес, а затем работать над Силой. Максимальное количество Интеллекта, необходимое вам для создания всего, — 70.
Появляйтесь на каждом мероприятии
Если вы не будете появляться на всех мероприятиях, охранники станут подозрительными. К счастью, все, что вам нужно сделать, это показаться, тогда вы можете сразу уйти. Как только вы увидите зеленую галочку, вы можете делать все, что хотите, и охранники не будут подвергать вас сомнению.
Используйте групповые действия
Групповые действия, такие как Перекличка и Обеды, — лучшее время для приобретения и завершения квестов Заключенных, потому что все будут в одном месте. Есть много квестов, где вам необходимо передать предмет другому заключенному. Так как все здесь, это быстрые и легкие деньги.
Используйте с пользой свободное время
Вам необходимо держать ваши статистические данные на достаточно высоком уровне, для обеспечения запланированного побега, и вам нужно выбрать лучшие места и время для этого. Свободное время — это самый длинный период времени, когда вы можете сделать что-то, поэтому используйте его с умом.

Проверяйте стол каждого заключенного
Заключенные хранят в своих столах всевозможные крафтинговые материалы и другие полезные предметы. Взятие их сэкономит много времени и денег. Только не задерживайся слишком долго, если охранник увидит вас, начнет что-то подозревать.
Как получить работу
Во время Рабочего времени, появится стрелка, которая идет к комнате. Если вы войдете в комнату, рабочий сядет с вами, подаст жалобу, и вы заработаете деньги.
Если у вас нет работы, идите на знак, ведущий не в комнаты, исможете подать заявку на работу. Вы можете потерять работу, пропустив ее 3 дня подряд, поэтому обязательно выполняйте свою трудовую квоту каждый день!
Умело скрывайтесь
Всякий раз, когда вы повредите какое-либо имущество в тюрьме, это будет обнаружено, и появится сигнал тревоги. Также все повреждения будут исправлены, сведя на нет все ваши усилия. Вы можете исправить это, спрятав свою работу. Создайте плакат, если вы пробиваете стены. Если вы копаете дыру в своей камере, вы можете взять свой стол и поместить его над отверстием, чтобы скрыть его. Если вы проходите через вентиляционные отверстия в потолке, вы захотите создать фальшивую крышку.
The Escapists 2 — сиквел к игре 2015 года от Moldy Toof, аркадного 2D-платформера с элементами логики и постановки RPG. Игрокам предстоит перевоплотиться в заключенных, пребывающих в тюрьмах строгого режима с усиленной охраной. Им необходимо разработать план побега. Для этого необходимо найти союзников, а также различные предметы, подходящие для создания полезных инструментов для достижения поставленной цели. По сравнению с оригиналом, игра содержит множество улучшений, таких как новые способы свободного времени, модифицированная боевая система, возможность создания ранее недоступных предметов.
3rd Strategy[]
Another strategy (which also works on Console!) is extremely easy.
All you will need is
- A Fake Wall Block
- A Bed Dummy
- A Red Plastic Key
- A Guard Outfit
- And a Sturdy Pickaxe
So once you have all of these items, you will basically be all set to escape. Just wait until evening rollcall.
Right when it begins, or just before, place a bed dummy in your bed. Then, wait a few seconds during the rolecall (like one second after all three guards arrive) then get into the solitary room, change into a guard outfit then walk around to the door that leads to the other part of the prison. Try to evade the guards as much as possible but do not worry if one or two see you. There is a door with a red key lock in one of the electric fence areas on the right side. When you find it, go through using the red key and walk down outside of the upper right corner of the barracks. dig under using your pickaxe and once your tunnel; in underneath the inside of the barracks, dig up and cover the inside hole. Now there will be two locks, you can get through both with just the red key. Once you get through both of those doors. you will be on the docks. Walk to the area of it where it extends outwards (where the boats would be) and once you are in the area the game will end. You have escaped!
The Escapists 1 DLC Prisons
The following is only in The Escapists 1’s DLC Prisons and are unobtainable in The Escapists 2.
Escape Team
| Item | Requirements | Intelligence Required | Extra Info |
|---|---|---|---|
| Makeshift Tank Turret | Makeshift Tank Barrel + Makeshift Tank Firing Base + Roll of Duct Tape | 20 | |
| Makeshift Tank Barrel | Metal Tube + Metal Tube + Roll of Duct Tape | 20 | |
| Makeshift Tank Firing Base | Corrugated Iron + Corrugated Iron + Roll of Duct Tape | 20 | |
| Makeshift Explosive Round | Metal Cone + Explosive Compound | 40 | |
| Explosive Compound | Mixing Container + Explosive Mix | 40 | |
| Explosive Mix | Charcoal + Potassium + Fertilizer | 60 | |
| Makeshift Fuse | Lighter + Taper | 80 |
Duct Tapes Are Forever Crafts
| Item | Requirements | Intelligence Required | Extra Info |
|---|---|---|---|
| Voice Recording | Memoir Tapes x1 + Tape Player x1 | 60 | |
| Fake Fingerprint | Weak Fingerprint x1 + Blue Putty x1 | 60 | |
| Weak Fingerprint | Dirty Glass x1 + Tub of Talcum Powder x1 + Sticky Tape x1 | 60 | |
| Metal Rimmed Hat | Cutting Laser Watch x1 + Pork Pie Hat x1 + Sheet of Metal x1 | Unknown | |
| Flamethrower | Hairspray x1 + Lighter x1 | Unknown |
Santa’s Sweatshop Crafts
| Item | Requirements | Intelligence Required | Extra Info |
|---|---|---|---|
| Presents | Wooden Scooter x1 + Wrapping Paper x1 + Sticky Tape x1 | Unknown | |
| Presents | Wooden Block x1 + Wrapping Paper x1 + Sticky Tape x1 | Unknown | |
| Presents | Wooden Doll x1 + Wrapping Paper x1 + Sticky Tape x1 | Unknown | |
| Presents | Wooden Ball x1 + Wrapping Paper x1 + Sticky Tape x1 | Unknown | |
| Tinsel | Glitter x1 + Roll of Toilet Paper x1 + Tube of Super Glue x1 | Unknown | |
| Fairy Lights | Bulbs x1 + Wire x1 + Battery x1 | Unknown |
Как сбежать с карты K.A.P.O.W Camp в The Escapists 2
Для побега с различных тюрем в игре The Escapists 2 зачастую приходится хорошенько пораскинуть мозгами. К тому же нужно постоянно следить за охранниками и отмечать их распорядок дня. Однако даже при тщательном изучении новой локации бывает довольно трудно понять, что на ней нужно сделать, чтобы сбежать. Если подобная проблема случилась с вами на карте K.A.P.O.W Camp, то мы советуем прочитать наше руководство, где указаны основные способы побега с нее как для одиночного, так и для многопользовательского режима.
В принципе ничего экстраординарного в этой карте нет. Главное – это не попадаться на глаза охранникам, иначе вы наберете слишком много звезд, что значительно усложнит побег. За прохождение данной локации вы получите трофей «Побег из лагеря!» .
Тюрьма Area 17
Первый побег
Только для мультиплеера.
После этого идите на запад по коридорам и найдите лестницу, ведущую к красной двери. Действуйте вдвоем, чтобы открыть её, затем осмотрите посадочную площадку луны внутри комнаты. Найдите предмет, спрятанный внутри, отнесите его в безопасную зону и сохраните.
Для следующей части плана вам понадобится монтажная плата, радиоприемник и ножницы. Со всеми предметами в руках, включая предмет с посадочной площадки луны, идите к югу от зоны переклички и найдите комнату с наименьшей степенью защиты. Здесь отключите питание, которое сделает бесполезным детектор контрабанды. Теперь поднимитесь по лестнице, и вы окажетесь в очень низкой зоне безопасности. Здесь вы должны прорезать два забора с отключенным питанием.
Доберитесь до корабля и начните его ремонтировать, используя все предметы, которые вы собрали. Как только корабль будет полностью отремонтирован, вы сможете сбежать из тюрьмы.
Escape Plan[]
First, you’ll need to work on your strength. After you have a good amount of strength, knock out a soldier and take a Taper and a Mixing Container. Also take a Guard Outfit, as you will need it next. Craft the Taper with a Lighter to create the last item you’ll need, the Makeshift Fuse.
Now, take the guard’s outfit and go into the Soldier sleeping area northeast of the shower block. This area has green beds. You will need the Guard Outfit to enter. There is a green desk with a Target on it. Open it, and take one Charcoal. You should enter this area when there aren’t other guards around, as they will bust you if they catch you, even with the Guard Outfit on.
Next, knock out the officer with the red staff key and create two key molds using Putty and Molten Plastic. After creating fake keys, head southeast of the map. There should be a somewhat large building, just east of solitary. You should see a red double door north of the building. You can either use the Plastic Staff Key you created or chip the wall next to it to get in. Keep in mind, you can only enter at night if you choose to chip the wall, as you will instantly be sent to solitary if the wall is gone during the day. There should be a desk near the bottom of the building. Open the desk and take a Metal Tube, a Corrugated Iron, and a Metal Cone. You will also need to head north of the building. There is a wall completely surrounding a green desk with a target on it. You will need to chip this wall, but you can do so during the day. You will need to use a poster to cover the hole. Keep in mind that the guards are less likely to find you chipping if you chip the east wall rather than the west wall. Take one Potassium.
You can complete this next step in one of two ways. The easiest is to get the Gardener Job. To get this job you will need to distract the inmate who has the job. This shouldn’t be too hard, as you can just recruit them for the whole job period as long as their opinion is above 90. You can also chip into this building, or obtain the green work key and use that to enter. After you enter using one of these methods, take one bag of Fertilizer. After that, you won’t need to enter this room again.
Finally, there is a building with two metal containers and one green desk with a target on it. Enter this building by chipping it and using a poster or by using the red staff key. Take a Metal Tube and a Corrugated Iron.
Return to your cell and craft a Makeshift Fuse, Makeshift Explosive Round, and the Makeshift Tank Turret. (See above for crafting recipes)