Running a server (advanced topics)
Содержание:
- Installation: Steam tool
- Gameplay
- Other credits
- Installation: Standalone application
- Monsters & Weapons
- Starting a server: Console
- Server administrators
- Cheat commands
- Network[edit]
- Interaction
- Connectivity
- Introduction
- Monster models
- The monsters
- Setting up Sven Co-op
- Video[edit]
- The weapons / equipment
- Previous contributors
- Mechanical
- Artists
- The music
- Sven Coop в конце недели
- The allies
- Mapping and Modeling Community
- Passwords
- Maps
- Installing custom maps
Installation: Steam tool
Our dedicated server package in Steam will allow you to effortlessly install a server attached to your Steam account. It’s quick, easy, and should be up and running as fast as you can download it. This is an ideal approach for temporary / part-time servers. You will require a valid installation of Sven Co-op to continue.
Instructions are as follows:
- Launch Steam and log in.
- In the main Steam screen hover over Library and click Tools.
- Scroll down the list of available tools until you see Sven Co-op Dedicated Server.
- Double-click the package to install it.
- Follow the on-screen installation.
That is it. You should now have the dedicated server tool ready to launch. Double-click the tool in the library and select Play Sven Co-op Dedicated Server to launch a server with a .
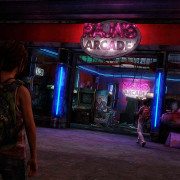
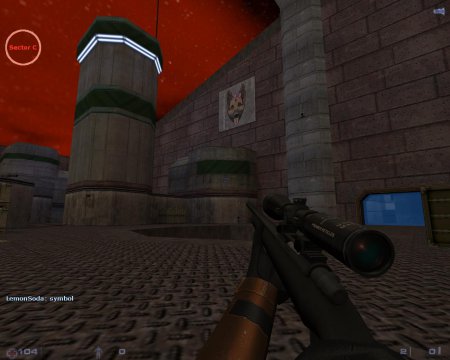
Gameplay
In-Game screenshot
Since Sven Co-op is heavily based on the original Half-Life, it is essential that you are at least familiar with Half-Life and its controls, and it is recommended that you have completed Half-Life’s Hazard Course.
The single-player campaign of Half-Life 1 is supported by Sven Co-op, but in a slightly altered form to create more challenge for multiplayer games.
SC levels are set as missions and are generally separate from each other. Many missions span several maps, and some are collected together in a series. The aim of most levels is to reach the end or to achieve an objective — obtaining a high score is not essential to beat a level, its just part of the fun. Map scenarios include settings set in Black Mesa, cartoony worlds, World War 2 in Africa, Fantasy-like maps and modern urban warfare set in the Middle East.
Some of the most major features of the mod include:
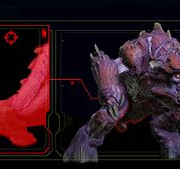
- In-Game Monster/Player Info System, that displays info about the monster or player you are looking at.
- The ability for mappers to create friendly monsters and let players issue orders to them.
- The ability for mappers to change the models and sounds of each monster and weapon.
- A medkit weapon that heals other players and allies.
- Major Monster AI improvement
Other credits
| Menu background | Created by Joanna «LemonSoda» LempiainenHuman models by RomkaTouched up by Josh «JPolito» Polito and Adam «Adambean» Reece |
| Menu music | Pavel «Pavel_Perepelitsa» Perepelitsa |
| Cyborg MP3 music | Steve «Blevo» Blevin |
| HLLibHLExtract | Ryan «Nemesis» Gregg |
| FMOD sound system | Firelight Technologies |
| Model bug fixes | Peter «WAR_Nuker» KavanaughBenjamin «Mr. Mazur» F.Josh «JPolito» Polito |
| Game manualScore board iconsPlaylist editor tool | Adam «Adambean» Reece |
| Map compiler tools | Sean ‘Zoner’ Cavanaugh»Vluzacn»Martin «Silencer» M.Adam «Adambean» ReeceAdam «Amckern» McKern |
Installation: Standalone application
Our dedicated server package is also available as a standalone package available via the SteamCMD tool. Though it requires further knowledge to install and use you will benefit from a server that doesn’t depend on your Steam client, can be run as a console application, and even be run as an unattended system service. Permanent / full-time servers should opt for this approach. You will also NOT require an existing Sven Co-op installation to continue.
Do not use this method of installation if you are unfamiliar with some basic server administration concepts such as using a command prompt or terminal environment, and reading/writing configuration files.
Instructions are as follows:
- Open a command prompt or terminal environment on your system.
- Download and install SteamCMD .
- Download our dedicated server package with the following command:steamcmd +login anonymous +force_install_dir "C:\SvenDS" +app_update 276060 validate +exitReplace the path C:\SvenDS with a location to your preference.
- Wait for the package to download and validate.
Once it has finished you can use the SvenDS.exe executable to launch a server. Launching without any arguments will start it with a , or if you specify the -console argument it will start with a .
The same command is used to update the server application too, however be sure you have no server instances running or the update will fail.
Monsters & Weapons
Sven Co-op includes several new monsters and weapons. Most of these come from the Half-Life Expansion Half-Life: Opposing Force, but have all been coded from scratch.
The new monsters included in the game are: The Pit Drone, Shock Trooper, Shockroach, Barney and Soldier Zombie, Baby and normal Voltigore, Gonome, Male Assassin including the Osprey, Otis, Cleansuit Scientist and the new Grunts, all from Half-Life: Opposing Force.
Sven Co-op also includes three other monsters, namely the Baby Gargantua, the Robo Grunt and the Heavy Weapons Grunt. The last two were originally supposed to be included in Half-Life, but were cut.
The new weapons included are the Barnacle, Pipewrench and M40a1 Sniper Rifle, from Half-Life: Opposing Force.
Sven Co-op also includes some original weapons, namely a Medkit, Single and Akimbo Uzis and a Minigun. There is also a small secret weapon included.
Starting a server: Console
This option is only available to the standalone application. You will need to open a command prompt or terminal environment on your system then change the working directory to your Sven Co-op dedicated server installtion (usually C:\SvenDS).
Next you need to build a command to launch your server. The following list of arguments and parameters will determine how your server starts. Be sure to split them up with a space. Pay attention to those beginning with a hyphen (arguments) and those beginning with a plus (parameter), as they will not work with the wrong symbol. Sections highlighted before the colon are the parts you type, and underlined sections are parts you change.
- SvenDS: The name of the application, does not need to have «.exe» on the end.
- -console: Required, or your server will start in .
- -game modname: Only needed if you are running a mod on our engine, otherwise ignore this.
- +ip ipaddress: Only needed if your computer has more than one IP address assigned to it, and you need to specify which address to listen on.
- -port 27015: Chooses the network port to listen on, usually 27015 unless you’re running more than one server on the same IP address.
- +maxplayers 12: The maximum number of players that can be on your server at one time (2-32). It will be 12 if you do not specify this.
- +map _server_start: Specify which map to launch the server on. If you do not specify this your server will remain stuck in an un-connectible state!
- +log on: Start a log file for the server console (recommended).
Here is a simple example to start an 8-player server on map stadium4 listening on port 27015 with logging enabled:
SvenDS -console -port 27015 +maxplayers 8 +map stadium4 +log on
Server administrators
Sven Co-op has a (minimal) framework for server administrators and owners to get some representation of their status and some basic functionality to help control the game session.
These players are given this status by declaring their Steam ID within the file adminsfile (pointing to «admins.txt» by default). To give a player administrative status simply write their Steam ID on a line in this file. You can write comments after if you want to keep note of the players’ handle.
Server administrators will be shown as such on the score board with the icon . If the server is yours you can also denote yourself as such by placing an asterisk ‘*’ before your Steam ID, for which you will get a tinted icon . No additional functionality is currently available to owners, it’s mainly for show.
Here is an example of how your administrator list file could look:
// Owners/operators
*STEAM_9:1:488201	# Paul (owner)
*STEAM_9:0:38195	# Jane

// Administrators
STEAM_9:0:95482		# Dave
STEAM_9:1:5828645	# Emily
STEAM_9:1:1522834	# sUpErDeAn
STEAM_9:0:864923	# Zamnuzi
You do not have to include your Steam ID if you are only going to be running a listen server (i.e. for a temporary map test session). As a player hosting a listen server, you are automatically given the ownership status.
The only administrative functionality built-in currently provided is the ability to use , primarily because this feature is fairly new to the game. We will be including more functionality in future releases, however our scripting platform is able to determine if a player is an administrator or owner. Anyone can write a server plug-in script to boost the functionality available without a complicated permissions base.
Cheat commands
The cheat commands built-in to Sven Co-op can only be used under certain conditions:
- If the server is for Internet players, it cannot have a maximum capacity of more than 3 players — LAN servers do not have this restriction.
- If CVAR «sv_cheats» is 1 anybody can use cheat commands.
- If CVAR «sv_cheats» is 2 only can use cheats, and will not be subject to the server capacity restriction.
- If CVAR «sv_cheats» is 255 anybody can use engine diagnostic settings (such as gl_wireframe) even in a multi-player game.
If a cheat command is attempted and these conditions are not met the player is told why, and the server will log this event (or print it in the console if logging is disabled).
Cheat commands are useful for private testing sessions, particularly for map authors as they provide some useful controls and limited debugging capabilities. If this is for you we advise you check the provided file «map_test.cfg» as this contains a range of command aliases and bindings to help you do this.
Here is a list of cheat commands currently available:
| Command | Parameters | Description |
|---|---|---|
| Basic modes | ||
| godmode | = disable1 = enable | Enable or disable god mode.You will be immune to all damage against your health, but not HEV battery. A map entity can still forcibly kill you, and the kill command will still function as normal. |
| cl_noclip | = disable1 = enable | Enable or disable no-clipping mode.You will be flying instead of walking, and can move through solid matter like a ghost. You will not be non-solid yourself though, meaning NPC’s can still touch/damage you, and you will still interact with brush based triggers. |
| cl_notarget | = disable1 = enable | Enable or disable non-targetable mode.You will be completely invisible to all NPC’s, though they can still hear you (they will try to find you), and can damage you by accident. |
| cl_nonsolid | = disable1 = enable | Enable or disable non-solid mode.You will become non-solid like a ghost, thus players, NPC’s, and brushes can pass through you without touching/damaging you. If something moves inside you and stays there however, you will be unable to move away as that other object is still solid. You will also not take damage from solid type objects (bullets/blades/etc), but particle type damage (explosions/fire/freeze) will still hurt you. |
| Equipment & status | ||
| give | Weapon/ammo/item name | Give yourself some equipment (weapons, ammo, and items).Names should reflect the entity name of the equipment, for example weapon_shotgun, ammo_rpg, or item_longjump. You cannot use this to obtain item_inventory based items, use the trigger command instead.You can technically give yourself any entity (such as a monster), but be warned the effects can be anything from humorous to catastrophic. |
| giveallimpulse 101 | N/A | Give yourself every weapon in the game with some ammo for it. The minigun and shock rifle are omitted due to their exclusive usage constraint. |
| givepoints | Number | Give yourself score/points. You can use a negative value to deduct points. |
| reviveme | N/A | Revive yourself if you’ve been killed. You will be revived with half health. |
| healme | N/A | Fully restores your health. |
| chargeme | N/A | Fully charges your HEV suit battery. |
| Map testing/debugging | ||
| teleport | Co-ordinates as X Y Z | Teleport yourself to specific co-ordinates. |
| trigger | Map entity name | Trigger an entity in the map by its target name.This is best avoided for all but map authors, or those with good knowledge of the map in question. You as an entity will be passed to that entity as its activating and calling entity. |
Network[edit]
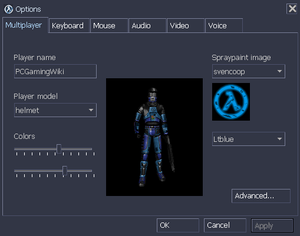
In-game multiplayer settings.
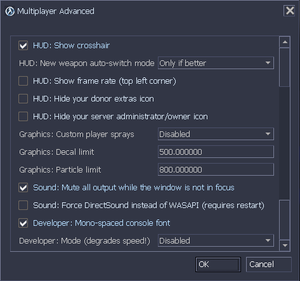
In-game advanced multiplayer settings.
Connection types
| Type | Native | Notes |
|---|---|---|
| Matchmaking | ||
| Peer-to-peer | Steam NAT punch-through service can used to connect individual peers without firewall configuration as of version 5.19. Open the console (~) and use command to connect to a person’s game. | |
| Dedicated | ||
| Self-hosting | Only LAN, by default. Use sv_lan 0 in the main menu and, if you have port forwarding set up, others can connect with the command. | |
| Direct IP | Open the console (~) and use followed by the IP and port. |
Ports
| Protocol | Port(s) and/or port range(s) |
|---|---|
| UDP | 27005 (client), 27015 (server), 26900 (VAC), all configurable with CVARs , , and respectively. |
- This game does not support Universal Plug and Play (UPnP) for automatic port configuration.
Interaction
In order to help your team complete missions effectively with allied characters, there are a set of commands you can use (and bind to a key) to interact with the allied characters around.
All allied characters will follow the players in the same way scientists or Barney does in regular Half-Life. Simply use them once to make them follow you, then use them again to make them stay where they are.
All allies that are following you can now be given simple commands. You can set keys to these commands in the control options.
| Command | Description | Recommended key |
|---|---|---|
| npc_attackmytarget | Your followers will attack the enemy currently in your cross-hair. | V |
| npc_findcover | Your followers will look for a good covering position. — This is automatically done when you use the grenade warning command, so you won’t need to configure this. | X |
| npc_return | Your followers will immediately return to your position. | C |
| npc_moveto | Your followers will immediately walk to the location you’re aiming at. You’ll see a spark to confirm where you’re sending them to. | , (comma) |
| medic | A near by medic will come to heal you. You’ll also alert other players that you’re asking for medication. | Z |
| grenade | Alerts other players that they should take cover. This will automatically perform the npc_findcover command too. | X |
There are some combinations you can set on these keys for better interaction, for example:
- bind X «grenade; say_team Look out!»
- bind Z «medic; npc_return; say_team Medic please.»
- Friendly opposing force grunts are dressed in jungle camouflage, and hostile opposing force grunts are dressed in the standard white urban camouflage. While this is different from opposing force, this is necessary to keep the same style as the standard grunts in Sven Co-op. Just remember, green is good, white is bad.
- Players caught by Barnacles will not be able to call for aid. Other players will only hear a struggle.
Connectivity
Once you have got your server up and running and you want players to connect to it over the Internet it is likely that your server will be behind a firewall, a router with a firewall, or a router using network address translation (NAT). This is likely to mean you will require some additional configuration of one or more of these in order to make your server world visible.
The most likely scenario particularly for game servers at residential properties is a router using network address translation. This is where one public IP address is assigned to a NAT router at home, of which is then shared between one or more computers/devices using a private address network. The easiest way to determine if this is the case for you is to do the following:
- Open a command prompt or terminal environment on your system.
- Submit command: ipconfig (on Windows) or ifconfig (on Linux).
- Take note of the numbers to the right of the IPv4 Address row.
Ignore any network device that shows one of these address ranges, because they are not connected to the Internet anyway:
- .0-255.0-255.1-254.
- 127.0-255.0-255.1-254.
- 169.254.0-255.1-254.
Check if your IPv4 address is within the following ranges:
- 10.0-255.0-255.1-254.
- 172.16-31.0-255.1-254.
- 192.168.0-255.1-254.
If this is the case you are definitely behind a router using NAT. You will need to configure port forwarding on your router in order to make your game server world visible. Because there are literally thousands of different home router models worldwide we are not going to guide you on how to do this. Instead visit www.portforward.com to find a set of instructions specific to your router. You will also need administrative permission on your router in order to make this adjustment, so if it isn’t yours ask for permission first.
Our server application only uses the following transport ports. You can amend these using the corresponding command line parameter.
| Port | Protocol | Parameter | Description |
|---|---|---|---|
| 27015 | UDP | -port | Game & content transfers traffic |
| 27015 | TCP | -port | Remote console (RCON) traffic |
| 26900 | UDP | -sport | Valve anti-cheat (VAC) service traffic (auto-increments from default if taken to the next available port) |
Introduction
Sven Co-op is a co-operative based game based around Valve Software’s Half-Life. In this game players must work together against computer controlled enemies and solve puzzles as a team.
It is ideal that you are at least familiar with Half-Life and its controls, and it is recommended that you have completed Half-Life’s hazard course.
While Sven Co-op is similar to Half-Life with similar weapons, monsters, and characters, the difficulty has been increased to suit team play.
Sven Co-op’s levels are set as missions and are generally separate from each other. Many missions span several maps and some are collected together in a series. The aim of most levels is to reach the end or to achieve an objective — obtaining a high score is not essential to beat a level, its just part of the fun.
Monster models
| ApacheFemale Assassin | RomkaRussell «Rusty» HarrisBenoit «Der Graue Fuchs» Hanikenne |
| Human gruntsHeavy weapons gruntMale assassinOpposing Force gruntsOspreyPit drone | Russell «Rusty» HarrisBenoit «Der Graue Fuchs» Hanikenne |
| BarnabusOtisOtto | Ambient-ImpactRussell «Rusty» Harris |
| BarneyBullsquidScientist | Taehl |
| Chubby | Paladin |
| Government man | Marphy Black |
| RobogruntShock roachSqueak nest | Benoit «Der Graue Fuchs» Hanikenne |
| Tentacle | H4wk |
| Tor | Shannon CaldwellKune |
| Zombie | Ambient-ImpactTaehl |
| Zombie Soldier | Russell «Rusty» Harris |
| They Hunger: Barnabus | Teddy «TeddyBear» Bergsman Lind |
| They Hunger: Gonome | LiquidatorKune |
| They Hunger: Head bug | Peter «WAR_Nuker» Kavanaugh |
| They Hunger: Zombie rat | Sph!nx |
| Other They Hunger monsters | Black Widow Games |
| Alterations & additional animations | Peter «WAR_Nuker» KavanaughBenoit «Der Graue Fuchs» HanikenneRussell «Rusty» HarrisBenjamin «Mr. Mazur» F.Josh «JPolito» Polito |
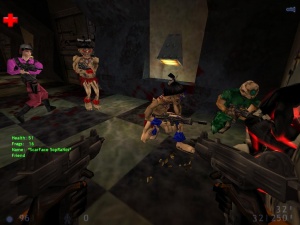
The monsters
|
Stopping you from achieving your objectives are the computer controlled monsters (AI enemies). These appear in greater numbers than players and are a lot smarter than they were the original Half-Life, with new tactics and abilities. In most cases, monsters are hostile and should be killed as soon as possible. Occasionally however, you will meet friendly (player allied) monsters, who can follow you and attack your enemies (more on that later). Sometimes these monsters may be similar to generic Half-Life monsters, but in other cases they may be stronger, faster or have new attacks. When playing a new map, you can never be certain of what you might find yourself up against.
|
Setting up Sven Co-op
Here is how to install Sven Co-op:
- Install Steam and register an account if you haven’t already.
- Launch Steam and log in.
- Visit the Sven Co-op store page so you can activate Sven Co-op on your Steam account.
- In the main Steam screen click Library.
- Scroll down the list of available games until you see Sven Co-op.
- Double-click the package to install it.
- Follow the on-screen installation.
Once completed Sven Co-op will appear in your Steam library. Simply double-click it to start.
Before playing you should set your game options. To do simply select Options from the title screen, then go through the tabs until you’re happy. Be sure to check out what the controls are.
Once you’re ready click Find servers to find a game server to play on.
Video[edit]
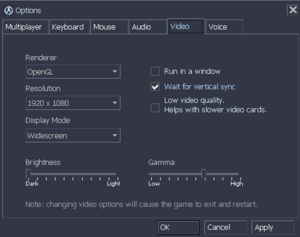
In-game video settings.
| Graphics feature | State | Notes |
|---|---|---|
| Widescreen resolution | Hor+ since 5.04 (July 2016), was Vert- prior. | |
| Multi-monitor | ||
| Ultra-widescreen | ||
| 4K Ultra HD | Render resolution is always upscaled to desktop resolution. | |
| Field of view (FOV) | See . | |
| Windowed | ||
| Borderless fullscreen windowed | See . | |
| Anisotropic filtering (AF) | Controlled by CVAR , values 0-16. | |
| Anti-aliasing (AA) | 4x MSAA; disable with Command line argumentDriver antialiasing cannot be forced, however in-game MSAA can be enhanced.Enhanced Transparency SGSSAA is blurry on oblique angles. Use Nvidia Profile Inspector to enhance the with , , , or HSAA (Hybrid Sampled Antialiasing) in Antialiasing — Setting instead, leaving transparency supersampling disabled. | |
| Vertical sync (Vsync) | ||
| 60 FPS and 120+ FPS | Capped at 200 FPS. See . | |
| High dynamic range display (HDR) |
Field of view (FOV)edit
- Changing the FOV can be done with the CVAR.
| Console[citation needed] |
|---|
|
| Config files[citation needed] |
|---|
|
Borderless fullscreen windowededit
| -window -noborder[citation needed] |
|---|
|
High frame rateedit
| Set FPS limit[citation needed] |
|---|
fps_max "<desired FPS value>"
fps_override 1
The fps_override 1 command disables Svengine’s arbitrary 200 FPS limit. 4. Save the file and launch the game. |
Disable texture blur (bilinear texture filtering)edit
| Modify [citation needed] |
|---|
gl_texturemode GL_LINEAR_MIPMAP_LINEAR to gl_texturemode gl_nearest_mipmap_linear 4. Save the file and launch the game. |
The weapons / equipment
|
Upon respawning or joining the game players are normally given a preset range of equipment and ammo. The type and amount varies between maps. It is also possible to pick up new weapons, ammo, and equipment in a map. The weapons you can pick up are generally better than your starting equipment and you should keep an eye out for them. Players have the ability to share weapons and ammo with team mates using the drop weapon/ammo keys definable in the control options, so make sure to share in difficult scenarios to help with your chances for survival.
|
Previous contributors
| Daniel «Sven Viking» FearonFounder; Team Leader; Programmer | |
| Kevin «Nivekdev» LoperVersion v2.x lead programmer | |
| Steven «Mad Jonesy» JonesLevel design; Project co-ordination | |
| David «Commando» StarrLevel design; Project co-ordination | |
| Shannon Caldwell3D character artist; Animation | |
| Teddy «TeddyBear» Bergsman Lind2D artist | |
| Peter «Pete» Conneely3D and 2D artist | |
| Jareth «Jerig» HeinLinux programming | |
| Josh «Flewda» Powers3D artist | |
| (GIT)r-manSound effects | |
| Flashbang3D artist | |
| Another1Programmer | |
| James «Osidio» O’Donnell3D and 2D artist | |
| Tom Taylor1.9 — 3.0 Assistant programmer | |
| Alfred ReynoldsOld linux port; Programming help | |
| Andy NemerInfrastructure; 4.0 project co-ordination | |
| Kristian «Toadie» Miller3.0 — 4.0 Lead model & sound artist | |
| Brent «BackAssward» Holowka4.0 assistant programmer | |
| Martin «Silencer» M.4.0 — 4.8 Programmer | |
| «g1l»4.0 Programmer | |
| David «Davidkra» KraeutmannAssistant programmer | |
| «Dynamite»Test game hosting, 4.0-5.0 Test co-ordination | |
| Joanna «LemonSoda» LempiainenLevel design; 5.0 menu background | |
| Oscar «Nev» Björhn4.8 Programmer; Linux platform | |
| Peter «WAR_Nuker» Kavanaugh4.0 Lead model artist | |
| Stuart «cSMG» Genge4.8 Model & skin artist | |
| «SoloKiller»5.0 Co-ordination; Programmer; Engine; AngelScript framework | |
| «Jolene»4.0 — 4.8 Test game hosting | |
| Martin «Homosapien» Madsen4.8, 5.0 Test co-ordination |
Mechanical
These mechanical foes often aid the human military class and are immune to common weaknesses humans have such as poison and Barnacles, but not Gargantuas. Bullets often have much less effect.
Sentry turret
|
|
Small mounted turret
|
|
Large mounted turret
|
|
Robot grunt
|
|
Apache helicopter
|
|
Osprey helicopter
|
Artists
| Benoit «Der Graue Fuchs» HanikenneLead model artist | |
| «CryoDragon»Modelling & animation; Level design | |
| «D.N.I.O. 071″Modelling & skinning | |
| Jordy «KernCore» AlecssanderAngelscript | |
| Josh «JPolito» PolitoLevel design; Sound & graphics; Animation | |
| Benjamin «Mr. Mazur» F.Modelling & animation; Level design | |
| «Nih»Level design | |
| Norman RogerModelling & skinning | |
| Russell «Rusty» HarrisModelling & skinning | |
| Ian «Soctom» OrtizLevel design | |
| «The303″Modelling, skinning & animation | |
| Christopher «Trempler» LembrechtLevel design; Modelling & skinning | |
| Mike «tu3sday» ChenderlinLevel design |
The music
Thanks to the new FMod sound library from Firelight Technologies more than just MP3 files can be played using the in-game music player.
Use the included play list editor tool «playlist.exe» to easily create a list of music files or import a play list to use in the in-game player.
In case you’re having trouble running this tool, all you should need is Microsoft .NET Framework 3.5. This is available free of charge for all Windows users:
- via the Windows Update website for Windows 2000, XP, and 2003 users.
- via the Windows Update tool (Start » All Programs) for Windows Vista, 2008, 7, 2008 R2, 8, and 8.1 users.
- via the Programs and Features control panel for Windows 10 users.
Sven Coop в конце недели
В это воскресенье (12 октября 2014) всем порталом играем в Sven Coop, а именно проходим кампанию Fortified. Приглашаются все желающие.Начало: 12 октября 2014 18:00 (время московское)Количество мест: 32Место проведения (адрес сервера): s20.hldm.org (195.191.250.139:27015)Скачать Sven Coop: http://hldm.org/files/others/208-sven-co-op-48.htmlSven Co-op — кооперативная модификция для Half-Life, где игроки должны убивать контролируемых компьютером монстров, разбирать головоломки и выполнять различные цели (указываются в MOTD) в команде. Игра полностью бесплатна, для игры потребуется установленный Half-Life клиент.Fortified — карта от разработчика «Nih», где игроки являются бойцами секретного подразделения и должны напасть на защищенный объект. Один из игроков должен взять на себя командование, у него отсутствует возможность непосредственно передвигаться и убивать противников, он наблюдает сверху и помогает подразделению, посылает атаку с воздуха, выдает оружие другим игрокам. Карта поделена на несколько секторов, каждый из которых предстоит захватить.
The allies
|
Not all computer controlled monsters are out to kill you — some monsters will work with you against hostile monsters. To identify these allies, use the in game Friend or Foe system. Simply point your cross hairs at a monster then information will show up in the bottom-left corner of your screen. If the monster is going to attack you the information will show up red. If it is green the monster is an ally and will help you. Real players will show up in blue. The Friend or Foe system also provides useful information about a monster or player’s health and name. Certain maps may have disabled this feature. Typically this is enabled, though a map author can control this feature for their map.
|
Mapping and Modeling Community
The community has slowly dwindled over the years, but Sven Co-op still remains one of the mods with most custom content.
This success might be because of several reasons:
Due to Sven Co-op’s single-player nature, it is easier for mappers to create their own worlds and scenarios, and the ability for mappers to change models and sounds give them even more freedom. A backside of the «single-player» style, is that Sven Co-op maps generally take more time to create than maps for multiplayer games, but SC mapping has still managed to thrive.
A common criticism of single-player mapping for games, is that you never know how many people have played your map. When you are mapping for a coop game, you can create your own scenarios and tell a story to the players, and still be able to see how many are playing your game online.
Passwords
| Setting | Default value | Description |
|---|---|---|
| rcon_password | Empty | Password used for accessing the server console remotely. Use a password strength meter to help you build a good password. Only your trusted server administrators should know this as it allows unlimited access to your game server. If you leave this blank, remote console access will not be available (don’t worry — it won’t allow everyone to use RCON without a password). |
| sv_password | Empty | Password used for players to join your server. Leave blank if your server is public. |
| sv_spectator_password | Empty | Password used for spectators to join your server. Leave it blank if your server is public. Currently obsolete in Sven Co-op. |
Maps
See the maps page for BSP file names and a screen shot.
Campaign conversions
Half-Life campaign
Co-op conversion & updates by: Ian «Soctom» Ortiz, Josh «JPolito» Polito, SoloKiller
Opposing Force campaign
Co-op conversion & updates by: Edman747
Map «of2a3» remade by: Ian «Soctom» Ortiz
Blue Shift campaign
Co-op conversion & updates by: Edman747, Josh «JPolito» Polito
Uplink campaign
Co-op conversion & updates by: Ian «Soctom» Ortiz
Neil Manke’s They Hunger campaign
Co-op conversion, map merging, & updates by: Josh «JPolito» Polito, Dynamite
Weapon models by: Norman Roger, Benoit «Der Graue Fuchs» Hanikenne
Scripts by: Tomáš «GeckonCZ» Slavotínek (NPCs), KernCore (Weapons), «Zode» (Misc.)
Official missions
| «A1win»Mazing; Tetris | |
| Adam «Adambean» ReecePolar Rescue | |
| «AzShadow»Crystal | |
| «B-dama»Another Unit | |
| «BlueFeena»Momma Mesa | |
| Ryan «BMT» HeeleyIncoming | |
| «cold_blood3d»Infested | |
| «Hezus»Last Stand; Quarter; Sandstone; Suspension | |
| «Incy247″Escape series | |
| Josh «JPolito» PolitoStadium 4; They Hunger: Escape | |
| Konrad «Koelzk» KölzerToonrun | |
| Joanna «LemonSoda» LempiainenPsyko | |
| «Mutant»Black Mesa EPF | |
| «Nih»Abandoned; Dead Simple Neo 2; Fortified; Judgement; Toad Snatch; The Turret Fortress: Original; The Turret Fortress: Reversed | |
| «Norsu»YABMA | |
| Sebastian «Puchi» A.Single-player campaign portal | |
| Martin «Silencer» M.Danger of Collapse; Robination: Revised | |
| «Skacky»Persia | |
| David «Sniper» McDermottOsprey Attack | |
| Daniel «Sven Viking» FearonSven Co-op series | |
| «the-middleman»Desert Circle | |
| «tdw»Sandstone | |
| Christopher «Trempler» LembrechtBlack Mesa Special Tactics Sector | |
| Mike «tu3sday» ChenderlinWarForts | |
| «Turrican»Intruder | |
| «Tylak»Hostile Planet |
Installing custom maps
Your players will inevitably get bored with the official set of maps provided. You will almost certainly want to install some of the many additional maps around to improve the experience of your game server.
Installing custom maps is a simple process providing map artists follow the map distribution guidelines. You will have downloaded a map as a file containing the map contents typically as a ZIP, RAR, or 7Z archive. Maps are rarely distribute maps as a standalone BSP file or as a bunch of unpacked files.
You can use a free utility such as 7-Zip to open most of the archive formats around today. This runs on both Windows and Linux and is provided for free of charge.
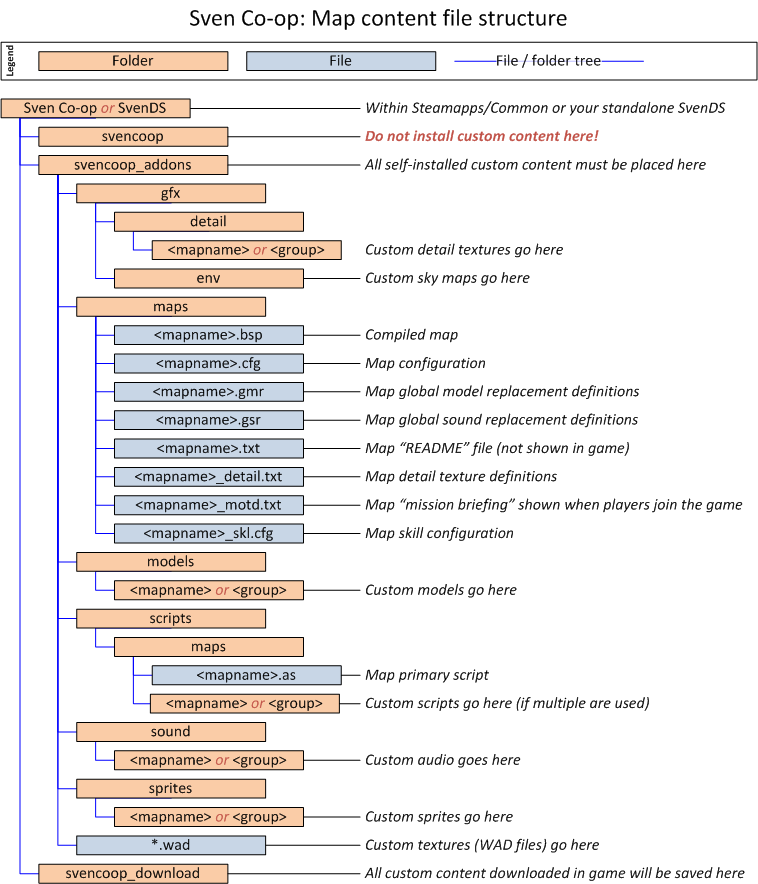
When you open the archive you should see a set of folders that could be gfx, maps, models, scripts, sound, and sprites. It’s also likely you’ll see a bunch of WAD files here too. If this is what you see you will need to extract all of these to your server’s svencoop_addons folder.
- Do not extract any unofficial resources directly into the svencoop folder. To help keep your game files clean, use the svencoop_addons folder. The game engine is perfectly capable of loading maps and their contents from this location.
- If there is a scripts folder included take a look inside before extraction. There should only ever be a maps folder inside this. Anything else should be treated as suspicious and not extracted, or deleted after extraction.
- If there is only a svencoop folder inside the archive, you need to enter this folder before extraction. This shows the map artist has not followed our current guidelines on map distribution.
- If there is only a BSP file (and maybe a couple of TXT/CFG files along side it) this means the map doesn’t have much custom content. These files should be extracted to the maps folder within the svencoop_addons folder.
This diagram shows how custom map content should be laid out in your game.