Dead frontier 2 → оптимизация для слабых пк
Содержание:
- Past Maps
- Levels
- Сюжет
- Звук в Dead Frontier 2 отсутствует или пропадает в заставках
- Friday, April 2nd, 2021
- Episode 2: Ties that Bind Part 2
- Titan Guide[]
- Стоит ли покупать The Walking Dead: A New Frontier
- Open World Map
- Introduction[]
- A Sniper’s Guide to Rifles
- Contents
- Advantages and Disadvantages
- List of Rifles
- Introduction to Pistols[]
- Statistics
- Experience
- Sunday, April 11th, 2021
- A More Complete List[]
- Отсутствует DLL-файл или ошибка DLL
- Game Basics
- Body Skins and Mask[]
- Dead Frontier 2, скачанная с торрента не работает. Решение
- Файлы, драйверы и библиотеки
Past Maps
| 3D version map before the map extension in 2016 |
|---|
| This was the 3D map until January 2016 when new areas have been added to the game and the map was randomized. The zone markers should be the same, but each block layout has completely changed. |
| 3D version map before the map extension in 2014 |
|---|
| This was the 3D map until November 2014 when new areas have been added to the game. By now, the ‘zone’ borders in Fairview have changed dramatically — this map is only supposed to give a broad idea of the difficulty in each area. |
| 3D version map before the map extension in 2012 |
|---|
| This was the 3D map until October 2012 when new areas have been added to the game. By now, the ‘zone’ borders in Fairview have changed dramatically — this map is only supposed to give a broad idea of the difficulty in each area. |
Levels
To gain a level, you will need to gain a certain amount of experience, which is gained by killing Zombies, participating in Outpost Attacks, or completing Missions.
At this point, you can only level up (to a maximum of 325) by going back to an outpost. You will be eligible to level up when the experience counter on the screen turns a gold color and reaches 100%. However, if you die before you enter an outpost from a zombie-related causee, you will lose half the experience you have gained since the last time you entered an outpost. This means that you may not level up if you die in the city, even if the EXP counter said 100% and turned gold. Depending on how much experience you gained in the Inner City, it is possible that you level up more than once when you return to the outpost.
Each new level requires more experience until you hit level 110, which is where it locks at 7,000,000 experience to level up to level 200. From levels 201-220, the amount of experience needed to level up changes to 15,000,000. Lastly, from levels 221-325, the amount of experience needed to level up changes from 15,000,000 to 60,000,000 per level.
— 10/18/2012 the level cap was raised 200 to 220 adding an additional 300 million experience required to reach the cap.
— 2/16/2016 the level cap was raised 220 to 325 adding an additional 6.3 billion experience required to reach the cap.
Сюжет
Итак, эпическая сага о выживании на Диком Западе Ред Дед Редемпшен 2 продолжается. Только теперь ваш новый герой станет еще более бесстрашным, так как он будет мстить. А месть бывает очень жестокой. Вы столкнетесь с самыми опасными преступниками прерий и пустынь, пройдете вместе с вашим героем много километров через всю западную часть Америки, откроете для себя новый мир гангстеров и будете зачищать мелкие городишки от бесчинств целых банд преступников, которые грабят население, поезда ради денег и наживы. Взяв кольт, оседлав своего коня, вы начнете свое опасное путешествие по западу. И теперь у вас в игре РДР 2 на ПК появятся еще и напарники.
Звук в Dead Frontier 2 отсутствует или пропадает в заставках
- В трее нажмите ПКМ по значку динамика;
-
В открывшемся меню необходимо выбрать пункт
«Звуки»
; -
Следом необходимо выбрать устройство (это могут быть либо динамики, либо наушники) и
нажать на
«Свойства»
; -
Перейти на соседнюю вкладку
«Дополнительно»
; -
Отыщите меню под названием
«Формат по умолчанию»
, чтобы задать значение, но
оно должно быть ниже текущего; -
Нажмите
«Применить»
, откройте Dead Frontier 2 и проверьте результат проделанной
работы.
- Вновь в трее ПКМ по значку динамика;
-
В меню отыщите функцию под названием
«Пространственный звук»
, чтобы
отключить; - Остаётся лишь перезапустить Dead Frontier 2 и проверить результат.

Friday, April 2nd, 2021
Client V60
- Call of the Cult Easter Event preparations.
- Increased how much distance lootable ragdolls teleport in bounds.
- Added setting to toggle the noise filter graphic setting.
- Reduced Harvester attack tracking speed.
- Fixed a bug where bandits and players with PvP toggled on couldn’t shoot through loot spots.
- Fixed a bug where bandit ragdolls were causing performance issues on death.
- Fixed a bug that made trees remain bright in low brightness settings.
- Fixed a bunch more flickering textures and oddly lit floor tiles.
Please report any bugs found in #df1-bug-report so we can have a smooth event.
Side note: Wanted to say thank you for being so patient in regards to news on updates outside of tomorrows event. I will be talking about what I have been working on and future plans after this event has concluded.
Episode 2: Ties that Bind Part 2
Старт The Walking Dead: A New Frontier вышел нетипичным в том плане, что разработчики предложили загрузить сразу два эпизода. Здесь Telltale Games схитрила, потому что эти два эпизода проходятся за то же время, что и один стандартный.
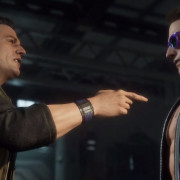
В результате драматического, но предсказуемого финала главный герой теряет одну из своих спутниц и наблюдает, как другая ловит пулю в живот. Находясь под обстрелом, Хавьер делает выбор — дать бандитам отпор, чтобы отсрочить их наступление на населенный пункт Прескотт, или броситься сопровождать семью до данного селения. С последствий данного решения и стартует второй эпизод. На центральный план выходит противостояние жителей Прескотта и бандитов группировки «Новый фронтир», о которых известно совсем чуть — члены организации привыкли щеголять меткой на шее.
Сценаристы предсказуемо пускают под нож все живое. В действие вступает следующее правило — если вам удалось перекинуться несколькими словами с хорошо смоделированным персонажем, будьте уверены, он еще сыграет весомую роль в сюжете. В остальном Ties that Bind Part 2 не столь схематичен, как предыдущий эпизод, дает больше информации по Клементине, вводит персонажа из комиксов по имени Иисус и предлагает действительно интересный выбор ближе к финалу.
Titan Guide[]
| Titan | |
|---|---|
|
Health Points: Level 15-20; 375 / Level 25-30; 1,500 / Irradiated; 1,875Damage per Hit: Level 15-20; Bite 32 / One Arm 64 / Two Arms 128 / Level 25-30; Bite 64 / One Arm 128 / Two Arms 192 / Bloodied; Bite 96 / One Arm 192 / Two Arms 288Calm Speed: SlowAlerted Speed: Very FastSprint Speed: Very FastExperience: Level 15-20; 1,920 / Level 25-30; 7,680Level: {`Level`}: {`Debuffs`}
It’s rumored that Fairview’s top body builders used the N4 Drug to stay one step above the rest of the competition, which have since mutated their elitist bodies into a monstrous and twisted mold of a «Titan». This beast is the stuff of nightmares, using his terrifying loud roars to intimidate his prey whilst charging at full speed. A huge and tough enemy that can sprint towards the player for a certain period of time. His head is rather less exposed which makes scoring headshots problematic. Exploit his large hitbox to continuously land shots on him. Melee is unadvised. Spawns in level 15 zones and beyond. |
Titan is a very tanky Mutation and will take a while to kill him, he also runs very fast but has to stop to attack you, so as long as you don’t run into a dead end or an obstacle or make mistakes, you will avoid taking damage. He was recently nerfed so that no longer has a chance of attacking very fast. Worth noting that with enough Walk Speed you can just ADS/Reload the entire fight without him being able to hit you.
You will need to wait for him to stop sprinting before you can reload, unless you have good enough reload speed and knock-back distance to reload after stunning him.
A two-player strategy to killing this boss legitimately would be to have 1 player equip items with high jog/sprint speed and run in circles around an obstacle whilst luring the boss, and the 2nd player stands at the door to prevent other infected from spawning in, and shoots the boss (best to rejoin the room if the boss chases the shooter).
ZeroLife’s Titan Guide: https://www.youtube.com/watch?v=Ud_Z_SR2eL4?t=10
Стоит ли покупать The Walking Dead: A New Frontier
Обкатав новый движок в Batman: The Telltale Series и набив шишек в техническом плане, разработчики продолжают успешно гнуть свою линию в The Walking Dead. К улучшенной графике прибавилась действительно похорошевшая анимация, игра больше не напоминает дешевый комикс. Сценаристы осваивают новые подходы к подаче сюжета, благодаря чему за его развитием следить интересно примерно так же, как в первый раз. Достигнут очень хороший баланс по чередованию мирных и экшен-сцен, раз за разом подымается непростой моральный вопрос, можно ли доверять незнакомым людям.
Судя по увиденному, The Walking Dead: A New Frontier будет лучше второго сезона, поэтому мы готовы рекомендовать его даже людям, не знакомым со вселенной. Хотя фанатам будет всяко интереснее. Появления знакомых персонажей из игр, комиксов и сериала не исключены.
The Walking Dead: A New Frontier доступна на PC, Xbox One, PS4, iOS и Android. Текст игры переведен на русский язык. Оценка сезону будет выставлена после выхода всех эпизодов.
Смотреть все скриншоты Walking Dead: Season 3 →
Все скриншоты из Walking Dead: Season 3 можно посмотреть здесь.
- Telltale показала трейлер The Walking Dead: A New Frontier
- Обзор Batman: The Telltale Series — Ep. 1-5
- В мобильной The Walking Dead: March to War будут доступны персонажи сериала
Open World Map
The Open World represents the world that all players play in. It consists of a large, 30 by 18 cells, with Palehaven city divided into eighteen districts (formerly towns).
The player is fully free to explore the entire world, with no physical restriction on travel or movement (aside from the local infected threat). Players can use their car to fast travel between the three outposts.
The various areas of the map offer higher levels of difficulty, with areas to the West of the town (left side of the map) being the easiest at level 1, and with further east zones becoming more difficult, maxing out at level 50. Higher difficulty zones present more dangerous and numerous infected and mutated, but higher EXP gains and loot opportunities.
The world map is procedurally regenerated every 7 days.
Outposts
Three of the districts, represented on the map in yellow, are outpost zones, with one central building being the outpost. These districts being Dallbow, Haverbrook and Greywood. While the streets are just as dangerous as any other district, the outpost itself offers a safe haven for players to escape Stalker, store items, engage in quests or to buy or sell in the market.
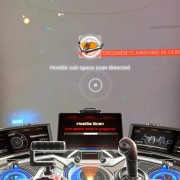
Every four hours, one of the outposts will come under attack by hoards of infected. While during the attack the infected cannot physically enter the outpost, they will attack the exterior door. When an attack occurs, a large alarm siren blares and the adjacent cells to the outpost will change into an orange colour, with infected spawning in all adjacent zones and charging at the outpost. Failure to defend the outpost will result in it being ‘abandoned’ for one hour, with all NPCs except the Trader being unavailable, and all rooms other than the lobby being swarmed with infected.
PvP Zone
Two 2×2 size red colour PvP Combat zones exist. One is located located in Dawnhill and the other one in Greywood. Players are immediately allowed to engage in a PvP open combat when entering either the zone in the city. However, PvP will be disabled when players are inside the buildings.
There is currently no additional loot or EXP available within the PvP zones, so the main reasons of entering the zones are scoring points towards your personal PvP score, or for daily missions that happen to be within a zone. Players may travel safely within PvP zones without the fear of being exposed to unwanted PvP activity by going into Lobby and choosing «Play Solo» option.
Introduction[]
Once the player finished the character creation part, the game will start. The player will receive 1 point at the beginning, where they can spend it on the said skills. The player can maximize their level up to level 50, but that’s not the end. Once the player achieves the 50th level, they can continue to earn Prestige Points, Rare Enhancers, Elite Enhancers and Dyes. This is done by continuing to earn experience points, every 500,000 exp the player received a Rare Enhancer and a random Dye, and every 5,000,000 exp they will receive an Elite Enhancer and a Prestige Point, up to a maximum of 10 Prestige Points.
Experience Per Level
The following statistics has been cataloged to represent the amount of experience required per level before the player can move onto the next.
| Starting Lvl | EXP Prev > Next | Exp 0 > Next | Final Lvl |
|---|---|---|---|
| 1 | |||
| 1 | 250 | 250 | 2 |
| 2 | 500 | 750 | 3 |
| 3 | 1,000 | 1,750 | 4 |
| 4 | 2,000 | 3,750 | 5 |
| 5 | 3,000 | 6,750 | 6 |
| 6 | 4,000 | 10,750 | 7 |
| 7 | 6,000 | 16,750 | 8 |
| 8 | 8,000 | 24,750 | 9 |
| 9 | 10,000 | 34,750 | 10 |
| 10 | 12,000 | 46,750 | 11 |
| 11 | 14,000 | 60,750 | 12 |
| 12 | 16,000 | 76,750 | 13 |
| 13 | 18,000 | 94,750 | 14 |
| 14 | 20,000 | 114,750 | 15 |
| 15 | 22,000 | 136,750 | 16 |
| 16 | 24,000 | 160,750 | 17 |
| 17 | 26,000 | 186,750 | 18 |
| 18 | 28,000 | 214,750 | 19 |
| 19 | 30,000 | 244,750 | 20 |
| 20 | 36,000 | 280,750 | 21 |
| 21 | 42,000 | 322,750 | 22 |
| 22 | 48,000 | 370,750 | 23 |
| 23 | 54,000 | 424,750 | 24 |
| 24 | 60,000 | 484,750 | 25 |
| 25 | 66,000 | 550,750 | 26 |
| 26 | 72,000 | 622,750 | 27 |
| 27 | 78,000 | 700,750 | 28 |
| 28 | 84,000 | 784,750 | 29 |
| 29 | 90,000 | 874,750 | 30 |
| 30 | 100,000 | 974,750 | 31 |
| 31 | 110,000 | 1,084,750 | 32 |
| 32 | 120,000 | 1,204,750 | 33 |
| 33 | 130,000 | 1,334,750 | 34 |
| 34 | 140,000 | 1,474,750 | 35 |
| 35 | 150,000 | 1,624,750 | 36 |
| 36 | 160,000 | 1,784,750 | 37 |
| 37 | 170,000 | 1,954,750 | 38 |
| 38 | 180,000 | 2,134,750 | 39 |
| 39 | 190,000 | 2,324,750 | 40 |
| 40 | 200,000 | 2,524,750 | 41 |
| 41 | 210,000 | 2,734,750 | 42 |
| 42 | 220,000 | 2,954,750 | 43 |
| 43 | 230,000 | 3,184,750 | 44 |
| 44 | 240,000 | 3,424,750 | 45 |
| 45 | 250,000 | 3,674,750 | 46 |
| 46 | 260,000 | 3,934,750 | 47 |
| 47 | 270,000 | 4,204,750 | 48 |
| 48 | 280,000 | 4,484,750 | 49 |
| 49 | 290,000 | 4,774,750 | 50 |
| 50 | 5,000,000 | 9,774,750 | 50+1 |
| 50+1 | 5,000,000 | 14,774,750 | 50+2 |
| 50+2 | 5,000,000 | 19,774,750 | 50+3 |
| 50+3 | 5,000,000 | 24,774,750 | 50+4 |
| 50+4 | 5,000,000 | 29,774,750 | 50+5 |
| 50+5 | 5,000,000 | 34,774,750 | 50+6 |
| 50+6 | 5,000,000 | 39,774,750 | 50+7 |
| 50+7 | 5,000,000 | 44,774,750 | 50+8 |
| 50+8 | 5,000,000 | 49,774,750 | 50+9 |
| 50+9 | 5,000,000 | 54,774,750 | 50+10 |
A Sniper’s Guide to Rifles
Contents
Naturally accurate, with a good base chance for critical hits and a respectable damage output shot-for-shot compared to many other weapons, Rifles serve well as primary weapons and are effective in most builds due to their inherent strengths. Their reasonably high capacities and powerful rounds allow them to be effective even in the hands of characters with lower values in accuracy and reloading.
All Rifles up to the VSS Vintorez have High Critical Chance, requiring 112 Critical Hit points to reach the maximum critical chance of 80%. Most high-level Rifles (with the exception of the Dusk, X-Dusk Carbine, Crossbow, and the X-Garand) instead have Very High Critical Chance, only requiring 79 Critical Hit points to reach the same maximum point.
There are two kinds of Rifles: Carbines and Bolt Action:
Bolt Action Rifles are characterized by their Very High Accuracy» and high damage per shot, and only 1 round per second fire rate. This allows Bolt Action Rifles to achieve important 1-crit kill or 2-crit kill damage points against certain zombie types earlier than Carbines.
Carbines are characterized by their High Accuracy and lower damage per shot, but higher 1.5 rounds per second fire rate. This provides better crowd control, which is handy when facing groups of weaker zombies.
Low tier Rifles are extremely powerful compared to all other types of weapons, with the caveat being the expensive ammunition they use. This poses a significant handicap for lower-level players who cannot loot ammo in sufficiently large quantities, as opposed to Pistols whose ammunition is available in an abundant quality, and Melee Weapons which require no further upkeep at all. As proficiency goes up, however, both the cost and damage differences gradually fade, to the point where late-game Rifles perform and cost practically the same as late-game Pistols.
Requirements
Rifles have no strength requirements. The first rifle available, the Beretta RX4, requires 10 proficiency points to use. The Farmer class starts out with a Mini-41, along with 80 rounds of 5.5mm.
Early-game Rifles require 112 Critical Hit, while late-game Rifles require 79 Critical Hit to reach optimal performance. High accuracy stat is not as important with Rifles due to their inherent accuracy, and Reloading can also be passed over to some degree due to most Rifles’ sizable capacity.
Looting/Scouting
Since they only draw aggro from zombies currently on-screen, Rifles are ideal for scouting and looting runs in the Inner City. Some general tips:
Rifles can easily hit distant zombies with relative consistency. Try to snipe them before they get close.
Stay in the open. Due to their low rates of fire, Rifles are not the best weapons to use in close quarters, especially against large mobs, and a single missed shot can be costly. With a high critical stat, this is not as big a concern, provided the Rifle is one of the faster-firing ones.
Be ammo conscious. With relatively slow reloads (unless one has high Reloading), learning to reload whenever you get a quiet moment is important. As with any weapon, one trick is to hit «R» just before you transition to another screen, as this results in an instantaneous reload once you reach the next block.
Aggro Combat
Similar to Pistols and Melee Weapons, Rifles are not designed to fight off hordes of zombies at all. Your best bet in this situation is to try to reach a safe space to weather the storm, find an exit from the situation, or use another weapon altogether.
Advantages and Disadvantages
Advantages
- Early-game Rifles are significantly more powerful than other weapons.
- Rifles are relatively silent and do not cause aggro spike, allowing it to be used extensively during looting.
- Rifles naturally starts out with the best accuracy in the game, meaning there is little need to put points in increasing accuracy.
- Most Rifles have a large magazine capacity.
- Bolt Action Rifles have the greatest per-shot damage of all weapons.
Disadvantages
- Early-game Rifles only have High instead of Very High Critical Hit chance.
- Rifle ammunition has smaller box sized compared to handgun ammunition (600 per box compared to pistols having 800 per box), and are generally more expensive.
- Bolt Action Rifles have the lowest fire rate in the game, which results in almost no crowd control against hordes.
List of Rifles
The Damage values in brackets indicate the averaged damage that can be achieved with the maximum critical hit chance. The Scrap values in brackets indicate the scrap price with Master Crafted (MC) items.
Some unique rifles are not available in this article. Instead, they are listed in the Special Gear article.
Introduction to Pistols[]
In Dead Frontier 2, pistols is the first gun a player can get their hands on together with the 2×4. Pistols usually serve as a good DPS gun (with the exception of revolvers). Pistols can also serve as primary weapons if the player chooses it.
Pistols are usually grouped into two categories: revolvers and semi-automatics.
Semi-automatics are characterized by having a moderately sized magazine, ranging from 8 to 15, faster firing speed of 1.33 per second and reload speed of 2 seconds, but lower body and headshot damage.
Revolvers are characterized by having a small sized clip of 6, slower firing speed of 1 per second and reload speed of 3 seconds, but a higher body and headshot damage. In other words, more bang for your buck.
Statistics
Damage Per Second (DPS)
A list of DPS values for all weapons can be found Here. This list is not reliable, due to bugs with attack speed and hidden damage multipliers with certain machine guns (see )
Knockback Power
A rough measure of the weapon’s ability to knock back zombies. Weapons with higher fire rate and more pellet per shots generally have higher knockback power, with Shotguns in particular generally having high knockback power but low DPS.
Stagger
Zombies can be staggered if they received in a single frame damage that is at least 1/100 of its remaining HP, causing it to temporarily cease moving and greatly increasing the knockback effect of weapons that meet the stagger requirement.
Stagger condition is independent from knockback power; weapons with low knockback power but high DPH (such as bolt action Rifles) are able to stagger heavy target earlier than usual, but will not inflict knockback as well against weaker enemies.
Aggro Generation
Several weapon types in the game are considered to be «loud» weapons, meaning that using weapons of these categories for extended period of time will cause the game to summon an as a response (infrequent usage with decent breaks between uses may help to prevent aggro spikes):
- Chainsaws
- Shotguns
- Sub-Machine Guns
- Rifle-caliber Machine Guns
- Explosives
This «artifical» aggro spike is separate from the «natural» ones that occur randomly over time, meaning that even when strictly silent weapons are used, you will still have a chance to counter an aggro spike. Additionally, there is a cooldown after each aggro spike that prevents another one from occurring, regardless of method and the nature of the spike.
All firearms and Chainsaws also generate «noise» that will attract zombie on-screen, causing them to progress 1 step in the zombie behavior chart (). The chance of creating «noise» corresponds to how «loud» the weapons are: Melee Weapons are completely silent, Pistols/Rifles infrequently generate «noise», Chainsaws/Machine Guns have a higher chance, and Shotguns/Explosives are guaranteed (100% chance) to do so.
Attack Speed
Each weapon class tends to have 1 or 2 specific set of attack rates, denoted by their Attack Speed. Due to bugs within the game, all weapons have a lower attack speed than their coded attack rate might suggest:
- The theoretical values are the values coded in game, which can «theoretically» be achieved by a machine running the game perfectly. Since the Unity version DF runs on simply does not work well with modern machines, the theoretical values can never be achieved, and are only here for reference.
- The actual values reflect the fire rate most common among modern computers after taking the firerate issue into account; it is unlikely that your fire rate will deviate much away from these numbers.
| Attack/Firing Speed | Attacks per Second | |
|---|---|---|
| Theoretical | Actual | |
| Very Slow | 1 | 0.968 |
| Slow | 1.5 | 1.429 |
| Average | 2 | 1.875 |
| Fast | 3 | 2.727 |
| Very Fast | 8.571 | 6.667 |
| Super Fast | 12 | 8.571 |
| F***ing Fast! | 12.245 | 8.696 |
| Insanely Fast! | 30 | 15 |
Accuracy
| Weapon Accuracy | Reliable Aim Onscreen | Perfect Aim Onscreen/Reliable Aim Offscreen | Perfect Aim Offscreen |
|---|---|---|---|
| Very High | 40 | 60 | 80 |
| High | 60 | 80 | 100 |
| Average | 80 | 100 | 124 |
| Low | 100 | 124 | N/A |
| Very Low/Ultra Low | 124 | N/A | N/A |
Experience
You gain experience by killing zombies and as you gain experience you will level up. There are 4 independent layers of experience modifiers available, which are multiplied with each other to get the final EXP number:
- Class: Soldier gets x0.8, Student gets x1.22, RP classes get x1.3; other classes get x1
- Nourishment: Starving: x0.6, Hungry: x0.9, Fine: x1.2, Nourished: x1.5
- Gold Membership: x2
- Implants + Drugs + Two-Factor Authentication email confirmation (+10%) + event bonus: This is the EXP bonus number shown in-game.
Keep in mind that because the game has consistent problem with handling multiplication/division, you will almost always get less EXP than what your calculation suggest.
Sunday, April 11th, 2021
Beginning of a New Era?
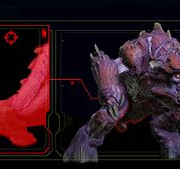
Today was an unusual day in Fairview: from the northern reaches of Secronom Bunker down to the furthest of the Wasteland, the sky is covered in a thick, mysterious red fog that blotted out the sun and seemingly caused the infected to be more aggressive than usual.
After 9 days of chaos, the «Bunny Man» has finally decided to end the chase himself, by broadcasting his final coordinate across the entire city and inviting everyone for a talk.
Following the coordinates, our scouts made contact with an individual who introduced himself as Dr. Peters, a member of the cult that wrecked havoc on the city this Easter, seemingly leading to the wild chase that left the Commander MIA and the Secronom crew scrambling to apprehend him. He warned us of a facility located somewhere in the city that the Commander and Dr. Adler tried their best to seal away (along with whatever unfortunate survivors trapped within), currently being barely secured by an emergency power system that’s about to give way, and containing unimaginable things that threaten to send Fairview into what he can only describe as «the outbreak all over again.»
Whatever he’s talking about, it seems that this facility is the cause behind the red fog that is currently suffocating the city in darkness. Our best hope is for the fog to clear once the season changes, and our forces be as well armed as possible to whether what’s ahead.
A More Complete List[]
Note: As an observer I have found this list to be incomplete. I’ve been making note of each of the head cosmetics in my spare time, and I will update it here again in the future when it is more complete. I realize pictures for each would be really helpful, but I’m too lazy.
There is also a armor set known as hazard armor:
Hazard armor (red, orange, yellow, green, turquoise, blue, purple, pink, white, black) which can be purchased for 800 credits for each set.
Here is the list in alphabetical order, with notes on known variants and colors.
Head:
Alien Mask
Anonymous mask
Balaclava A,B (black, …)
Bandana (black, red, …)
Beret (blue, …)
Bionic Mask
Bowler Hat
Clown Mask
Cowboy hat B
Exterminator Helmet
Fedora (White)
Flyers Hat
Gas Mask (blank, _E,F,G …)
Goggles (grey, brown, blue, red, …)
Hannya Mask
Hard Hat
Headscarf
Hockey Mask
Infinity Mask
Japanese Headscarf
Jester Mask
Karura mask
Kitsune Mask
Medieval Helmet (A, …)
Military Bandana (normal, Urban Camo)
Military headscarf (normal, Urban Camo
Military Helmet (_,_,C,D,E,F) (forest camo, green, grey)
Ninja Mask
Old top hat
Oni Mask
Ornate Helmet
Padded Coif
Plague mask
Pork Pie Hat
Potato Sack
Santa Hat
Scarf (Green, …)
Shaman Mask
Shemagh (A, B) normal, green, brown
Skii Goggles (blue, yellow, …)
Skull Mask
Tengu Mask
Tin helmet
Tribal mask
Tricorn Hat
Turban
Viking Helmet (A,B,C, … F, …)
Also, a note: Most, (if not all) helmets will ‘hide’ the player’s hair, but a shortened haircut is usually visible underneath. Most masks retain the players original hair. Some helmets cover the head entirely and as such do not have this feature visible, such as the «Ornate Helmet.»
Отсутствует DLL-файл или ошибка DLL

«DLL»
DLL-fixer
Ошибка d3dx9_43.dll, xinput1_2.dll,
x3daudio1_7.dll, xrsound.dll и др.
Все ошибки, в названии которых можно увидеть
«d3dx»
,
«xinput»
,
«dxgi»
,
«d3dcompiler»
и
«x3daudio»
лечатся одним и тем
же способом – воспользуйтесь
веб-установщиком исполняемых библиотек DirectX
.
Ошибка
MSVCR120.dll, VCRUNTIME140.dll, runtime-x32.dll и др.
Ошибки с названием
«MSVCR»
или
«RUNTIME»
лечатся установкой
библиотек Microsoft Visual C++ (узнать, какая именно библиотека нужна можно в системных
требованиях).
Избавляемся от ошибки MSVCR140.dll / msvcr120.dll / MSVCR110.dll и
других DLL раз и навсегда
Очень часто стал замечать, что люди плачут об ошибках «запуск программы невозможен, так как
на компьютере отсутствует MSVCR120.dll». Это встречается…
Game Basics
First Things First
You start the game with damaged weapons and gear, that you will eventually get better items from looting or market, but as a starter you would be better off going with looting for now to have better understanding of the game mechanics, and be familiar with the game itself and how it works.
A basic RNG loot based drop.
Managing Inventory Slots and Stash
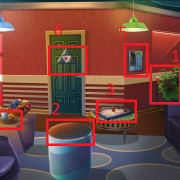
Most common thing to see is players keep looting things, which is basically a fair thing to do, but they end up picking up useless things, or dropping an important item they may not be aware of, and that can be a game changer for them in many ways even if low level loot. We can’t deny that many low level items can contain either good or bad stats, but let me show in pictures better and explain below them what i mean in the common mistakes sub section below.
But before that, the bonus round goes for… Market selling items, which is 20 slots, in each outpost so thats 60 slots, you can turn these to inventory instead of selling in market, put the items there, and set a high price for them, TADA!
Common Mistakes
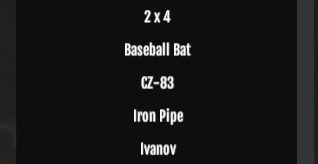
Example of picture above, these common items give literally 0 stats, on top of that taking inventory slot from you that you can use them for better items to keep. As long as you won’t replace them with a current item, that they can be better, maybe an upgrade from ivanov to Cz pistol, use CZ and drop the ivanov, that is in the case if both were common.
This goes for almost everything except for melee weapons, you may keep the one you’re using till you find a better one depending on attack speed, for example you don’t want a slow speed melee, and rather stick to faster ones.
Most common one and it can be punishing as well. most players go like ” WOW i got this rare vest, i will throw my superior since it is lower grade” WRONG.
Quality doesn’t matter when it comes to “superior, rare, and elite” as much as the stats they provide. Sure that higher quality provides more stats, but are they useful? let us see and compare these 2 items seen above and see their actual stats.
We can see that Superior providing a better stats since it has one of important stats -% incoming damage, additionally 10% inventory, while vest has 16% inventory, while the other stats aren’t that important. Yet this can have many different preferences, some players may want only inventory slots to maximize the stat, others want average slots and better survivability from damage reduction, which experienced players can choose easily, but this just an example to show that quality doesn’t mean better stats, regards of item levels.
Body Skins and Mask[]
| Nomad-mesh | |
|---|---|
|
The Nomad armor set is a unique cosmetic reward given to all players who reached certain milestone levels in Dead Frontier 1. The set consists of 5 pieces that can all be worn together or individually.
Level 20: For reaching level 20 in Dead Frontier 1, you will receive both the Nomad Boots and the Nomad Gloves. Level 50: For reaching level 50 in Dead Frontier 1, you will receive the Nomad Legs. Level 100: For reaching level 100 in Dead Frontier 1, you will receive the Nomad Body. Level 200: For reaching level 200 in Dead Frontier 1, you will receive the Nomad Helmet. |
|
| Dusk Mesh | |
| If you own any of the Dusk items, whether it is regular Dusk or X-Dusk on Dead Frontier 1, you will receive the Dusk Mesh set which comes with a Helmet and Armor piece. | |
| Vengeance Guard | |
| Owning a Vengeance Guard in DF 1 will give you the Vengeance Guard cosmetic in DF 2. This is just a cosmetic for your armors and will not add any benefits other than looks to your character. |
| Pumpkin Head | |
|---|---|
|
A reward for owning ultra boost in Dead Frontier 1 but can also be purchased from the cosmetics trader for a cheap 200 credits.
(A remake of the Pumpkin Head from Dead Frontier 1 but with a unique DF 2 style) |
Dead Frontier 2, скачанная с торрента не работает. Решение
Такие версии игр использовать не просто неудобно, а даже опасно, ведь очень часто в них изменены многие файлы. Например, для обхода защиты пираты модифицируют EXE-файл. При этом никто не знает, что они еще с ним делают. Быть может, они встраивают само-исполняющееся программное обеспечение. Например, майнер, который при первом запуске игры встроится в систему и будет использовать ее ресурсы для обеспечения благосостояния хакеров. Или вирус, дающий доступ к компьютеру третьим лицам. Тут никаких гарантий нет и быть не может.
К тому же использование пиратских версий — это, по мнению нашего издания, воровство. Разработчики потратили много времени на создание игры, вкладывали свои собственные средства в надежде на то, что их детище окупится. А каждый труд должен быть оплачен.
Поэтому при возникновении каких-либо проблем с играми, скачанными с торрентов или же взломанных с помощью тех или иных средств, следует сразу же удалить «пиратку», почистить компьютер при помощи антивируса и приобрести лицензионную копию игры. Это не только убережет от сомнительного ПО, но и позволит скачивать обновления для игры и получать официальную поддержку от ее создателей.
Файлы, драйверы и библиотеки
Практически каждое устройство в компьютере требует набор специального программного обеспечения. Это драйверы, библиотеки и прочие файлы, которые обеспечивают правильную работу компьютера.
- Скачать драйвер для видеокарты Nvidia GeForce
- Скачать драйвер для видеокарты AMD Radeon
Driver Updater
- загрузите Driver Updater и запустите программу;
- произведите сканирование системы (обычно оно занимает не более пяти минут);
- обновите устаревшие драйверы одним щелчком мыши.
существенно увеличить FPSAdvanced System Optimizer
- загрузите Advanced System Optimizer и запустите программу;
- произведите сканирование системы (обычно оно занимает не более пяти минут);
- выполните все требуемые действия. Ваша система работает как новая!
Когда с драйверами закончено, можно заняться установкой актуальных библиотек — DirectX и .NET Framework. Они так или иначе используются практически во всех современных играх:
- Скачать DirectX
- Скачать Microsoft .NET Framework 3.5
- Скачать Microsoft .NET Framework 4
- Скачать Microsoft Visual C++ 2005 Service Pack 1
- Скачать Microsoft Visual C++ 2008 (32-бит) (Скачать Service Pack 1)
- Скачать Microsoft Visual C++ 2008 (64-бит) (Скачать Service Pack 1)
- Скачать Microsoft Visual C++ 2010 (32-бит) (Скачать Service Pack 1)
- Скачать Microsoft Visual C++ 2010 (64-бит) (Скачать Service Pack 1)
- Скачать Microsoft Visual C++ 2012 Update 4
- Скачать Microsoft Visual C++ 2013