Achievements
Содержание:
- Reaching The Dreadlands [ ]
- Generating a new world [ ]
- Mobs
- Summoning Asorah, The Fallen[]
- Reaching The Dreadlands[]
- Rituals
- Omothol [ ]
- Crystallizer Recipes[]
- Summoning Asorah, The Fallen [ ]
- Generating a new world[]
- Dimensions
- Article management templates[]
- General wiki templates[]
- The Dreadlands [ ]
- Screenshots:
- Transmutator Recipes[]
- Phase 4: The Omothol
- Gaining Entry to Cha’garoth’s Lair [ ]
- AbyssalCraft
- Exploring the Overworld[]
Reaching The Dreadlands [ ]
In order to reach the Dreadlands, the player must have killed Asorah, located an Abyssal Stronghold, and have a gateway key, and be in the possession of a transmutation gem. Asorah’s Dreaded Gateway Key is crafted by placing the gateway key in the center of the crafting grid, with the other 3 components around it (1 located on top of it, the other 2 on the sides in the grid). The key is used like it’s former counterpart. Right-click on the ground and a portal will be created.
One thing you should do before heading to the Dreadlands is to create a Transmutation Gem and 5 Coralium Bricks . In order to obtain the Coralium Bricks, you need to pour Liquid Antimatter on Liquid Coralium, creating Coralium Stone. Liquid Antimatter can be found in the Coralium Infested Swamp biome, but can also be crafted if you can’t find the biome (using 1 lava bucket, 1 water bucket, 1 milk bucket and 1 liquid coralium bucket, with 5 iron ingots placed as a boat with the buckets on top of it in the crafting grid).
Generating a new world [ ]
The first thing you should do after installing AbyssalCraft (as of version 1.8.4 and later) is to craft a Necronomicon. This picture shows how a Necronomicon is crafted:
This book contains the majority of the information written on this wiki page, with some extra info on materials found in the various dimensions added by the mod (and new materials found in the Overworld).
As you might suspect, AbyssalCraft adds a new overworld biome when you generate a new world with it, the biome (called «The Darklands») is made out of Darklands grass, which is a purple/indigo grass that emits nether portal particles, and other things you can easily notice inside it is the trees (leaves have a similar color to the grass) and the various generated structure scattered around the place (as of lately, the structures are quite rare). A good start when you find a Darklands biome is to locate the 2 story high buildings that looks like a wizard tower, for the simple reason that it contains a fully powered enchantment table, allowing you to quickly enchant tools/armor as you obtain them.
Mobs
AbyssalCraft introduces 40 regular mobs and 4 bosses to Minecraft.
Hostile Mobs
Some of the hostile mobs of AbyssalCraft are listed below:
- Depths Ghoul, a mob that spawns in the Darklands and the Abyss dimensions and have zombie-like behavior.
- Abyssal Zombie, a zombie variant that spawns in the Darklands, the End and the Abyss dimensions. Can infect other zombies to become Abyssal Zombies.
- Evil Pig, a pig-looking mob that is hostile. Turns into Demon Pig when killed.
- Demon Pig, another pig-looking hostile mob. Spawns in the Nether and the Dreadlands, or when an Evil Pig dies. It Is resistant to fire.
- Dreaded Abyssalnite Golem, a mob that spawns in the Dreadlands and attacks nearby players and Abyssalnite Golems.
- Shadow Creature, the smallest of the 3 types of Shadow beings. All Shadow beings are covered in smoke and try to avoid sunlight. They spawn in the Darklands Mountains biome and The Dark Realm. They become invisible when it is dark enough.
- Shadow Monster, the medium-sized mob out of the Shadow beings.
- Dread Spawn, a mob that spawns in the Dreadlands Forest biome in large packs and is very slow.
- Dreadling, a mob that spawns in the Dreadlands and usually crawls around in the Dreadlands Mountains biome.
- Spawn of Cha’garoth, a mob that is only spawned by Cha’garoth and is a more powerful version of the Dread Spawn.
- Dark Offspring, a mob resembling a goat mixed with a dead tree, often spawns in the forest at night.
Neutral Mobs
Some of the neutral mobs of AbyssalCraft are listed below:
- Abyssalnite Golem, a mob that spawns in the Dreadlands and is hostile to Dreaded Abyssalnite Golem. If the player attacks one Abyssalnite Golem, all Abyssalnite Golems nearby become hostile to the player.
- Remnant, a mob that spawns in Omothol. A player with an Omothol Necronomicon or Abyssalnomicon can trade with it. If the player attacks one Remnant, all Remnants nearby become hostile to the player.
Elite Mobs
Elite mobs are hostile mobs that are tricky to kill. Some of the elite mobs of AbyssalCraft are listed below:
- Dreadguard, a large and powerful mob known to guard Cha’garoth’s lair.
- Spectral Dragon, a mob that spawns in the Abyssal Wasteland and behaves similarly to the Ender Dragon. It is able to phase through most materials and heals Asorah.
- Shadow Beast, the largest and strongest mob out of the Shadow Beings,
- Skeleton Goliath, a tall skeleton with a Cudgel as it’s weapon. The Skeleton Goliath spawns in the Abyssal Wasteland.
- Fist of Cha’garoth, a mob that is only spawned by Cha’garoth.
Boss Mobs
Boss mobs are the most powerful mobs in Abyssalcraft. They are listed below:
- Asorah, The Fallen, the first boss in AbyssalCraft. It spawns Spectral Dragons to heal itself. This boss is summoned in the Abyssal Wastelands.
- Cha’garoth, The Dreadbeast, the second boss in AbyssalCraft. It spawns Spawn of Cha’garoth and Fist of Cha’garoth to help itself. This boss is summoned in the Dreadlands.
- J’zahar, Gatekeeper of the Abyss, the third boss in AbyssalCraft. When J’zahar is killed, it will create a big explosion. This boss is summoned in Omothol.
- Sacthoth, Harbinger of Doom, an optional boss in AbyssalCraft. It spawns all types of Shadow beings. This boss is usually summoned in the Dark Realm, but can be summoned in other dimensions.
Anti-Mobs
When a mob or the player gets killed by Liquid Antimatter, which deals 5 points of damage every half-second upon contact, an anti version of the killed mob is generated. Anti-mobs are stronger than its normal variant, and will explode when touching the normal version of the mob.
Summoning Asorah, The Fallen[]
Once the player obtains the components to craft an Altar, the first boss of AbyssalCraft, Asorah, The Fallen, may be summoned. In order to summon the boss, the Altar must be built in the wastelands using abyssal cobblestone. Assembling the altar requires a shift-right click to the center block with the second tier (abyssal wastelands) Necronomicon. Once built, Asorah can be summoned by the player performing the Ritual of the Sleeper (details in the Necronomicon).
Fighting Asorah can be tricky. During the fight,Spectral Dragons will spawn around him, allowing him to drain their life to heal his own, killing them in the process. It’s worth noting that when a Spectral Dragon dies, they explode, dealing direct damage to Asorah. When Asorah reaches half health, he will start to slowly lose health when a spectral dragon is nearby. When he reaches 25% health, however, he will once again continue to drain the life out of the dragons.
Once defeated, Asorah will drop a large amount of experience as well as the «Eye of The Abyss».
Reaching The Dreadlands[]
In order to reach the Dreadlands, the player must have killed Asorah, located an Abyssal Stronghold, and have a gateway key, and be in the possession of a transmutation gem. Asorah’s Dreaded Gateway Key is crafted by placing the gateway key in the center of the crafting grid, with the other 3 components around it (1 located on top of it, the other 2 on the sides in the grid). The key is used like it’s former counterpart. Right-click on the ground and a portal will be created.
One thing you should do before heading to the Dreadlands is to create a Transmutator, as it will be very useful later when it comes to experimenting with crystals produced by the Crystallizer. In order to craft it, you need 2 Refined Coralium Blocks, 1 Liquid Coralium Bucket, 1 Transmutation Gem and 5 Coralium Bricks. In order to obtain the Coralium Bricks, you need to pour Liquid Antimatter on Liquid Coralium, creating Coralium Stone. Liquid Antimatter can be found in the Coralium Infested Swamp biome, but can also be crafted if you can’t find the biome (using 1 lava bucket, 1 water bucket, 1 milk bucket and 1 liquid coralium bucket, with 5 iron ingots placed as a boat with the buckets on top of it in the crafting grid).
Rituals
AbyssalCraft includes a magic system called Rituals.
Rituals require altars to be performed. Altars are player-made structures consisting of 9 pillars with one in the center. 8 types of different materials can be used to create altars. The central pillar of the altar is usually just called the Altar, and the side pillars are usually called Pedestals.
Shift right-click an Altar using a Necronomicon to complete an Altar or to perform a ritual. When performing a ritual, items must be placed on the altar, and a type of energy called Potential Energy is required. Rituals are used for various different tasks.
Omothol [ ]
As of AbyssalCraft 1.8.2, Omothol is still quite the work-in-progress, so the dimension is currently just floating islands with Remnants, Shadow Creatures, Shadow Monsters, Shadow Beasts and Sacthoth populating its terrain. The Harbinger of Doom also has a small chance of spawning. Future plans for the dimension hint to an infinitely large, randomly generated city. When they are done editing, the will be a small village were you can fight J’zahar, The gate keeper of the abyss, who is the final boss.
-
Сталкер путь человека дежавю прохождение
-
Ведьмак 3 как попасть в закрытые дома
-
Darkwood радиовышка как пройти
-
Невервинтер демогоргон прохождение
- Сталкер тень чернобыля сюжет
Crystallizer Recipes[]
Note: Not all elements return 2 outputs.
- Liquid Coralium -> 2 Crystallized Coralium
- Liquid Coralium Bucket -> 2 Crystallized Coralium
- Refined Coralium Ingot -> 1 Crystallized Coralium
- Chunk of Coralium -> 1 Crystallized Coralium
- Liquified Coralium Ore -> 1 Crystallized Coralium
- Abyssalnite Ingot -> 1 Crystallized Abyssalnite
- Chunk of Abyssalnite -> 1 Crystallized Abyssalnite
- Dreadium Ingot -> 1 Crystallized Dreadium
- Sulfur -> 1 Crystallized Sulfur
- Iron Ingot -> 1 Crystallized Iron
- Gold Ingot -> 1 Crystallized Gold
- Redstone -> 1 Crystallized Redstone
- Coal -> 1 Crystallized Carbon
- Blaze Powder -> 1 Crystallized Blaze
- Bone Meal -> 1 Crystallized Phosphorus
- (O) Abyssalnite Ore/Dreadlands Abyssalnite Ore -> 1 Crystallized Abyssalnite
- (O) Coralium Ore/Abyssal Coralium Ore -> 1 Crystallized Coralium
- (O) Iron Ore/Abyssal Iron Ore -> 1 Crystallized Iron
- (O) Gold Ore/Abyssal Gold Ore -> 1 Crystallized Gold
- (O) Tin Ingot -> 1 Crystallized Tin
- (O) Abyssal Tin Ore -> 1 Crystallized Tin
- (O) Copper Ingot -> 1 Crystallized Copper
- (O) Abyssal Copper Ore -> 1 Crystallized Copper Ore
- (O, I) Aluminium Ingot -> 1 Crystallized Aluminium
- (O, I) Aluminium Ore -> 1 Crystallized Aluminium
- (O, I) Block of Copper -> 9 Crystallized Copper
- (O, I) Block of Tin -> 9 Crystallized Tin
- Block of Gold -> 9 Crystallized Gold
- Block of Iron -> 9 Crystallized Iron
- Block of Abyssalnite -> 9 Crystallized Abyssalnite
- Block of Refined Coralium -> 9 Crystallized Coralium
- Block of Dreadium -> 9 Crystallized Dreadium
- Coal Ore -> 1 Crystallized Carbon
- Block of Coal -> 9 Crystallized Carbon
- Redstone Ore -> 1 Crystallized Redstone
- Block of Redstone -> 9 Crystallized Redstone
- (O, I) Zinc Ingot -> 1 Crystallized Zinc
- (O, I) Zinc Ore -> 1 Crystallized Zinc
- Dreaded Chunk of Abyssalnite -> 1 Crystallized Abyssalnite + 1 Crystallized Dreadium
- Dreaded Abyssalnite Ore -> 1 Crystallized Abyssalnite + 1 Crystallized Dreadium
- Water -> 4 Crystallized Hydrogen + 2 Crystallized Oxygen
- -> 4 Crystallized Hydrogen + 2 Crystallized Oxygen
- -> 2 Crystallized Hydrogen + 1 Crystallized Oxygen
- Lapis Lazuli -> 6 Crystallized Silica + 4 Crystallized Sulfur
- Methane -> 1 Crystallized Carbon + 4 Crystallized Hydrogen
- Gunpowder -> 4 Crystallized Nitrate + 1 Crystallized Sulfur
- (O) Nitre (Saltpeter) -> 1 Crystallized Potassium + 1 Crystallized Nitrate
- (O) Nitre Ore (Saltpeter Ore) -> 1 Crystallized Potassium + 1 Crystallized Nitrate
- Obisidian -> 1 Crystallized Silica + 1 Crystallized Magnesia
- Stone -> 1 Crystallized Silica + 1 Crystallized Alumina
- Crystallized Silica -> 1 Crystallized Silicon + 2 Crystallized Oxygen
- Crystallized Alumina -> 2 Crystallized Aluminium + 3 Crystallized Oxygen
- Crystallized Magnesia -> 1 Crystallized Magnesium + 1 Crystallized Oxygen
- (O, I) Bronze Ingot -> 1 Crystallized Copper + 3 Crystallized Tin
- Crystallized Methane -> 1 Crystallized Carbon + 4 Crystallized Hydrogen
- Crystallized Nitrate -> 1 Crystallized Nitrogen + 3 Crystallized Oxygen
- Lapis Lazuli Ore -> 6 Crystallized Silica + 4 Crystallized Sulfur
- Lapis Lazuli Block -> 54 Crystallized Silica + 36 Crystallized Sulfur
- (O, I) Brass Ingot -> 3 Crystallized Copper + 2 Crystallized Zinc
- (O, I) Brass Ore -> 3 Crystallized Copper + 2 Crystallized Zinc
- Rotten Flesh -> 2 Crystallized Phosphorus
- (O, I) Iron Dust -> 1 Crystallized Iron
- (O, I) Gold Dust -> 1 Crystallized Gold
- (O, I) Tin Dust -> 1 Crystallized Tin
- (O, I) Copper Dust -> 1 Crystallized Copper
- (O, I) Coal Dust -> 1 Crystallized Carbon
- (O, I) Aluminium Dust -> 1 Crystallized Aluminium
- (O, I) Bronze Dust -> 1 Crystallized Copper + 3 Crystallized Tin
- (O, I) Brass Dust -> 3 Crystallized Copper + 2 Crystallized Zinc
Summoning Asorah, The Fallen [ ]
Once the player obtains the components to craft an Altar, the first boss of AbyssalCraft, Asorah, The Fallen, may be summoned. In order to summon the boss, the Altar must be built in the wastelands using abyssal cobblestone. Assembling the altar requires a shift-right click to the center block with the second tier (abyssal wastelands) Necronomicon. Once built, Asorah can be summoned by the player performing the Ritual of the Sleeper (details in the Necronomicon).
Fighting Asorah can be tricky. During the fight,Spectral Dragons will spawn around him, allowing him to drain their life to heal his own, killing them in the process. It’s worth noting that when a Spectral Dragon dies, they explode, dealing direct damage to Asorah. When Asorah reaches half health, he will start to slowly lose health when a spectral dragon is nearby. When he reaches 25% health, however, he will once again continue to drain the life out of the dragons.
Once defeated, Asorah will drop a large amount of experience as well as the «Eye of The Abyss».
Generating a new world[]
The first thing you should do after installing AbyssalCraft (as of version 1.8.4 and later) is to craft a Necronomicon. This picture shows how a Necronomicon is crafted:
This book contains the majority of the information written on this wiki page, with some extra info on materials found in the various dimensions added by the mod (and new materials found in the Overworld).
As you might suspect, AbyssalCraft adds a new overworld biome when you generate a new world with it, the biome (called «The Darklands») is made out of Darklands grass, which is a purple/indigo grass that emits nether portal particles, and other things you can easily notice inside it is the trees (leaves have a similar color to the grass) and the various generated structure scattered around the place (as of lately, the structures are quite rare). A good start when you find a Darklands biome is to locate the 2 story high buildings that looks like a wizard tower, for the simple reason that it contains a fully powered enchantment table, allowing you to quickly enchant tools/armor as you obtain them.
Dimensions
The 4 dimensions of AbyssalCraft are collectively known as The Abyss and are: The Abyssal Wastelands, the Dreadlands, Omothol and The Dark Realm.
The Abyss dimensions (excluding The Dark Realm) are accessed by Gateway Keys, which place down a portal when used. To exit the Abyss, the player will have to walk through a corresponding portal in the Abyss dimensions.
Compasses and Clocks do not work at all in the Abyss dimensions. The Abyss dimensions also do not have a day-night cycle system.
The Abyssal Wasteland
The Abyssal Wasteland is the first Abyss dimension that the player will encounter. This dimension has a bright green sky and a dark ground. The mobs Death Ghoul, Abyssal Zombie, Zombie, Skeleton, Spectral Dragon and Skeleton Goliath spawn here.
The Abyssal Wastelands spawns abyssal versions of Overworld ores. These ores spawn at the same Y-level as their corresponding Overworld ore.
Pools of Liquid Coralium generate here. The terrain is slightly mountainous plains with dark green grass. The first boss of AbyssalCraft, Asorah, The Fallen can be spawned here.
The Dreadlands
The Dreadlands is the second Abyss dimension. This dimension has a red, Nether-like sky and maroon Dreadlands Grass on the ground. The Dreaded Abyssalnite Golem, Abyssalnite Golem, Dreadling, Dread Spawn and Dreadguard are the mobs that are found in The Dreadlands.
The ores Dreaded Abyssalnite and Dreadlands Abyssalnite are found in this dimension.
The Dreadlands contain different biomes such as the Dreadlands Mountains, Purified Dreadlands and Dreadlands Forest. Dreadlands Trees are commonly seen here. The second boss, Cha’garoth, The Dreadbeast can be spawned here.
Omothol
Omothol is the third Abyss dimension. This dimension has a completely black sky and the ground is filled with dark gray colored Omothol Stone. Remnants, Omothol Ghouls, Omothol Wardens and the Minions of the Gatekeeper are the mobs that populate Omothol.
Ethaxium Ore are found in Omothol.
The terrain here is generated on sky islands, and falling into the bottom void is very easy. The terrain consists of barren mountains and plains that is nearly completely made out of Omothol Stone. The third boss, J’hazar, Gatekeeper of the Abyss can be spawned here.
The Dark Realm
The Dark Realm is the fourth and final Abyss dimension. Unlike the other Abyss dimensions, The Dark Realm is accessed by jumping off the edge of an island in Omothol. Fall damage occurs when a player enters The Dark Realm. The player can exit The Dark Realm by using a Cha’garoth’s R’lyehian Gateway Key to make a portal to Omothol.
Shadow Creature, Shadow Monster, Shadow Beast and Lesser Shoggoth populate The Dark Realm. The terrain here is completely made of dark violet colored Darkstone. The optional boss, Sacthoth, Harbinger of Doom is spawned rarely in this dimension.
Article management templates[]
Nominate an article for deletion
{{delete}}
Add this to an article to nominate it for deletion. It will add the article to Category:Candidates for deletion.
{{speedydelete|<reason>}}
Add this to an article for pages that qualify for speedy deletion.
Disambiguation articles
{{disambig}}
If you have several articles that have similar or identical names, you may wish to create a «disambiguation» page at the main article name, with the articles taking an extra phrase in brackets afterwards. For example:
-
The Prince <— disambiguation page, with links to:
- The Prince (frog)
- The Prince (human)
- Using {{disambig}} marks an article as a disambiguation page by adding a banner to the article and categorizing it under Category:Disambiguations. Add links to the various articles under the banner.
- For more information, see Help:Disambiguation.
Stubs
{{stub}}
- When a page has little or no useful information, then it is likely a stub. This template will include them in Category:Article stubs, and is used to list which articles need expanding.
- For more information, see Help:Stubs.
General wiki templates[]
Clear
{{clr}}, plus {{clrl}} and {{clrr}}
- This template is used to reduce the amount of non-wikicode used on pages, replacing the code . Its use should generally be avoided.
- You can use {{clr}} instead of the HTML tag that clears space below things like images, pictures and tables, so the following stuff doesn’t begin until the bottom of the image, picture or table box.
- You can also use {{clrl}} or {{clrr}} to clear only left or right floats.
{{for|<name>|<link>}}
Use at the top of articles as a simple «for x see y» template.
{{main|<main article>}}
Use at the start of a section to link to the main article on it.
Right-aligned Table of Contents
{{tocright}}
This template floats the table of contents (toc) on the right. It should only be used when absolutely necessary, to keep consistent design.
{{sandbox}}
A template that should be used to head up all Project:Sandbox pages.
{{t|<template>}}
This template allows you to show example template code (with a link to the templates) without using the template itself. It is used extensively on this page.
Welcome
{{welcIP}} and {{welcome}}
- The first (with longer version «welcomeIP» for those of you who like typing more) is to welcome new non-vandalistic contributors who are «anonymous», identified only by their IP number; it encourages them to register.
- The second template is for welcoming new registered users. Should be customized for the wiki, indicating the pages we most want newcomers to visit.
- The above two templates are very suitable for having «subst:» prefixed, because they can be edited with additions or deletions appropriate to the apparent strengths of the person being welcomed; e.g. if the contributor has already demonstrated good wiki editing skills you could delete references to pages about «how to edit».
Wikipedia
{{wikipedia}}, {{wikipedia-deleted}}
Wikipedia-related templates. Use {{wikipedia}} for articles taken directly from Wikipedia, and {{wikipedia-deleted}} for articles deleted from Wikipedia.
The Dreadlands [ ]
Once inside the Dreadlands, you’ll notice the Abyssalnite/Dreaded Abyssalnite Golems, who continuously fight each other (with the exception of the dreaded one also attacking the player). These mobs can be used as an easy way to farm huge quantities of Abyssalnite, as they drop chunks of it on death. The environment in the Dreadlands is quite desolate, but there are still mobs that spawn here (apart from the aforementioned golems). In the Dreadlands Forest biomes you can find Demon Pigs and Dread Spawns (and the golems plus the Dreadling, which has a fairly average chance of spawning in all of the various Dreadlands biomes). If you happen to stumble upon a Dreadlands Mountains biome, you should be able to find larger amounts of Dreadlings, but also Fists of Cha’garoth, Spawns of Cha’garoth and the infamous Dreadguard. The only ore you can find here are the Dreaded/Dreadlands Abyssalnite ores, which can be smelted down for more Abyssalnite Ingots. There is also a Purified Dreadlands biome (which is the opposite of the normal Dreadlands biome, since this one is covered in Abyssalnite Stone instead of Dreadstone).
Screenshots:
Coralium Infested Swamp – A Coralium Infested Swamp biome

The Darklands – A normal Darklands biome

Darklands Plains – A Darklands Plains biome

Darklands Forest – A Darklands Forest biome

Darklands Highlands – A Darklands Highlands biome

All items in the mod as of version 1.9.5.1

Liquid Coralium and Liquid Antimatter, two fluids added in the mod

Buttons and Pressure Plates made from various materials.

Portals leading to the various dimensions added in the mod. Worth noting only the green one is built in the Overworld.

All ordinary blocks in the mod as of version 1.9.5.1.

You can make doors out of the two wood types.

Storage, machines, heads, explosives and some out-of-the-ordinary blocks

Statues depicting Lovecraftian deities and other blocks used in the mods energy system

A setup of pedestals and an altar used in the mods magic system to perform various rituals.

A Darklands Mountain biome

The first dimension

The second dimension. Also the color palette of torture

The third dimension

The fourth dimension

Probably the most hated mob in all of modded Minecraft.

Translucent, smoking, hard to see in dark places. Inhabitants of the Darklands and the Dark Realm.

All purpose undead. Probably carry all sorts of diseases…

Skeleton Goliath – Undead, big, has a club.

Dread Spawns

Armored foe that can barf all sorts of nasty stuff on you.

Inhabitants of Omothol. Has a thing for trading.

Transmutator Recipes[]
Note: Gaseous elements would normally turn into gas if they were de-crystallized, but here nothing happens to the crystal. Then there’s the fact that this type of crystallization is fictional.
- Crystallized Abyssalnite -> 1 Abyssalnite Ingot
- Crystallized Coralium -> 1 Refined Coralium Ingot
- Crystallized Dreadium -> 1 Dreadium Ingot
- Dreaded Shard of Abyssalnite -> Dreadium Ingot
- Crystallized Iron -> 1 Iron Ingot
- Crystallized Gold -> 1 Gold Ingot
- Crystallized Sulfur -> 1 Sulfur
- Crystallized Blaze -> 1 Blaze Powder
- Crystallized Redstone -> 1 Redstone
- Crystallized Hydrogen -> 1 Crystallized Hydrogen
- Crystallized Oxygen -> 1 Crystallized Oxygen
- Crystallized Nitrogen -> 1 Crystallized Nitrogen
- Crystallized Methane -> 1 Methane
- Crystallized Tin -> 1 Tin Ingot
- Crystallized Copper -> 1 Copper Ingot
- Darkstone -> 1 Stone
- Stone -> 1 Darkstone
- Stone Brick -> 1 Darkstone Brick
- Darkstone Brick -> 1 Stone Brick
- Cobblestone -> 1 Darkstone Cobblestone
- Darkstone Cobblestone -> 1 Cobbelstone
- Coralium Stone Brick -> 4 Coralium Brick
- Coralium Brick -> 1 Coralium Stone
- Liquid Coralium Bucket -> 1 Liquid Coralium
- Liquid Coralium -> 8 Coralium Stone
- Liquid Antimatter Bucket -> 1 Liquid Antimatter
- Diamond -> 64 Coal
- -> 1 Water
- -> 1 Lava
- Wool -> 9 String
- Gravel -> 2 Flint
- Quartz Block -> 4 Nether Quartz
- Nether Brick -> 4 Nether Brick (item)
- Nether Brick (item) -> 1 Netherrack
- Water -> 8 Ice
- Wheat -> 1 Seed
- Seed -> 1 Wheat
- Dense Carbon Cluster -> 1 Diamond
- Dreaded Gateway Key -> 1 Cha’garoth’s R’lyehian Gateway Key
- Crystallized Aluminium -> (O, I) 1 Aluminium Ingot
- Crystallized Zinc -> (O, I) 1 Zinc Ingot
- Lava -> 8 Solid Lava
- End Stone -> 1 Ethaxium
- Ethaxium -> 1 End Stone
- Ethaxium Brick (block) -> 1 Ethaxium
Phase 4: The Omothol
The Omothol is the 3rd and final main dimension you can access in Abyssalcraft. Much like the End, The Omothol consists of several small to moderately large floating islands. The spacing between these islands make use of a Ring of the Flying Squid, Elytra, or the vampire bat mode skill almost mandatory to traverse the space between them. Ethaxium is the material of this dimension and is used to make the strongest tools in Abyssalcraft. Ethaxium is obtained through crafting and rituals, but can often be obtained faster by killing Minions of the Gatekeeper with a looting sword.
Obtaining a Tier IV (Omothol) Necronomicon
Most rituals within the Omothol will require the use of a Omothol Necronomicon. This upgrade will unlock more rituals including the rituals for producing . On top of this, the upgrade also enables the Necronomicon to store up to 40,000 PE. Making the Omothol Necronomicon requires many of the same steps as in earlier upgrades with slight variations: gather essence from the Omothol enemies (Not Shadows) and surround with Omothol Ghoul Flesh (Crafted using Coralium-Plagued Flesh and Eldritch Scales dropped by Minions of the Gatekeeper) to produce skin which is crafted with the previous Necronomicon to upgrade it.
Finding and summoning J’zahar
J’zahar, the gatekeeper of the Abyss, is the final boss of Abyssalcraft and drops Essense of the Gatekeeper, an item essential for crafting the Abyssalnomicon and many endgame pieces of equipment. J’zahar’s temple is located at the world origin in the Omothol, with the ritual circle needed to summon him at the coordinates x=4, y=54, z=85. To summon J’zahar, you must perform the Ritual of Reversed Time using 4 Omothol Essenses and 4 Shards of Oblivion. When you summon J’zahar, time is rewound on the temple, restoring it to its base state, allowing the temple to act as an infinite source of books and Dark Ethaxium Brick while also clearing any placed blocks within the temple.
Fighting J’zahar
J’zahar is the most dangerous boss in Abyssalcraft, weilding the ability to fire exploding skulls, apply withering against you, or create black holes and explosions. J’zahar has a damage cap of 7 and is very difficult to fight using a stand due to his black holes redirecting their projectiles. The only way of dealing damage above the cap is by using a fork, a melee weapon exclusive to hunters. It is recommended that you bring a shield to defend against J’zahar’s melee attacks and, if possible, an immunity to the wither effect, such as through a Witherless Rose or Withered Heart. When J’zahar dies, he begins drawing all nearby entities towards himself as a final attack, exploding and warping anybody too close into the Dark Realm. It is important to note that if this final attack is successful and it manages to teleport a player, J’zahar will not drop any loot.
Gaining Entry to Cha’garoth’s Lair [ ]
In order to reach Cha’garoth, and fight him, you need to access his lair. This is done by crafting the two pieces of his altar, then placing them at ground level 40 inside a Dreadlands Mountains biome. However, in order to do this, you will need Dreadium Ingots, which can be obtained through a couple of methods. You can obtain them by transmuting Dreaded Shards of Abyssalnite (dropped by Dreadguards, who has a chance of spawning in any Dreadlands biome, but more often in Dreadlands Mountain biomes), or by crystallizing Dreaded Chunks of Abyssalnite (the Crystallizer is crafted by surrounding a furnace with Dreadstone Bricks, but with 1 Block of Dreadium on each side of the furnace). The altar consists of 2 pieces, a bottom part and a top part, the bottom part is crafted with 2 Bones, 1 Dread Cloth , 2 Dreadium Ingots, 2 Dreadstone, Asorah’s Dreaded Gateway Key and 1 Dreaded Shard of Abyssalnite (the Gateway Key in the middle, with 1 Dreadium Ingot on each side, then 1 Dreadstone below the Dreadium Ingot, and the Dreaded Shard there, then the cloth on top of the Gateway Key with a Bone on each side of it). The top part requires 1 Bucket, 2 Sticks, 3 Dread Cloths and 3 Dreadium Ingots (the Bucket on top with 1 Stick on each side, then all of the Dread Cloth in the middle row and all of the Dreadium Ingots in the bottom row). Once you have the altar pieces, you will need to get to ground level 40 in the Dreadlands Mountains biome. When you place the bottom piece of the altar, you will get a message if the altar is placed at the wrong height, then you will get a message telling you to right-click the top part if both of the altar pieces have been placed correctly. Once you have clicked, the altar will disappear, and you will be inside Cha’garoth’s Lair.
The Dread Cloth is crafted by putting a piece of leather in the middle, surrounded by Strings and Dread Fragments (four each, in a checkers pattern).
AbyssalCraft
Здравствуй, игрок. В этом гайде я обучу тебя моду AbyssalCraft.
Не удивляйся, если тебя начнут бить коровы, свиньи или курицы. Это Демоны, после убийства оболочки появится демоническое животное. С него падает гнилая плоть и мясо этого животного.
Для начала тебе нужно найти Шогготов.
После их смерти выпадают статуи богов и плоть шоггота.
Статуи нужны для зарядки некрономикона.
Следующим шагом будет поиск гор тёмных земель. Они выглядят так:
Тебе нужны мобы ,,Темное существо» ,,Темный монстр» и ,,Темный зверь». Они выглядят так:
из них выпадают фрагменты/осколки или камни тени, которые нам нужны. Их тебе нужно около 20.
Опускайся под землю ниже 30 высоты и находи коралловую руду, на первое время хватит стака.
Создай пропитанный кораллом камень:
и выплавляй его в печке
после создай вот такую конструкцию из статуй, которых ты выбили с шогготов:
Нужно встать в середину с некрономиконом и ждать. Так же можно поставить некрономикон на энергический пьедестал:
После того, как некрономикон наполнился создай такую конструкцию:
На получившемся алтаре создай 5 камней трансмутации:
Создай катализатор забвения:
После захода в мир ты видишь вот такую картину:
Здесь есть много коралловой руды, добудь ее.
Так же здесь есть данжи, выглядят они так:
Перед сундуком есть коралловый камень, добудь их 36 штук, переплавь и создай 9 кирпича.
Теперь тебе нужно улучшить некрономикон. Создай посох раздирания:
Как делается осколок забвения я уже показывал.
Отправляйся в Бездну и найди там шогготов. Теперь тыкай по ним пкм. После 100 нажатия тебе дадут сущность, их нужно 8. После отправляйся убивать глубинных зомби и выбей стак плоти, пораженной кораллами
Теперь сделай кожу бездной пустоши:
А теперь Асора. Из сделанных тобой коралловых кирпичей делай конструкцию:
Сам ритуал Асоры таков:
Призывай и убивай его из меча или лука. Тебе выпадет глаз Бездны (Асоры).
А еще создай трансмутатор:
Он работает на коралловых камнях
Следующим шагом будет камень силы. Создай трекер:
Ну а теперь мы создаем ключ в глубокоземье:
В бездне клацай пкм и открывай портал:
Убивая здешних мобов можно выбить фрагмент Глубокоземья и Глубокоземный осколок абиссальнита. Фрагментов нужно пару стаков а осколков 45 и около стака плоти шогготов.
Ищи шогготов/других мобов и выбивай сущность (так же как и с бездной) и улучшай некрономикон.
Теперь в трансмутатор положи 41 осколок абиссальнита и жди. Получившиеся красные осколки переделай в красные глубокоземные камни. Теперь перекладывай их в трансмутатор. У тебя получатся слитки дредиума. Делай 2 блока. Из красного камня глубокоземья сделай кирпичи. А теперь сделай кристаллизатор:
Клади в кристаллизатор плоть шогготов и жди. Опять переделывай осколки в камни и клади в трансмутатор. Создай ткань:
Так же ты можешь сделать глубокоземную пластину:
А теперь алтарь Чагарота, состоящий из двух частей:
После создания алтаря отправляйся в горы глубокоземья и прокопавшись до 40 высоты ставь алтарь. Нажми пкм и призови Чагарота. Начало данжа выглядит так:
Полностью изучи данж, ведь там есть 2 блока дредиума и кристаллизатор.
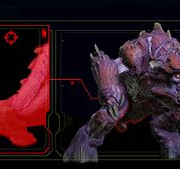
Сам Чагарот выглядит так:
После его убийства падает зараженных ключ, который нужно засунуть в трансмутатор. После очистки ты получаешь ключ в Омотул.
На координатах X: 5, Y:53, Z: 7 ты найдешь Замок Джахара. На втором этаже сидит сам Джахар:
После его убийства упадет сущность привратника, ей можно улучшить некрономикон до абиссальнамикона.
Если ты не успел его убить, то ниже комнаты Джахара есть алтарь, на котором можно запустить ритуал возрождения Джахара.
Welcome to AbyssalCraft! An eldritch horror mod that takes heavy inspiration from H.P. Lovecraft ‘s Cthulhu Mythos. This Minecraft mod will have you encountering twisted fiends of the dark depths, exploring strange worlds outside our understanding, and battling powerful bosses not of this world.
This page will serve as an introductory course to help you into the extensive mod.
Exploring the Overworld[]
Your next step should be crafting a Gateway Key, which will allow you to enter the Abyssal Wasteland. It’s recommended that you stock up with armor and tools as well. Abyssalnite Armor and Tools can be made from coralium, which is slightly stronger than their iron counterparts.
You will then need to seek out a Darklands Mountains biome and slay enough Shadow Creatures, Shadow Monsters, and Shadow Beasts to obtain Shadow Gems which will be turned into Shards of Oblivion. To craft the Gateway Key you will need 16 gems.
Once you have the key, find a good open area to create the portal and right click the ground to open it. (It’s advised that you gather a supply of food and light sources before going through the portal. Where you’re going, those two are going to be hard to come by).