Replay mod documentation
Содержание:
- Replay Center
- 1.2 Installing FFmpeg
- Frequently Asked Questions
- 3.7 Player Overview
- 1.1 Installing the Replay Mod
- 5.4 Compatibility with other Mods
- 3.1 Movement
- 5.2 Crash while rendering
- 1.2 Installing FFmpeg
- 5.4 Compatibility with other Mods
- Frequently Asked Questions
- 3.1 Movement
- 3.2 Controlling Time
- 3.1 Movement
- 3.2 Controlling Time
- 5.2 Crash while rendering
- 3.7 Player Overview
- 1.3 Compatibility with other Mods
- 5.2 Crash while rendering
- 1.3 Compatibility with other Mods
- 3.7 Player Overview
- Как использовать X Replay
- 3.1 Movement
- 3.7 Player Overview
- 3.2 Controlling Time
- Building
- 3.1 Movement
- 1.1 Installing the Replay Mod
- 1.1 Installing the Replay Mod
Replay Center
The Replay Center is where you can share your Minecraft Moments with others and discover awesome Replays by other Users.
To be able to use the Replay Center, you need an account on ReplayMod.com.
4.1 Authentication
When starting Minecraft with the Replay Mod installed, you will be asked to login to ReplayMod.com.
If you don’t want to use the Replay Center, you can click the «Skip» Button to continue without logging in.
If you want to browse other users’ Replays and share your own Replays however, you need to Register an account.
Please note that you can only create only one ReplayMod.com Account per Minecraft Account, so choose your username wisely.
Once you’ve registered, you’re automatically going to be logged in. The Mod remembers your login until you manually log out from the Replay Center,
so it won’t ask you upon every startup if you logged in once.
4.2 Replay Files
Once you’ve logged in, you can use the «Replay Center» Button in the Main Menu to access the Replay Center.
In the upper half of the screen, there are 6 Buttons for 6 Tabs of the Replay Center:
Recent
Shows the most recently uploaded Replays in the
Replay Center
Best
Shows the Replays with the best rating and most downloads
Downloaded
Shows all of the Replays you’ve downloaded locally
Favorited
Shows all of the Replays you favorited
Search
Allows you to search for specific Replays
When you’ve found an interesting looking Replay, you can download it using the «Download» Button in the lower left corner. After downloading,
you’ll automatically join the Replay.
After you’ve downloaded a Replay, you can rate and favorite it in the Replay Center using the respective buttons.You are encouraged to rate Replays after you downloaded them to help promoting the best Replays.
The Login Screen which is displayed upon startup
The Register Screen
The Replay Center in the Mod
1.2 Installing FFmpeg
To render your creations with Replay Mod you will need to have FFmpeg installed.
1.2.1 Windows
Download the latest FFmpeg build from https://www.gyan.dev/ffmpeg/builds/ (the essentials version is sufficient).
In your folder, create a folder. Extract the downloaded .zip file into this folder. The FFmpeg executable should end up at .
Notes for alternative launchers
- Twitch launcher by default installs Minecraft instances in C:\Users\username\Twitch\Minecraft\Instances\instancename\
- GD Launcher by default installs Minecraft instances in C:\Users\username\AppData\Roaming\gdlauncher_next\instances\instancename\
- MultiMC by default installs Minecraft instances in C:\Program Files (x86)\MultiMC\instances\Instancename\.minecraft\
For these launchers, make sure FFmpeg exists in (Twitch / GD) or (MultiMC)
1.2.2 Mac OSX
On OSX, you can install FFmpeg with Homebrew using .
Alternatively, you can download the latest static build from https://ffmpeg.org/ and copy the FFmpeg executable to .
1.2.3 Linux
On Linux, you can install FFmpeg using your system’s package manager, for example using .
If in doubt, consult the documentation of your distribution.
Frequently Asked Questions
For how long can I record?
Theoretically, a Replay File can be up to 24 days, 20 hours, 30 minutes and 23 seconds long — which is a timespan you’ll probably never reach.
How many chunks around me does the Mod record?
If you’re playing in Singleplayer, all of the loaded chunks within your Render Distance are recorded.If you’re on a server, this depends on the view-distance setting in the server.properties file, which is set to 11 Chunks by default.
The Replay Mod of course records every loaded, not only the rendered chunks. Therefore, chunks behind your back are recorded as well.
Why can’t I start recording in the middle of a session?
Due to the way the Replay Mod works, you need to start recording when joining a Server or World — otherwise some data which the Replay Files need is missing.
How does recording affect my FPS?
Usually, recording a Replay does not affect your framerate, and it also doesn’t lead to lag on servers.We’ve tested the Mod on a low-end notebook with only 3GB of ram, and everything worked fine.
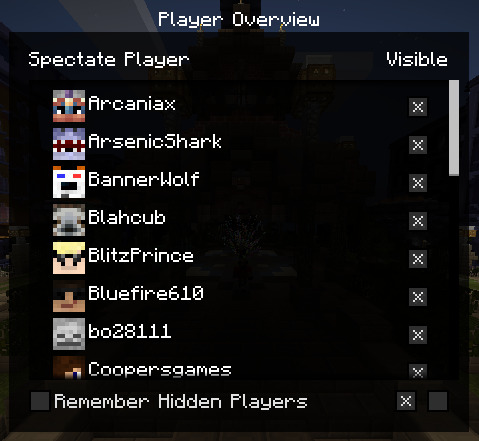
3.7 Player Overview
Using the key, you can open the Player Overview. In the Player Overview, you see a list of all currently loaded Players in the Replay.
By clicking on a player’s Name or Head, you can spectate this player.
Next to each player, there’s a checkbox using which you can toggle the player’s visibility.
This way, you can hide certain players from the Replay.Below the individual checkboxes, there are two checkbox buttons — one to hide all players and one to show all players.
If you want to save the player visibility settings, check «Remember Hidden Players» checkbox.
If checked, invisible players will stay invisible after closing the Replay (this can of course be reverted),
otherwise all of the players are visible again after reloading the Replay.

The Player Overview Screen
1.1 Installing the Replay Mod
Minecraft 1.14 and above
The ReplayMod for Minecraft 1.14 and above requires Fabric to be installed.
You can find Fabric and the installation instructions here.
After installing Fabric, simply put the downloaded ReplayMod .jar file into the folder of your Minecraft directory.
Minecraft 1.12.2 and below
For Minecraft 1.12.2 and below it requires Minecraft Forge to be installed.
If you don’t know how to install Forge, follow this tutorial.
After installing Forge, simply put the downloaded file in the folder of your Minecraft directory.
Note: The Replay Mod is entirely client side and can not be installed on the servers you play on.
5.4 Compatibility with other Mods
5.4.2 Shaders Mod
Karyonix’ Shaders Mod is no longer compatible with Minecraft Forge starting with 1.9.4. As such it is not compatible with the Replay Mod either.
Please use Optifine instead.
5.4.3 Custom Main Menu
The Custom Main Menu mod is often used in mod packs to customize their Main Menu with a button layout fitting the background image, links to their website / bug tracker and similar.
If you are familiar with it, the button id for the Replay Mod is: 17890234 (text: ).
Due to the nature of this Custom Main Menu mod, buttons added to the Main Menu by 3rd party mods like the Replay Mod will not show up by default.Thus, to access the Replay Viewer/Editor/Center, you need to manually configure the position for those buttons.To do so, you need to modify the Custom Main Menu configuration file.
Usually, you can find it at (if you’re using a mod pack launcher, it normally has its own .minecraft folder).For an explanation of this config file, have a look at Custom Main Menu’s page.
You can find a list of already modified config files here.
5.4.6 OldAnimationsMod
In case your Minecraft crashes when you are using both ReplayMod and OldAnimationsMod, try removing OldAnimationsMod.
5.4.7 Orange’s 1.7 Animations
If you use ReplayMod with shaders and 1.7 Animations you may see floating water and glass. Remove 1.7 Animations to resolve this.
5.4.9 Baritone
The Baritone mod can cause a crash when you’re trying to load a replay. If you experience such problems, try running without Baritone.
5.4.10 RandomPatches
Minecraft may crash if you try to use RandomPatches together with ReplayMod. Try removing RandomPatches if Minecraft crashes on startup.
5.4.11 Sodium
ReplayMod can record when Sodium is installed but will crash during render. Disable Sodium before rendering, it can be re-enabled after that.
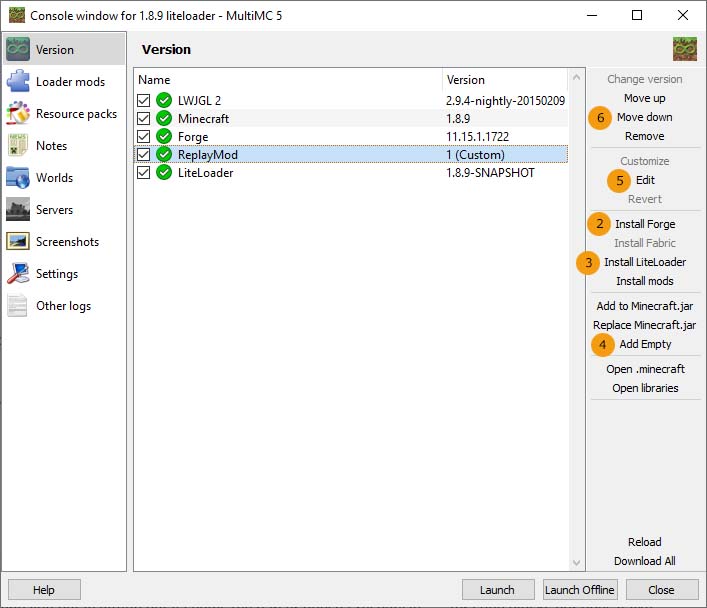
5.4.12 LiteLoader
LiteLoader is known to cause issues due to the mixin version it contains.
You can use MultiMC to workaround this problem.
The MultiMC function requires that your computer has a default editor for json files associated.
1: Create your instance then edit the instance2: Click 3: Click 4: Click ; use as name and as uid5: Select the new ReplayMod and click 6: Replace the contents with one of the below snippets7: Save and close the text editor8: Move ReplayMod up until it is above LiteLoader9: Remove the ReplayMod jar from the mods folder if you installed it previously.
Snippet for 1.8.9
Snippet for 1.12.2
The MultiMC interface to place ReplayMod above LiteLoader.
The properties for the new Empty.
3.1 Movement
3.1.1 Basic Controls
While in the Replay, you can freely move around using the movement keys ( by default).
You can move through block similar to Spectator Mode.
Using the Mouse Wheel, you can modify your flying speed. Scrolling up causes you to fly faster, while scrolling down slows you down.
If you prefer the camera to be controlled similar to vanilla Creative Mode, you can change that in the Replay Settings.
3.1.2 Camera Roll
While in a Replay, you can tilt the Camera.
By default, pressing will tilt the screen clockwise, and pressing will tilt the screen counterclockwise.Using , you can reset the Camera Roll.
When holding the key ( key on Mac) while tilting, you can tilt slower and more precisely.
Hint: Most of the Keybindings mentioned in this documentation can be changed in Minecraft’s Control Menu.
A Screenshot taken with a tilted camera
3.1.3 Spectating Entities
You can spectate any living entitiy (including players) while in a Replay. When looking at an entity, a crosshair will be visible.
By right-clicking, you will start spectating the entity. If you want to stop spectating the entity, use your Sneak Key ().
5.2 Crash while rendering
If Minecraft crashes after a few frames of rendering, it most likely means the FFmpeg didn’t like the Command Line Arguments you passed.
If you customized the Command Line Arguments manually, re-check them — it’s probably your own fault.
Hint: In your .minecraft folder, you’ll find a file called which contains information about FFmpeg’s rendering process.
- If you did not customize the Command Line Arguments, you might have entered some insanely high (or low) values e.g. for Bitrate or Video Resolution. Try again with other, more reasonable values.
- Make sure the camera doesn’t move below Y=0 or above Y=255
1.2 Installing FFmpeg
To render your creations with Replay Mod you will need to have FFmpeg installed.
1.2.1 Windows
Download the latest FFmpeg release from https://www.gyan.dev/ffmpeg/builds/ffmpeg-release-essentials.zip.
In your folder, create a folder. Extract the downloaded .zip file into this folder. The FFmpeg executable should end up at .
Notes for alternative launchers
- Twitch launcher by default installs Minecraft instances in C:\Users\username\Twitch\Minecraft\Instances\instancename\
- GD Launcher by default installs Minecraft instances in C:\Users\username\AppData\Roaming\gdlauncher_next\instances\instancename\
- MultiMC by default installs Minecraft instances in C:\Program Files (x86)\MultiMC\instances\Instancename\.minecraft\
For these launchers, make sure FFmpeg exists in (Twitch / GD) or (MultiMC)
1.2.2 Mac OSX
On OSX, you can install FFmpeg with Homebrew using .
Alternatively, you can download the latest static build from https://ffmpeg.org/ and copy the FFmpeg executable to .
1.2.3 Linux
On Linux, you can install FFmpeg using your system’s package manager, for example using .
If in doubt, consult the documentation of your distribution.
5.4 Compatibility with other Mods
5.4.2 Shaders Mod
Karyonix’ Shaders Mod is no longer compatible with Minecraft Forge starting with 1.9.4. As such it is not compatible with the Replay Mod either.
Please use Optifine instead.
5.4.3 Custom Main Menu
The Custom Main Menu mod is often used in mod packs to customize their Main Menu with a button layout fitting the background image, links to their website / bug tracker and similar.
If you are familiar with it, the button id for the Replay Mod is: 17890234 (text: ).
Due to the nature of this Custom Main Menu mod, buttons added to the Main Menu by 3rd party mods like the Replay Mod will not show up by default.Thus, to access the Replay Viewer/Editor/Center, you need to manually configure the position for those buttons.To do so, you need to modify the Custom Main Menu configuration file.
Usually, you can find it at (if you’re using a mod pack launcher, it normally has its own .minecraft folder).For an explanation of this config file, have a look at Custom Main Menu’s page.
You can find a list of already modified config files here.
5.4.6 OldAnimationsMod
In case your Minecraft crashes when you are using both ReplayMod and OldAnimationsMod, try removing OldAnimationsMod.
5.4.7 Orange’s 1.7 Animations
If you use ReplayMod with shaders and 1.7 Animations you may see floating water and glass. Remove 1.7 Animations to resolve this.
5.4.9 Baritone
The Baritone mod can cause a crash when you’re trying to load a replay. If you experience such problems, try running without Baritone.
5.4.10 RandomPatches
Minecraft may crash if you try to use RandomPatches together with ReplayMod. Try removing RandomPatches if Minecraft crashes on startup.
5.4.11 Sodium
ReplayMod can record when Sodium is installed but will crash during render. Disable Sodium before rendering, it can be re-enabled after that.
5.4.13 LiteLoader
LiteLoader is known to cause issues due to the mixin version it contains.
You can use MultiMC to workaround this problem.
The MultiMC function requires that your computer has a default editor for json files associated.
1: Create your instance then edit the instance2: Click 3: Click 4: Click ; use as name and as uid5: Select the new ReplayMod and click 6: Replace the contents with one of the below snippets7: Save and close the text editor8: Move ReplayMod up until it is above LiteLoader9: Remove the ReplayMod jar from the mods folder if you installed it previously.
Snippet for 1.8.9
Snippet for 1.12.2
The MultiMC interface to place ReplayMod above LiteLoader.
The properties for the new Empty.
Frequently Asked Questions
For how long can I record?
Theoretically, a Replay File can be up to 24 days, 20 hours, 30 minutes and 23 seconds long — which is a timespan you’ll probably never reach.
How many chunks around me does the Mod record?
If you’re playing in Singleplayer, all of the loaded chunks within your Render Distance are recorded.
If you’re on a server, this depends on the view-distance setting in the server.properties file, which is set to 11 Chunks by default.
The Replay Mod of course records every loaded, not only the rendered chunks. Therefore, chunks behind your back are recorded as well.
Why can’t I start recording in the middle of a session?
Due to the way the Replay Mod works, you need to start recording when joining a Server or World — otherwise some data which the Replay Files need is missing.
How does recording affect my FPS?
Usually, recording a Replay does not affect your framerate, and it also doesn’t lead to lag on servers.
We’ve tested the Mod on a low-end notebook with only 3GB of ram, and everything worked fine.
How big are the files the Replay Mod records?
The file size of the recorded .mcpr files greatly depends on the amount of world data the replay contains.
A Replay in which you travelled around and discovered a lot of terrain is significantly larger than a Replay which was recorded in a void world.
An average Replay File of 10 Minutes duration usually is between 2MB and 10MB large. Replays recorded on Minigame Servers with lots of particle effects and world changes might be larger.
3.1 Movement
3.1.1 Basic Controls
While in the Replay, you can freely move around using the movement keys (WASD, Space, Shift by default).
You can move through blocks similar to Spectator Mode.
Using the Mouse Wheel, you can modify your flying speed. Scrolling up causes you to fly faster, while scrolling down slows you down.
3.1.2 Camera Roll
While in a Replay, you can tilt the Camera.
By default, pressing J will tilt the screen clockwise,
and pressing L will tilt the screen counterclockwise.
Using K, you can reset the Camera Roll.
When holding the Ctrl key (Cmd key on Mac) while tilting, you can tilt slower and more precisely.
Note: Most of the Keybindings mentioned in this documentation can be changed in Minecraft’s Control Menu.
3.1.3 Spectating Entities
You can spectate any living entity (including players) while in a Replay. When looking at an entity, a crosshair will be visible.
By right-clicking, you will start spectating the entity. If you want to stop spectating the entity, use your Sneak Key (Shift)

A Screenshot taken with a tilted camera
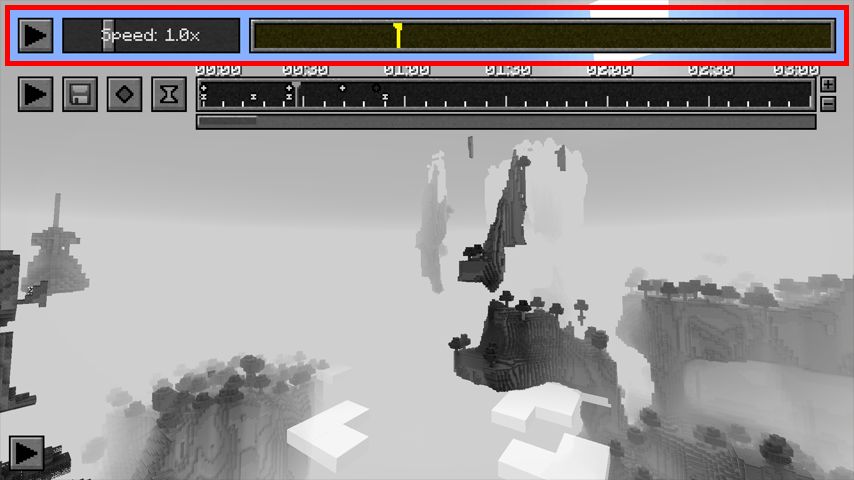
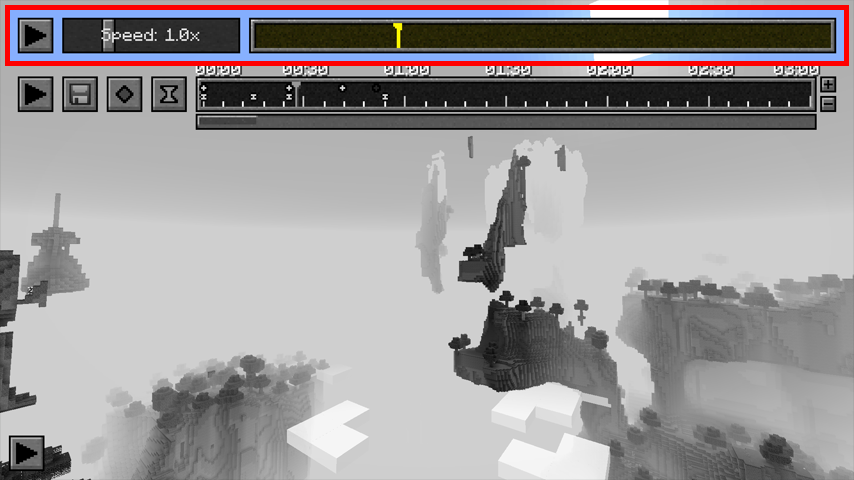
3.2 Controlling Time
3.2.1 Replay Speed
In the upper left corner of you screen, there is a Play/Pause button (Shortcut: ), using which you can entirely pause the time of the Replay.All Entities, Particles and Block Updates will be frozen until you resume. You can fly through a paused Replay as usual.
Next to the Play/Pause Button, there is a Speed Slider. Using the Speed Slider, you can control how fast the time in your Replay passes.The minimum Speed value is 0.1 times the normal Minecraft Tick Speed, and the maximum Speed is 8 times as fast.

The Play/Pause button, Speed Slider and Replay Timeline hightlighted
3.2.2 Jumping in Time
To the right of the Speed Slider, there is the Replay Timeline.
On the Replay Timeline, you see a yellow cursor indicating your current position in the Replay.By clicking somewhere on this Timeline, you will travel in time towards the specified point in time.Please note that it takes longer to do larger steps in time or to jump backwards in time (see also ).
3.1 Movement
3.1.1 Basic Controls
While in the Replay, you can freely move around using the movement keys ( by default).
You can move through block similar to Spectator Mode.
Using the Mouse Wheel, you can modify your flying speed. Scrolling up causes you to fly faster, while scrolling down slows you down.
If you prefer the camera to be controlled similar to vanilla Creative Mode, you can change that in the Replay Settings.
3.1.2 Camera Roll
While in a Replay, you can tilt the Camera.
By default, pressing will tilt the screen clockwise, and pressing will tilt the screen counterclockwise.Using , you can reset the Camera Roll.
When holding the key ( key on Mac) while tilting, you can tilt slower and more precisely.
Hint: Most of the Keybindings mentioned in this documentation can be changed in Minecraft’s Control Menu.
A Screenshot taken with a tilted camera
3.1.3 Spectating Entities
You can spectate any living entitiy (including players) while in a Replay. When looking at an entity, a crosshair will be visible.
By right-clicking, you will start spectating the entity. If you want to stop spectating the entity, use your Sneak Key ().
3.2 Controlling Time
3.2.1 Replay Speed
In the upper left corner of you screen, there is a Play/Pause button (Shortcut: ), using which you can entirely pause the time of the Replay.All Entities, Particles and Block Updates will be frozen until you resume. You can fly through a paused Replay as usual.
Next to the Play/Pause Button, there is a Speed Slider. Using the Speed Slider, you can control how fast the time in your Replay passes.The minimum Speed value is 0.1 times the normal Minecraft Tick Speed, and the maximum Speed is 8 times as fast.
The Play/Pause button, Speed Slider and Replay Timeline hightlighted
3.2.2 Jumping in Time
To the right of the Speed Slider, there is the Replay Timeline.
On the Replay Timeline, you see a yellow cursor indicating your current position in the Replay.By clicking somewhere on this Timeline, you will travel in time towards the specified point in time.Please note that it takes longer to do larger steps in time or to jump backwards in time (see also ).
5.2 Crash while rendering
If Minecraft crashes after a few frames of rendering, it most likely means the FFmpeg didn’t like the Command Line Arguments you passed.
If you customized the Command Line Arguments manually, re-check them — it’s probably your own fault.
Hint: In your .minecraft folder, you’ll find a file called which contains information about FFmpeg’s rendering process.
- If you did not customize the Command Line Arguments, you might have entered some insanely high (or low) values e.g. for Bitrate or Video Resolution. Try again with other, more reasonable values.
- Make sure the camera doesn’t move below Y=0 or above Y=255
3.7 Player Overview
Using the key, you can open the Player Overview. In the Player Overview, you see a list of all currently loaded Players in the Replay.
By clicking on a player’s Name or Head, you can spectate this player.
Next to each player, there’s a checkbox using which you can toggle the player’s visibility.
This way, you can hide certain players from the Replay.Below the individual checkboxes, there are two checkbox buttons — one to hide all players and one to show all players.
If you want to save the player visibility settings, check «Remember Hidden Players» checkbox.
If checked, invisible players will stay invisible after closing the Replay (this can of course be reverted),
otherwise all of the players are visible again after reloading the Replay.
The Player Overview Screen
1.3 Compatibility with other Mods
1.3.1 General information
In General, the Replay Mod should be compatible with most Forge Mods. However, due to the way that recording works, many Mods that add new Blocks, Mobs or Game Mechanics are not supported.
Mods that simply modify the Client (like the PixelCam Mod or the
CommandGroups Mod) usually work.
1.3.2 Optifine
The Replay Mod is compatible with , which can be downloaded at http://optifine.net/downloads.
Other Optifine Versions for Minecraft 1.8.0 might, but don’t have to be compatible as well.
Warning: If you have Optifine installed, you can not render videos from within the Replay Mod.
This might change in future Replay Mod versions.
1.3.3 Shaders Mod
You can use the Replay Mod together with karyonix’ Shaders Mod,
but rendering videos results in possible crashes and malformed videos. Therefore, you have to uninstall the Shaders Mod before rendering.
5.2 Crash while rendering
If Minecraft crashes after a few frames of rendering, it most likely means the FFmpeg didn’t like the Command Line Arguments you passed.
If you customized the Command Line Arguments manually, re-check them — it’s probably your own fault.
Hint: In your .minecraft folder, you’ll find a file called which contains information about FFmpeg’s rendering process.
- If you did not customize the Command Line Arguments, you might have entered some insanely high (or low) values e.g. for Bitrate or Video Resolution. Try again with other, more reasonable values.
- Make sure the camera doesn’t move below Y=0 or above Y=255
1.3 Compatibility with other Mods
1.3.1 General information
In General, the Replay Mod should be compatible with most Forge Mods. However, due to the way that recording works, many Mods that add new Blocks, Mobs or Game Mechanics are not supported.
Mods that simply modify the Client (like the PixelCam Mod or the
CommandGroups Mod) usually work.
1.3.2 Optifine
The Replay Mod is compatible with , which can be downloaded at http://optifine.net/downloads.
Other Optifine Versions for Minecraft 1.8.0 might, but don’t have to be compatible as well.
Warning: If you have Optifine installed, you can not render videos from within the Replay Mod.
This might change in future Replay Mod versions.
1.3.3 Shaders Mod
You can use the Replay Mod together with karyonix’ Shaders Mod,
but rendering videos results in possible crashes and malformed videos. Therefore, you have to uninstall the Shaders Mod before rendering.
3.7 Player Overview
Using the B key, you can open the Player Overview. In the Player Overview, you see a list of all currently loaded Players in the Replay.
By clicking on a player’s Name or Head, you can spectate this player.
Next to each player, there’s a checkbox using which you can toggle the player’s visibility. This way, you can hide certain players from the Replay.
Above the individual checkboxes, there are two checkbox buttons — one to hide all players and one to show all players.
If you want to save the player visibility settings, check the «Remember Hidden Players» checkbox.
If checked, invisible players will stay invisible after closing the Replay (this can of course be reverted), otherwise all of the players are visible again after reloading the Replay.
The Player Overview Screen
Как использовать X Replay
Есть два режима X Replay: режим PLAYER и режим RECORDER:РЕЖИМ RECORDER предназначен для записи повтора.Это стандартный режим, поэтому вам не нужно ничего настраивать.Режим PLAYER создан для воспроизведения повтора.Чтобы выбрать этот режим X Replay, вы должны установить опцию «Recorder:» в конфигурации.yml в значение «false», и вам следует загрузить на свой сервер карту недействительности. Вы можете скачать один здесь.Присоединитесь к серверу с X Replay, настроенным в режиме рекордера.После выключения сервера воспроизведение сохраняется.Присоединяйтесь к серверу с X Replay, настроенным в режиме PLAYERВведите «/history», здесь вы увидите последние десять идентификаторов сохраненных игр.Нажмите на идентификатор игры, которую хотите воспроизвести, и на «Загрузить повтор».Теперь вы можете телепортироваться к игроку с навигатором в вашем первом слоте.Наслаждайтесь просмотром сохраненной игры. Вы также можете использовать различные инструменты на панели быстрого доступа.
3.1 Movement
3.1.1 Basic Controls
While in the Replay, you can freely move around using the movement keys ( by default).
You can move through block similar to Spectator Mode.
Using the Mouse Wheel, you can modify your flying speed. Scrolling up causes you to fly faster, while scrolling down slows you down.
If you prefer the camera to be controlled similar to vanilla Creative Mode, you can change that in the Replay Settings.
3.1.2 Camera Roll
While in a Replay, you can tilt the Camera.
By default, pressing will tilt the screen clockwise, and pressing will tilt the screen counterclockwise.Using , you can reset the Camera Roll.
When holding the key ( key on Mac) while tilting, you can tilt slower and more precisely.
Hint: Most of the Keybindings mentioned in this documentation can be changed in Minecraft’s Control Menu.

A Screenshot taken with a tilted camera
3.1.3 Spectating Entities
You can spectate any living entitiy (including players) while in a Replay. When looking at an entity, a crosshair will be visible.
By right-clicking, you will start spectating the entity. If you want to stop spectating the entity, use your Sneak Key ().
3.7 Player Overview
Using the key, you can open the Player Overview. In the Player Overview, you see a list of all currently loaded Players in the Replay.
By clicking on a player’s Name or Head, you can spectate this player.
Next to each player, there’s a checkbox using which you can toggle the player’s visibility.
This way, you can hide certain players from the Replay.Below the individual checkboxes, there are two checkbox buttons — one to hide all players and one to show all players.
If you want to save the player visibility settings, check «Remember Hidden Players» checkbox.
If checked, invisible players will stay invisible after closing the Replay (this can of course be reverted),
otherwise all of the players are visible again after reloading the Replay.

The Player Overview Screen
3.2 Controlling Time
3.2.1 Replay Speed
In the upper left corner of your screen, there is a Play/Pause button (Shortcut: P), using which you can entirely pause the time of the Replay.
All Entities, Particles and Block Updates will be frozen until you resume. You can fly through a paused Replay as usual.
Next to the Play/Pause Button, there is a Speed Slider. Using the Speed Slider, you can control how fast the time in your Replay passes.
The minimum Speed value is 0.1 times the normal Minecraft Tick Speed, and the maximum Speed is 8 times as fast.
3.2.2 Jumping in Time
To the right of the Speed Slider, there is the Replay Timeline.
On the Replay Timeline, you see a yellow cursor indicating your current position in the Replay.
By clicking somewhere on this Timeline, you will travel in time towards the specified point in time.
Please note that it takes longer to do larger steps in time or to jump backwards in time.
The Play/Pause Button, Speed Slider and Replay Timeline highlighted
Building
Make sure your sub-projects are up-to-date:
For compiling 1.7.10, you must run once after the initial clone. This may take quite some time.
No IDE
You can build the mod by running (or just ). You can then find the final jar files in .
You can also build single versions by running (or just ) (builds the MC 1.8 version).
IntelliJ
Ensure you have at least IDEA 2020.1.
Build the mod via Gradle as explained above at least once ( should be sufficient). This will ensure that the sources for all MC versions are generated.
Then import the Gradle project from within IDEA: File -> Open -> build.gradle -> Open as Project
Finally configure IDEA to build everything by itself instead of delegating it to Gradle (cause that is slow): File -> Settings -> Build, Execution, Deployment -> Build Tools -> Gradle -> Build and run using: IntelliJ IDEA
3.1 Movement
3.1.1 Basic Controls
While in the Replay, you can freely move around using the movement keys ( by default).
You can move through block similar to Spectator Mode.
Using the Mouse Wheel, you can modify your flying speed. Scrolling up causes you to fly faster, while scrolling down slows you down.
If you prefer the camera to be controlled similar to vanilla Creative Mode, you can change that in the Replay Settings.
3.1.2 Camera Roll
While in a Replay, you can tilt the Camera.
By default, pressing will tilt the screen clockwise, and pressing will tilt the screen counterclockwise.Using , you can reset the Camera Roll.
When holding the key ( key on Mac) while tilting, you can tilt slower and more precisely.
Hint: Most of the Keybindings mentioned in this documentation can be changed in Minecraft’s Control Menu.

A Screenshot taken with a tilted camera
3.1.3 Spectating Entities
You can spectate any living entitiy (including players) while in a Replay. When looking at an entity, a crosshair will be visible.
By right-clicking, you will start spectating the entity. If you want to stop spectating the entity, use your Sneak Key ().
1.1 Installing the Replay Mod
Minecraft 1.14 and above
The ReplayMod for Minecraft 1.14 and above requires Fabric to be installed.
You can find Fabric and the installation instructions here.
After installing Fabric, simply put the downloaded ReplayMod .jar file into the folder of your Minecraft directory.
Minecraft 1.12.2 and below
For Minecraft 1.12.2 and below it requires Minecraft Forge to be installed.
If you don’t know how to install Forge, follow this tutorial.
After installing Forge, simply put the downloaded file in the folder of your Minecraft directory.
Note: The Replay Mod is entirely client side and can not be installed on the servers you play on.