Bloodstained
Содержание:
- Setting
- Tower of Twin Dragons — Breakable Walls & Secret Rooms
- Gameplay
- Сюжет
- Reception
- Dethroned: How to Get the Best Ending
- Графика
- Резюме
- Criticism
- Как открыть лучшую концовку в Bloodstained
- Best Armor To Get
- References
- Characters
- Livre Ex Machina — Breakable Walls & Secret Rooms
- Just A Flicker: How To Get The Worst Ending
- Forbidden Underground Waterway — Breakable Walls & Secret Rooms
- Bloodstained: Ritual of the Night — Featured Articles
- Что нам обещали
- Dian Cecht Cathedral — Breakable Walls & Secret Rooms
- Best Accessories To Get
- Overview
Setting
The setting of Bloodstained: Ritual of the Night is England around the late 1700s, about two decades into the Industrial Revolution. A group of alchemists, fearing its waning relevancy as science captures the 18th century setting, try to warn against the world losing faith. The alchemists then decide to summon demons to earth. Miriam, an orphan, is infused with magical crystals that attract these demons. However, Miriam falls into a comatose state, rendering her unable to be used as the sacrifice. However, using Gebel, the Alchemists are successful in summoning the demons. Having miraculously survived the ritual, Gebel decides to take revenge. Using his powers to summon demons, he destroys the Alchemist’s Guild. After 10 years, Miriam awakens, while at the same time a demonic castle emerges from the remains of the Alchemist Guild.
Tower of Twin Dragons — Breakable Walls & Secret Rooms
Click to Enlarge

The Tower of Twin Dragons only has 3 breakable walls and they can all be reached without any special skills. These can all be found before your fight with Valac.
Check Out Vs. Valac Walkthrough Here!
1. Breakable Wall 1 — MP Max Up

The first breakable wall can be found in the upper western part of the tower. It’s in the left wall and has an MP Max Up inside it.
2. Breakable Wall 2 — Invisible Blade

This breakable wall is in the upper east part of the tower. Jump on the ledge on the upper right corner of the room and break the wall to find the Invisible Blade.
3. Breakable Wall 3 — Riding Habit

The 3rd breakable wall is found under the save point and right before the boss fight with Valac. Break the right wall to grab the Riding Habit.
Gameplay
The game will follow the «Igavania» model of game design, «A Gothic, exploration-focused action platformer», the setting being Gebel’s castle which will house a variety of locations. Teleporters can be found around the castle that will allow the player to travel quickly in order to keep backtracking to a minimum. The game has been stated to contain of RPG elements in the same vain as previous Igavanias. By defeating enemies and completing quests, Miriam will gain powers enabled by the crystals on her body.
In addition, enemies in Bloodstained will drop which will play a role in the game’s crafting system. IGA has said his current idea is that there will be five different kinds of drops, corresponding to different parts of an enemy, the heads, arms and so on and that even single monsters will have multiple drops. Of those drops, some of them will have magical abilities and they sparkle to show their rarity. Normal crafting materials will be used on quests or for weapons and armor, but the sparkling rares, if you level them, will become crystals. Those crystals will link with the magi-crystals on Miriam’s body and allow her to use special abilities/skills.
Another idea IGA has mentioned is for the drops to give different stat sub-effects: for example, an enemy head drop will raise magic power or a drop from an enemy leg/foot will raise movement speed. By using the different drop materials and the different stat sub-effects, the player will be able to customize Miriam to his or her liking.
The game will be presented in a 2.5D style and is built on Unreal Engine 4.
Development update
Development Update
On June 8, a video featuring early gameplay footage was released. The video showed Miriam’s basic attacks and some of her movement animations as she fights against floating star-shaped enemies.
Within the video itself, IGA talks about some of the design styles and the basic direction has has for the gameplay, explaining that he enjoys when programmers have input into the art direction for the game, as feels it adds visual content to the game’s look.
At the end of the update, he explains that he was surprised the game’s «punch» was as good as it was and felt that the impact of playing through the art he’d seen previously was a good experience. With this in mind he is sure that he’ll be able to move forward in development, making an amazing game.
On its 72th update (August 20, 2018) on the Bloodstained: Ritual of the Night kickstarter page, it was announced that the game’s launching would be pushed back to 2019 for development and quality reasons. It was also announced that the game would no longer be released on the PlayStation Vita due to Sony’s plans to discontinue the system.
On its 84th update (May 23rd, 2019), 505 Games announced that a DLC for the game called, «Iga’s Back Pack,» will launch on June 18th for the Xbox One, Steam, and PS4 while on June 25th, it will launch on the Switch. The DLC, which will cost $9.99, will allow the game’s player to fight a monstrous caricature of Igarashi himself and receive a Swordwhip as a reward for his defeat.
Сюжет

Девочка совсем не проста
Первое, что нужно сказать – с точки зрения сюжета «Ритуал Ночи» это совсем не новая «Кастельвания». То есть, конечно, в итоге нам придется лазить по древнему замку и геноцидить орды плохишей – но к вампирам это не имеет никакого отношения, да и ГГ (по крайней мере, первая из трех обещанных) совсем не демоноборец в сотом поколении.
Перед началом игры нам рассказывают небольшую историю о том, как гильдия Алхимиков, испугавшись промышленной революции, решила провести мрачный Ритуал. Для этого они сначала вживили в тело десятка подопытных демонические кристаллы, а потом принесли их всех в жертву. Неизвестно, чего именно они хотели достигнуть, но в итоге разверзлись Адские врата и в чопорный викторианский мир хлынули полчища демонов.

А вот Джибель понаглее – зато встречает нас прямо на нашем корабле, а не отсиживается в замке
Первую волну вторжения удалось отбить, но к началу событий Bloodstained затихнувшая было война разгорается с новой силой. Во главе адских полчищ стоит чудом выживший во время Ритуала Джебель, освоивший управление демонической силой кристаллов. Последней надеждой человечества становится Мириам – вторая выжившая участница Ритуала, которая провела в летаргии 10 лет и проснулась аккурат к началу описываемых игрой событий. Именно она и станет нашим первым протагонистом.
Алхимикам стало известно, что обиженный на весь мир Джибель копит демонические орды в отдаленном замке. Именно туда Мириам и отправляется на корабле с помогавшим ей алхимиком Йоханнесом. Вот так с самого начала нас отправляют убивать единственного похожего на нас человека во всем мире.
Если прочитав в досье протагонистки «девочка-сиротка, страдающая от страшного проклятья» вы ожидали увидеть скромную и слегка забитую героиню, то вас ждет большая неожиданность. Наша Мириам уже в первые минуты игры выдает монолог в духе «Мне нужна ВСЯ СИЛА».
Йоханнес, видимо страдает комплексом вины, так что не ставит ГГ на место. А еще как для крутого алхимика он слишком бесполезен и напуган при виде демонов.
Reception
User-generated reviews on Steam were mostly positive. Most praised the nostalgia that the game had to offer due to memories from playing Castlevania titles such as Symphony of the Night and Order of Ecclesia. Others congratulated Igarashi for the successful development of a Metroidvania title without the Castlevania IP and claimed that the wait was indeed worth it. RotN, however, was not without its criticism upon launch. Kotaku writer, Joshua Rivera, states that the game’s storyline and mechanics are too familiar to fans of the Metroidvania genre. For example, he writes, «loads of games have done what Castlevania did well. Hollow Knight isn’t that far in the rearview. Timespinners came out this month. The Messenger comes to mind. And those are just the recent standouts.» Rivera does, however, praise the shinier aesthetics that separates it from Symphony of the Night.
On Metacritic, Bloodstained: Ritual of the Night receives a metascore of 83/100 on both PC and PS4, 84/100 on Xbox One, and 74/100 on Nintendo Switch.
Dethroned: How to Get the Best Ending
WARNING! : This endings guide contains spoilers for the story. If you do not want to be spoiled, turn back now.
Best Ending Walkthrough Chart
| No. | Procedure |
|---|---|
| 1 | Acquire the Zangetsuto from the second fight with Zangetsu |
| 2 | Head back to the Hall of Termination |
| 3 | Face Gebel in his room, but avoid killing Gebel during the fight |
| 4 | Once the moon turns red, use the Zangetsuto to slash at the moon |
| 5 | After the cutscene, head to the Garden of Silence |
| 6 | There will be another room with a red moon. Slash the moon to open a portal |
| 7 | Enter the portal to transport to the Den of Behemoths |
| 8 | Make your way to the Glacial Tomb. Defeat Valefar along the way |
| 9 | Defeat Gremory in the Glacial Tomb |
| 10 | Continue moving through the Tomb until you meet Dominique |
| 11 | Defeat Dominique |
| 12 | Defeat Bael to trigger the good ending |
1. Where To Get the Zangetsuto
Click to Enlarge

You will be able to get the Zangetsuto sword after your second fight with Zangetsu in the Oriental Sorcery Lab.It will be on the top left room of the Oriental Sorcery Lab, to the left side of the Save Room.
3~4. Wait For The Moon To Turn Red

During the Gebel fight, your ultimate goal is to not kill Gebel, but to hit the moon. Keep an eye on the moon on the upper right part of your screen, then slash it with the Zangetsuto when it turns red to end the fight.
5~6. Garden of Silence Red Moon Location
Click to Enlarge

You will find the room with the Red Moon in the uppermost floor of the Garden of Silence area. It will be to the left side of the room on top of the large garden area.
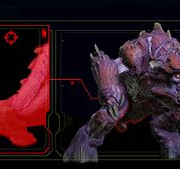
8. How To Get To Valefar & Gremory
Click to Enlarge

You will be starting at the top floor of the Den of the Behemoths. Use the map above as a guide to find which rooms you must pass through to get to Gremory. Be ready since you need to fight Valefar along the way.
10. Where To Find Dominique
Click to Enlarge

You will be able to find Dominique in the furthest room of the Glacial Tomb. It will be on the lower left portion of the area, across the save room on the left.
11~12. Dominique & Bael Boss Fights

Make sure to outfit yourself with the best items and equipment during the boss fight. The Bael boss fight will trigger as soon as you defeat Dominique.
Графика
Общее впечатление от визуального ряда – круто, очень круто. Давно уже платформер не тягался по качеству картинки с серьезными РПГ. Особенно поражают любовно отрисованные вручную задники локаций с множеством эффектов и мелких деталей.

Вот палуба корабля во время демонического вторжения. На скрине не видно, но она еще и качается
А вот мы высадились на берег в деревню под замком…
Более того, реальные скрины Bloodstained выглядят даже красивее, чем концепты, которые мы показали в самом начале статьи. Единственное, что HUD в релизе сделан не как в концептах, а в классическом виде (но так даже удобнее).
А вот диалоговые окна на наш взгляд не очень соответствуют стилистике игры. Вместо уместных для анимешного проекта двухмерных говорящих голов разработчики зачем-то используют трехмерные модели персонажей. И все бы ничего, если бы не кривоватая анимация движений губ, проигрываемая во время произнесения фраз. Она заметно снижает градус пафоса и вызывает как минимум улыбку.
Резюме
На первый взгляд Bloodstained: Ritual of the Night полностью оправдывает возложенные на нее ожидания – сюжет в меру пафосен и драматичен, локации прорисованы великолепно, боевка динамична и зрелищна, ролевая система органично вписывается в игру, выбор оружия, брони и аксессуаров поражает, а музыка просто шикарна. Студия выполнила практически все свои обещания – но, к сожалению, слишком сосредоточилась на контенте и красивостях, уделив недостаточно внимания оптимизации и тестированию. Так что игра, конечно, мастхев – но чтобы не портить от нее впечатления, стоит подождать парочку патчей.
Criticism
According to Polygon, the premium DLC for Bloodstained, «IGA’s Back Pack», drew heavy criticism from several fans because they were initially promised that the content would be exclusive to backers. While 505 Games acknowledged about DLC discussion is a sensitive topic, Robert Angel-Corlux had this to say; «Making this content available to everyone wasn’t just about making money. I mean obviously that’s a part of it, but the chief things I was considering was making sure everyone had a safe and legitimate way to get the full game experience no matter when they find out about Bloodstained, whether that’s 5 months ago or 5 years from now, and that we were being respectful of the price backers originally paid (hence the DLC pricing).” On a related note, a year prior to the RotN’s release, 30,000 backers took a survey regarding how they felt about DLC and according to the results, they were fine with selling it provided that it would be sold “at a price that would respect the purchase the backers originally made.” Furthermore, the 85th update on the Kickstarter page for Bloodstained stressed that while non-backers would pay $9.99 for the «IGA’s Back Pack», those that backed the game in advance will receive it at no charge.
Как открыть лучшую концовку в Bloodstained
В начале игры вы можете отправиться в Зал Уничтожения (Hall of Termination) и победить Джебеля (Gebel), бывшего союзника, который окажется вашим врагом. Чтобы раскрыть истинного финального босса и исследовать остальную часть карты, вам предстоит добыть меч Зангетцу-то (Zangetsuto).
Это оружие можно получить только в Восточной волшебной лаборатории (Oriental Sorcery Lab). Чтобы попасть туда, вам понадобятся несколько скрытых сил и предметов.
Как попасть в Восточную волшебную лабораторию
Для попадания в нужную локацию вам необходимо будет пройти в верхнюю часть вертикальной комнаты в зоне Входа (Entrance). Это самая первая комната замка. Вы найдете коридор, полный шипов, установленных наверху. Чтобы пройти через этот уровень, вам потребуются три силы: Витраж (Craftwork), Переворот (Invert) и Иммунитет от шипов (Spike Immunity).
- Витраж: Чтобы переместить железную деву, возьмите осколок Витраж от босса Собора Диана Кехта (Dian Cecht Cathedral).
- Переворот: Победите босса в пещере Инферно (Inferno Cave). Для попадания в пещеру нужно уметь погружаться под воду и ходить по ней. Вы можете получить эту силу от босса в Скрытой пустыне (Hidden Desert), когда победите Альфреда.
- Иммунитет от шипов: Возьмите Эгида-панцирь (Aegis Plate) из сундука с сокровищами в Башнях Драконов-близнецов (Towers of Twin Dragons). Спуститесь на лифте вниз и переверните мир, чтобы упасть справа от башни.
Добравшись до Восточной волшебной лаборатории, пройдите через нее, пока не встретите Зангецу. Победите его во второй раз, чтобы получить его клинок – Зангетцу-то.
Как выявить Демона Гремори
Отправляйтесь в Зал Уничтожения и сразитесь с Джебелем с помощью Зангетцу-то. Атакуйте Луну, когда она станет красной. Разрежьте ее с помощью своего меча, чтобы освободить Джебеля от власти Гремори. Демонесса исчезнет, поэтому вам нужно будет снова найти ее.
Как найти Гремори
Когда Гремори убежит, пройдите в Сад Тишины (Garden of Silence) и войдите в красный коридор над каретой. Разрежьте красную луну, чтобы создать портал в Логово Великанов (Den of Behemoths) – теперь вы можете войти в зону, полную гигантских врагов.
Найдите Альфреда в этом альтернативном мире – он потерял Liber Logiath. Поговорите с Альфредом и Зангецу, чтобы узнать, что Доминика манипулирует вами. Продолжайте искать вход в Ледяную гробницу (Glacial Tomb). В этой последней локации вы найдете настоящего финального босса и сможете получить хорошую концовку после победы над ним.
Best Armor To Get
Coronation Gown

Stat Bonuses
| DEF | 48 | STR | 5 |
|---|---|---|---|
| CON | 5 | INT | 5 |
| MND | 5 | MND | 5 |
Arguably the best armor you can craft, this provides great protection,and boosts to all major stats, while providing added elemental resistances.
Craftable using 1 Silk Dress, 1 Alexandrite, 1 Cashmere.
Shinobi Garb

Stat Bonuses
| DEF | 39 | STR | 5 |
|---|---|---|---|
| INT | 3 | — | — |
Viable for mid to end game, this armor grants a decent defense, strength and intelligence boost, while giving various elemental resistances.
Drops from the Ninja, or craftable using 2 Eastern Fabric and 2 Silk.
Stat Bonuses
| DEF | 40 | LCK | 7 |
|---|
An early game armor you can find which is viable even up to mid-late game, this armor grants a decent defense boost of 40 and adds 7 luck, which is great for critical damage and finding items.
References
- ↑ Bloodstained Kickstarter page
- Development Update #43
- ↑ Development Update #14
- ↑ Development Update #18
- Development Update #50
- Bloodstained: Ritual of the Night Official Forum
- Ask IGA #2
- Castlevania’s IGA back with ‘dream game’ Bloodstained: Ritual of the Night, Destructoid
- ↑ Bloodstained – Developer Interview with Koji Igarashi originally featured in game*spark
- IGA on His Castlevania Spiritual Successor, Konami, More — Kinda Funny Gamescast Special
- Update 72 from the Bloodstained: Ritual of the Night kickstarter page.
- Koji Igarashi Leaves Konami, Polygon
- ↑ Former Castlevania Producer Announces Bloodstained: Ritual of the Night, IGN
- Interview with IGA, US Gamer
- ↑ Koji Igarashi Day in the Life, Polygon
- Castlevania’s Koji Igarashi returns with new game, Gamasutra
- Castlevania Dungeon
- Koji Igarashi Episode 3 — The Ess Gee Bee
- https://www.kickstarter.com/projects/iga/bloodstained-ritual-of-the-night/posts/2772919
- Nintendo Everything
- Metascore for Bloodstained: Ritual of the Night on PCMetacritic, Retrieved February 26, 2020
- Metascore for Bloodstained: Ritual of the Night on PS4Metacritic, Retrieved February 26, 2020
- Metascore for Bloodstained: Ritual of the Night on Xbox OneMetacritic, Retrieved February 26, 2020
- Metascore for Bloodstained: Ritual of the Night on SwitchMetacritic, Retrieved February 26, 2020
- Gamer Assault Weekly
Characters
Miriam
- Main article: Miriam
Picked up as an orphan by an Alchemist at a young age, she became a host for the dark Alchemists’ curse. Although the magi-crystals were fused with her body at a young age, for 10 years she lay sleeping while the curse matured to its full form. It was during this period that the demons arrived, meaning that she missed their appearance and awoke with a mild form of amnesia, not quite fully understanding what happened to her.
She is a woman of few words but strong of purpose. Her youth is deceiving, making her seem confrontational and quick to judge, though in reality she is constantly evaluating her next step. The pain she felt as an orphaned child fuels her
compassionate desire to protect her loved ones and friends.
Johannes
- Main article: Johannes
A member of the defunct Alchemist guild and Gebel’s best friend. Johannes (yo-HAH-nis) was the only Alchemist who dissented with the plan to call demons to the earth to cement Alchemy as the prevalent philosophy. His rejection of the other Alchemists’ scheme is what kept him from sharing their fate. He has a vague understanding that Miriam’s awakening and the demon castle’s appearance are no mere coincidence.
Gebel
- Main article: Gebel
Original host for the magi-crystal curse that summons demons to the planet. Gebel (JEE-bill) was the only one to survive its effects at such a high level. He destroyed the guild that created him, but in doing so realized he was no longer human and had no place on Earth. This in turn, lead him to summon the demon castle from hell to appear on the planet.
It is said that his real purpose in summoning the castle was to give Miriam a place of her own, but as his Magi-crystal disease progressed, he soon forgot his own reasoning. The more he surrounded himself with hell-spawn, the quicker the magi-crystals engulfed his body. He continues to plot the downfall of man and how to best convince (or use) Miriam to achieve his dark ambition.
Livre Ex Machina — Breakable Walls & Secret Rooms
Click to Enlarge

In Livre Ex Machina, you’ll find 4 breakable walls. You’ll need a mix of the Reflector Ray and Double-Jump Shards to get to some of them.
1. Breakable Wall 1 — HP Max Up

This breakable wall is in the bottom half of Livre Ex Machina. In a long horizontal room, at the rightmost end, break the wall to get an HP Max Up.
2. Breakable Wall 2 — Capacity Up

The 2nd breakable wall is in the middle of Livre Ex Machina. In another horizontal room, check the leftmost end and break the wall to get a Capacity Up.
3. Breakable Wall 3 — Traverser’s Ring

To the left of the 2nd breakable wall, head into the big room where you’ll find a dragon. Use your Reflector Ray to get up on the ledge with a chest. Break the left wall to get a Traverser’s Ring.
4. Breakable Wall 4 — Secret Room

The only breakable wall with a secret room, this can be found in the top part of Livre Ex Machina. In the room with moving bookshelves, head to the top and break the ceiling. You’ll find a Diabolist’s cap in the chest inside the room.
Just A Flicker: How To Get The Worst Ending
Worst Ending Walkthrough Chart
| No. | Procedure |
|---|---|
| 1 | Acquire the Reflector Ray from Bathin in the Underground Sorcery Lab |
| 2 | Use the Reflector Ray to access upper parts of Livre Ex Machina |
| 3 | Head to the Hall of Termination via Livre Ex Machina |
| 4 | Face & defeat Gebel in his room to trigger the worst ending |
1. Where To Get Reflector Ray Shard
Click to Enlarge

You will be able to find Bathin in the Underground Sorcery Lab under the Bridge of Evil. Bathin will be waiting for you in the long room just before the end of the area.
Reflector Ray Required To Reach Hall of Termination
Now that you have the Reflector Ray Shard, you will be able to reach the Hall of Termination. To trigger the worst ending, you can simply head to Gebel’s room, and kill him without using the Zangetsuto!
Forbidden Underground Waterway — Breakable Walls & Secret Rooms
Click to Enlarge

The Forbidden Underground Waterway has a total of 12 breakable walls with 3 secret rooms. You need a combination of the Double-Jump, Reflector Ray, Aquastream, and Invert Shards to get all of the breakable walls.
Forbidden Underground Waterway Breakable Walls Rewards Chart
| 1 | MP Max Up |
|---|---|
| 2 | Critical Ring |
| 3 | Capacity Up |
| 4 | MP Max Up |
| 5 | Secret Room 1 |
| 6 | Capacity Up |
| 7 | Secret Room 2 |
| 8 | Voice Changer |
| 9 | MP Max Up |
| 10 | Secret Room 3 |
| 11 | Plunderer’s Ring |
| 12 | Supreme Dish Recipe Book |
1. Breakable Wall 1 — MP Max Up

Going down from the entrance, in vertical room leading to the middle save point, you’ll find the breakable wall in the lower left wall. It contains an MP Max Up.
2. Breakable Wall 2 — Critical Ring

To the right of the first breakable wall, you’ll reach a cable car type system. In the upper right corner, there’s a breakable wall with a Critical Ring.
3. Breakable Wall 3 — Capacity Up

In the north-eastern wall inside the vertical room that leads to another save point, you can break another wall. This one has a Capacity Up inside.
4. Breakable Wall 4 — MP Max Up

This breakable wall is right outside another save point in the Forbidden Underground Waterway. It’s to the right of the room and has an MP Max UP.
5. Breakable Wall 5 — Secret Room 1

At the very east end of the Waterway, you’ll reach a large vertical room with a waterfall. The bottom right wall is breakable and leads to a secret room with a Critical Ring.
6. Breakable Wall 6 — Capacity Up

In the same room as breakable wall 5, head to the middle part of the room until you see a blue chest. Above it is a breakable wall with Capacity Up. You’ll need Invert or an upgraded Reflector Ray Shard to reach it.
7. Breakable Wall 7 — Secret Room 2

Above breakable wall 6, you’ll find another one. This leads to a secret room where you’ll find Benjamin. If you rescued him the 1st time, he’ll show up here. If he doesn’t, it means you haven’t found him the first time.
Check Out Benjamin’s Side Quest Here!
8. Breakable Wall 8 — Voice Changer

This wall can be found in the top-middle part of the Waterway. From the Garden of Silence, you can drop down via the well to reach this wall faster. Inside you’ll find a Voice Changer.
9. Breakable Wall 9 — MP Max Up

This breakable wall is in the far northern right of the zone. Once you reach the Waterway from the door, the breakable wall is on the right with an MP Max Up inside.
10. Breakable Wall 10 — Secret Room 3

After defeating Alfred and getting the Deep Sinker Shard, you can access this breakable wall underwater. You’ll find a secret room with an HP Max Up & a red chest with 2000G.
11. Breakable Wall 11 — Plunderer’s Ring

Keep going left from the 10th breakable wall. You’ll find this in a large room, in the top-right ledge, across a green chest with the Swordfish. This wall will have a Plunderer’s Ring.
12. Breakable Wall 12 — Supreme Dish Recipe Book

After defeating Orobas in the Inferno Cave, you’ll make your way through to the Waterway again. You can find this breakable wall in the middle-left wall of a long vertical room. This has the Supreme Dish Recipe Book.
Bloodstained: Ritual of the Night — Featured Articles
All Story Walkthrough
| Galleon Minerva ~ vs. Vepar | Arvantville ~ vs. Zangetsu |
| Entrance: vs. Zangetsu ~ vs. Craftwork | Cathedral: vs. Craftwork ~ vs. Andrealphus |
| Livre Ex Machina: Andrealphus ~ vs. Valac | Towers: vs. Valac ~ vs. Glutton Train |
| Bridge: Glutton Train ~ vs. Bathin | Underground: vs. Bathin ~ vs. Abyssal Guardian |
| Hall of Termination ~ vs. Bloodless | Cathedral: vs. Bloodless ~ vs. Alfred |
| Desert: vs. Alfred ~ vs. Doppelganger | Lab: vs. Doppelganger ~ vs. Orobas |
| Cave: vs. Orobas ~ vs. Zangetsu (2nd) | Oriental Lab ~ vs. Gebel |
| Hall: vs. Gebel ~ vs. Valefar | Den: vs. Valefar ~ vs. Gremory |
| Glacial: vs. Gremory ~ vs. Dominique | Glacial: vs. Dominique ~ vs. Bael |
All Miriam Story Walkthrough
Game Database
| Full Map | All Trophies List |
| Best Weapons | Best Equipments |
| All Enemy List | All Cheat Codes List |
| All Weapon List | All Equipment List |
| All Accessories | All Shards |
| All Items & Materials | All Techniques List |
| All Side Quests | All Recipe Books List & Locations |
| All Breakable Walls & Secret Rooms | All Boss Fight List |
Play Tips & Useful Information
| How To Farm XP | How To Farm Money |
| How To Upgrade Shards | Cooking Guide |
| Preparing for a Boss | Points Of No Return |
| After Beating Game | Multiple Endings |
| How To Farm Gold Material | How To Double Jump |
End Game Content Guides
| How To Get Gebel’s Glasses | How To Get Solomon’s Ring |
| How To Get Recycle Hat | How To Unlock New Game Plus |
| Using 8-Bit Coins | Secret Boss Room & Key |
| Boss Medals | — |
Boss Fight Guides
| How to Find Enemy 44 | How To Beat IGA |
| How To Beat OD | How To Beat Eight Bit Overlord |
| How To Beat Millionaire’s Bane | How To Beat Revenant |
| How To Beat Master Carpenter | How To Beat Alfred |
| How To Beat Bloodless | How To Beat Dominique |
| How To Beat Zangetsu | — |
Check Out All Boss Fights Guide List!
Что нам обещали
В самом начале студия ArtPlay обещала создать экшен-платформер с фокусом на исследования, элементами РПГ и системой крафта. Приложенные к краудфандинговой кампании концепт-арты показывали вполне симпатичную и яркую картинку с оригинальным HUD-ом, сочными эффектами и прикольной анимешной графикой.

Как-то так это все должно было выглядеть
Сюжет должен был рассказывать о приключениях Мириам, девочки-сиротки, ставшей жертвой ужасного проклятья алхимиков, которое постепенно превращает ее кожу в кристаллы.
По мере того, как собранные средства выходили за рамки изначального бюджета (просили 500 тысяч долларов, получили 5 миллионов), студия раздавала все новые обещания в формате stretch-goals – тут тебе и второй играбельный герой, и уровень сложности Nightmare, и озвучка от Девида Хейтера (Солид Снейк из серии Metal Gear), и куча боссов, и множество новых локаций.
Попробуем разобраться, насколько хорошо ArtPlay выполнила собственные обещания в разных аспектах игры.
Dian Cecht Cathedral — Breakable Walls & Secret Rooms
Click to Enlarge

The Dian Cecht Cathedral has 4 breakable walls. 3 of the walls can be reached normally but 1 needs double jump or Invert to get to.
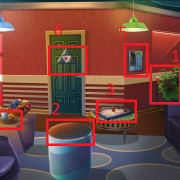
1. Breakable Wall 1 — MP Max Up

On the way up the Cathedral, in the room with many portraits, you’ll find this in the upper right wall right under the way to the next room. It has an MP Max Up.
2. Breakable Wall 2 — Rose Ring

In the wider room that leads to Todd and the Cathedral fast travel point, you’ll find the breakable wall to the right of a bookshelf near the right wall. The wall will have a Rose Ring in it.
3. Breakable Wall 3 — Secret Room 1

Once you reach the higher parts of the Cathedral, in one of the bridgeways, you can crack open the ceiling. You need Double-Jump or Invert to find an HP Max Up, MP Max Up, and Silver Knight Shard at the top.
4. Breakable Wall 4 — Secret Room 2

In the middle bell tower room, you can break the floor to reach a secret room below. This has a chest with Hair Apparent X in it and opens a path back to the Entrance.
Best Accessories To Get
Solomon’s Ring

Stat Bonuses
| DEF | 1 | STR | 6 |
|---|---|---|---|
| INT | 6 | LCK | 6 |
One of the best accessories you can find in the game, the Solomon’s Ring boosts your major stats greatly, while improving your chances of getting shards.
Complete all of Abigail’s quests in Arvantville.
Check Out How To Get Solomon Ring Here!
Cursed Ring

Stat Bonuses
| STR | 10 | INT | 10 |
|---|---|---|---|
| LCK | -10 | — | — |
Greatly improves strength and intelligence at the cost of luck, while providing added resistances. This is a valuable mid-end game item for defeating bosses.
Can drop from the enemy Cyhyraeth.
Stat Bonuses
| DEF | 3 | INT | 3 |
|---|---|---|---|
| CON | 2 | — | — |
One of the hardest things to acquire, this ring provides a bit of stat boost, but gives a passive MP regen.
Overview
Techniques can be discovered by examining bookcases found throughout the game world, each of which will provide an explanation of how to perform a particular action, along with which weapons it can be used with. These notes are stored in the «Journal» section of the menu: an entry will not be added to the «Techniques» section of the menu until the player has performed the relevant Technique in-game at least once. It is not necessary to find the bookshelf explaining the Technique in order to use it: the player only needs to have an appropriate weapon and input the command.
Techniques use MP in the same way as Shards, with either a one-off cost or a continuous cost depending on the Technique in question. They are affected by Words of Wisdom just like Shards are. They tend to function by adding percentage buffs to a weapon’s base damage rather than dealing fixed damage: as a result, weapons with a low base ATK such a Ridill are weak when using Techniques. Miriam is vulnerable during the wind-up animations of most of these moves, and if she is hit the move will fail.
All but three Techniques are accompanied by a «Mastery» bar, which fills up as the Technique is used on enemies (simply performing it on nothing will not result in any Mastery gain). Once the bar is completely filled, a «Technique Mastered» popup will appear over Miriam’s head.
Mastery of a Technique means that in addition to the listed weapons, all other weapons of the same type can use the Technique. For example, if Miriam has Mastered the Technique «Parry,» normally limited to Blutgang, she will be able to perform it with any Sword or Mace. Techniques without Mastery bars remain exclusive to the weapons they are assigned to.
Mastery is key to unlocking the full utility of Katana-type weapons, as these weapons have more Techniques than any other type.